Printing the Nozzle Check Pattern
04-Apr-2008
8200142200
Solution
Print the nozzle check pattern to determine whether the ink ejects properly from the print head nozzles.
1. Make sure that the machine is turned on, open the Front Tray, and extend the Output Paper Support.
2. Load a sheet of A4 or Letter-sized plain paper in the Rear Tray or the Front Tray.
3. Press the Paper Feed Switch to select the paper source where you have loaded paper.
4. Print the nozzle check pattern.
(1) Press the HOME button.
The HOME screen is displayed.
(2) Select Settings  then press the OK button.
 then press the OK button.
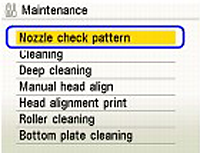
(3) Select Maintenance, then press the OK button.
The Maintenance screen is displayed.
(4) Select Nozzle check pattern and then press the OK button.

The pattern print confirmation screen is displayed.
(5) Select Yes and then press the OK button.
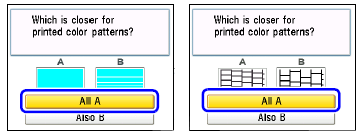
The nozzle check pattern is printed, and the pattern confirmation screens are displayed alternately.
5. Examine the pattern and take the appropriate action.
Examine the nozzle check pattern, and perform cleaning if necessary.
NOTE
If the ink level is low, the nozzle check pattern is not printed correctly. Replace the relevant ink tank. See [Replacing Ink Tanks].
1. Check the nozzle check pattern you printed.

(1) Check if lines in this pattern are missing.

(A) Good
(B) Lines are missing
(2) Check if there are white streaks in this pattern.

(C) Good
(D) White streaks present
2. The confirmation screens for white streaks and missing lines are displayed alternately. Select the pattern that is closer to the nozzle check pattern that you printed.

- If There Are No Missing Lines and No White Streaks
(1) Select All A and press the OK button.
The LCD returns to the Maintenance screen.
- If Lines Are Missing or White Streaks Are Present
(1) Select Also B and press the OK button.
The cleaning confirmation screen is displayed.
(2) Select Yes and press the OK button to start Print Head Cleaning.