Plug and Play Installation for Network Printers (Windows Vista)
Solusi
You can easily discover a shared WSD printer and install the printer driver for it from the Network Explorer in Windows Vista.
IMPORTANT
- [PDL Selection (PnP)] must be set to [PCL] from the printer's control panel or the Remote UI. For more information on the PDL Selection (PnP) settings, see the Reference Guide or the Remote UI Guide.
- You cannot install multiple printer drivers for the same printer using WSD. Uninstall the existing printer driver from the [Printers] folder first, then install the new printer driver. If you want to install multiple drivers for the same printer, use a standard TCP/IP port.
- If the [User Account Control] dialog box appears during installation, perform the following operations.
- For Administrator users, click [Allow] or [Continue].
- For Standard users, enter the required Administrator password > click [OK].
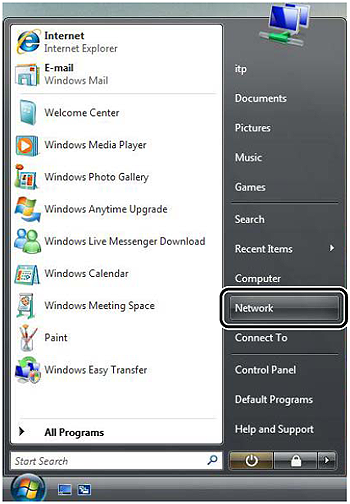
1. On the [  ] (Start) menu, click [Network].
 ] (Start) menu, click [Network].
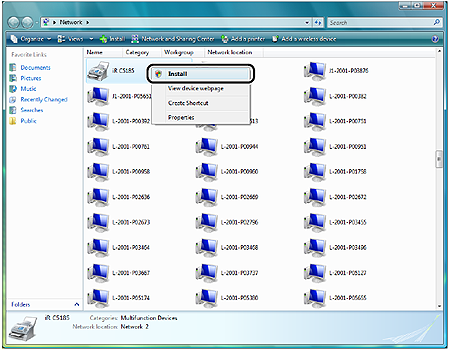
2. In the [Network] folder, right-click the printer icon for your printer > click [Install].

The printer icon is displayed in the [Printers] folder. The driver is now installed.
NOTE
If the printer driver was not found on the server PC, the Found New Hardware wizard starts. In this case, follow the steps below.
1. Click [Locate and install driver software (recommended)].
2. Click [Don't search online].
3. Click [I don't have the disc. Show me other options.].
4. Click [Browse my computer for driver software (advanced)].
5. Insert the Software CD-ROM into the CD-ROM drive > click [Browse] to select the driver from the following folders on the CD-ROM > click [Next].
PCL5e: \PCL\uk_eng\32BIT\win2k_vista\pcl5e_5c
PCL6: \PCL\uk_eng\32BIT\win2k_vista\pcl6
UFRII: \UFRII\uk_eng\32BIT\win2k_vista
6. If the [Windows Security] dialog box appears, click [Install this driver software anyway].
7. Click [Close] to finish the installation.


