Solusi
Typical examples of connecting the machine are described below. The machine cannot send/receive faxes if the connection is incorrect. Connect the machine correctly.
IMPORTANT
If the Power Disconnects Unexpectedly
If there is a power failure or if you accidentally unplug the power cord, all documents stored in memory will be lost. User data and speed dialing settings are retained.
If the power disconnects, the following will apply:
- You will not be able to send or receive faxes or make copies.
- When you are connecting the telephone or answering machine, whether or not you can use it depends upon your telephone line, telephone, or answering machine.
Methods of Connecting the Machine to an Analog Line
- Connecting the Machine without Telephone or Answering Machine
(A) Telephone line(analog)
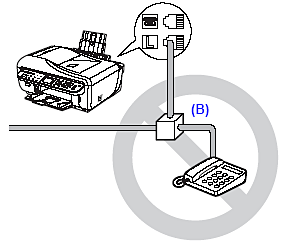
- Connecting a Telephone or Answering Machine Directly
(A) Telephone or answering machine
NOTE
Before connecting a telephone or answering machine, remove the Telephone connector cap.
IMPORTANT
Do not connect the machine and external devices in parallel to the same telephone line using a distribution adapter (B). The machine may not operate properly.
- Connecting a Telephone or Answering Machine via a Computer
(A) Computer
(B) Telephone or answering machine
NOTE
Before connecting a telephone or answering machine, remove the Telephone connector cap.
If the connector of the external device cannot be connected to the jack on the machine, you will need to purchase a B.T. adapter to connect as follows: Connect the external device line to the B.T. adapter, then connect the B.T. adapter to the jack.
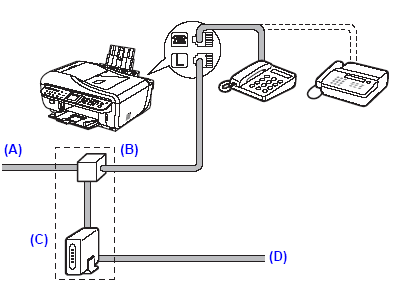
Methods of Connecting to the Various Lines
The following are some basic connection schemes that apply when you are connecting to a nonanalog telephone line. These are examples and could not be guaranteed to suit every
connecting condition. For details, refer to the instruction manual supplied with the network device (control devices such as an xDSL (Digital Subscriber Line) modem or terminal adapter) you are connecting to this machine.
(A) Digital Subscriber Line
(B) Splitter
(C) xDSL modem (splitter may be built-in to the modem)
(D) Computer
IMPORTANT
Do not branch the telephone line before the splitter (wall side). And also, do not connect splitters in parallel. The machine may not be able to operate properly.
REFERENCE
- When connecting to the xDSL line, select the same line type as you are subscribing in Telephone line type.
- Before connecting a telephone or answering machine, remove the Telephone connector
- Connecting to an ISDN Line
For details on ISDN (Integrated Service Digital Network) connection and settings, refer to the manuals supplied with your terminal adapter or dial-up router.
Setting the Telephone Line Type
Before using your machine, make sure you set the correct telephone line type for your telephone line. If you are unsure of your telephone line type, contact your telephone company. For ISDN or xDSL connections, contact the telephone company or service provider to confirm your line type.
NOTE
- Rotary pulse is not supported depending on the selected country in the Country select menu. The Telephone line type menu will not be displayed in such country.
- You can print the User’s data list to check the current setting.
1. Display the FAX menu screen.
1-1. Press the FAX button, then press the Menu button.
The FAX menu screen is displayed.
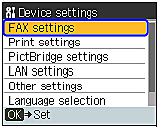
2. Display the Device settings screen.
2-1. Use the

or

button to select Maintenance/settings, then press the OK button.
The Maintenance/settings screen is displayed.
2-2. Use the
or
button to select Device settings, then press the OK button.
The Device settings screen is displayed.
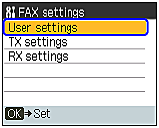
3. Display the User settings screen.
3-1. Use the

or

button to select FAX settings, then press the OK button.
The FAX settings screen is displayed.
3-2. Use the
or
button to select FAX settings, then press the OK button.
The User settings screen is displayed.
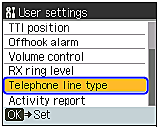
4. Display the Telephone line type screen.
4-1. Use the
or
button to select Telephone line type, then press the OK button.
The Telephone line type screen is displayed.
5. Select the telephone line type.
5-1. Use the
or
button to select the telephone line type, then press the OK button.
Rotary pulse: Suitable for pulse dialing.
Touch tone: Suitable for tone dialing.