Isu
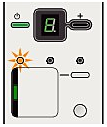
- Alarm Lamp Flashes Orange
When a machine error occurs, the Alarm lamp is lit orange and E and number (error code) are alternately displayed on the LED. Check the error code displayed on the LED and take the appropriate action to correct the error.
* Depending on the error occured, the Alarm lamp is not lit.
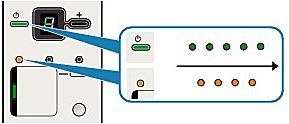
- Power Lamp Flashes Green and Alarm Lamp Flashes Orange Alternately
When the Power and Alarm lamps flash alternately as shown below, and P and number (error code) are alternately displayed on the LED, an error requiring servicing might have occurred.
Turn off the machine, and unplug the power cord of the machine from the power supply.
Plug the power cord of the machine back in, and then turn on the machine.
If the problem is not resolved, contact your Canon service representative.
Sebab dan Solusi
The machine is out of paper. / Paper does not feed.
Paper jam.
The FINE Cartridge cannot be recognized.
FINE Cartridge is not installed in the correct position.
Ink absorber is almost full.
Ink level cannot be detected.
The FINE Cartridge cannot be recognized.
The FINE Cartridge cannot be recognized.
Ink has run out.
The size of the original cannot be correctly detected or the document is too small when the Fit-to-Page copying is selected.
The machine is not connected with the computer.
Scanning the Photo Index Sheet has failed.
No DPOF information./Unable to scan images on the Photo Index Sheet correctly./No images on the Photo Index Sheet.
Unable to recognize the memory card when saving the scanned data on the memory card.
Unable to save the scanned images on the memory card.
The memory card is removed while saving is in progress.
The read/write mode is enabled in the read/write attribute.
The memory card is not inserted in the Card Slot.
Scanning the Print Head Alignment Sheet has failed.
Scanning the Language Selection Sheet has failed.
The memory card is inserted in the Card Slot when you change the read/write attribute setting.
Reload the paper on the Rear Tray correctly and press the Black or Color button.
Loading Paper
If paper has jammed in the machine, clear the jam, reload the paper in the machine correctly and then press the Black or Color button. -> "
Paper Jams".
The FINE Cartridge may not be installed properly, or the Cartridge may not be compatible with this machine.
Open the Scanning Unit (Cover) and install the appropriate FINE Cartridge.
If the error is not resolved, the FINE Cartridge may be damaged. Contact your Canon service representative.
Replacing FINE Cartridge
When FINE Cartridges run out of ink, follow the procedure below to replace them.
Make sure that each FINE Cartridge is installed in the correct position.
Replacing FINE Cartridge
When FINE Cartridges run out of ink, follow the procedure below to replace them.
The ink absorber is becoming full.
The machine has a built-in ink absorber to hold the ink used during Print Head Cleaning.
Press the Black or Color button to cancel the error so you can continue printing. Before the ink absorber becomes completely full, contact a Canon service representative. (You will need to replace a particular part of the machine.)
Ink may have run out.
The function for detecting the remaining ink level will be disabled since the ink level cannot be correctly detected.
If you want to continue printing without this function, press the Stop/Reset button for at least 5 seconds.
Canon recommends to use new genuine Canon cartridges in order to obtain optimum qualities.
Please be advised that Canon shall not be liable for any malfunction or trouble caused by continuation of printing under the ink out condition.
Checking the Ink Status
You can check the ink status on the computer screen or with the Ink lamps on the Operation Panel.
The FINE Cartridge may not be compatible with this machine.
Install the appropriate FINE Cartridge.
Replacing FINE Cartridge
When FINE Cartridges run out of ink, follow the procedure below to replace them.
The FINE Cartridge may not be installed properly.
Open the Scanning Unit (Cover) and install the FINE Cartridge properly.
Replacing FINE Cartridge
When FINE Cartridges run out of ink, follow the procedure below to replace them.
Ink has run out.
Replace the ink cartridge and close the Scanning Unit (Cover).
If printing is in progress and you want to continue printing, press the Stop/Reset button for at least 5 seconds with the ink cartridge installed. Then printing can continue under the ink out condition.
The function for detecting the remaining ink level will be disabled.
Replace the empty ink cartridge immediately after the printing. The resulting print quality is not satisfactory, if printing is continued under the ink out condition.
Replacing FINE Cartridge
When FINE Cartridges run out of ink, follow the procedure below to replace them.
- Make sure that the original meets the requirements and is correctly loaded on the Platen Glass.
- Check the position and direction of the original loaded on the Platen Glass.
Connect the machine and the computer with a USB cable.
- Make sure that the Photo Index Sheet is set in the correct position and orientation on the Platen Glass.
- Make sure that all required circles on the Photo Index Sheet are filled in.
- There is no image data saved on the memory card that can be read by this machine.
- The machine may not recognize the file if the file name or the folder path contains certain characters. Use only alphanumeric characters.
- Photo data edited or processed on a computer must be printed from the computer.
The format of the memory card is not compatible with this machine. Use the memory card formatted by the FAT form.
E, 4, 1 / E, 4, 2 / E, 4, 3 / E, 4, 4 / E, 4, 5
- You cannot save the scanned images on the memory card if the read-only mode is enabled. Press the Maintenance button repeatedly until c appears on the LED, and then press the Black button to enable the read/write mode.
- Unlock the memory card when you save the scanned images.
- The memory card is full.
After carrying out the above measures, if the problem continues, turn the machine back on. If the error is not resolved, the memory card may be damaged.
Do not remove the memory card while saving is in progress.
You cannot print images if the read/write mode is enabled. Press the Maintenance button repeatedly until c appears on the LED, and then press the Color button to enable the read-only mode.
Insert the memory card in the Card Slot.
- Make sure that all required boxes on the Print Head Alignment Sheet are filled in, and that the sheet is set in the correct position and orientation on the Platen Glass.
- Make sure the Platen Glass and the Print Head Alignment Sheet are not dirty.
If the error is not resolved, connect the machine to the computer and align the Print Head on the printer driver.
Aligning the Print Head
If printed ruled lines are misaligned or print results are otherwise unsatisfactory, adjust the print head position.
You need to prepare: a sheet of A4 or Letter-sized plain paper
1. Make sure that the power is turned on, and load a sheet of A4 or Letter-sized plain paper in the Rear Tray......
- Make sure that all required boxes on the Language Selection Sheet are filled in, and that the sheet is set in the correct position and orientation on the Platen Glass.
- Make sure the Platen Glass and the Language Selection Sheet are not dirty.
When the memory card is inserted in the Card Slot, you cannot change the read/write attribute setting. Remove the memory card from the Card Slot and press the Black or Color button.

