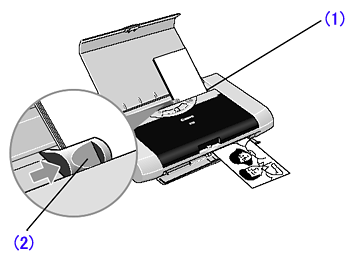
Loading Paper
16-Mei-2008
8200183400
Solusi
1. Flatten the four corners of the paper before loading it.
IMPORTANT
When paper is curled, gently bend them in the opposite direction until
the paper becomes completely flat.
2. Prepare to load paper.

(1) Open the Paper Support and Paper Output Slot Cover.
(2) Move the Paper Thickness Lever to the correct position for the media in use.
Move to the right position for plain paper. Move to the left position for envelope, and T-Shirt Transfers.
NOTE
- Place the printer on a flat surface.
- Do not place any obstacles in front of the printer to secure the space for paper output.
- Remove each sheet as soon as paper is out. If the Paper Output Slot Cover is stacked with printed sheets, they may be folded or jammed.
- When performing duplex printing, pay great attention to the dust and stain on the area (desk, etc.) where the printed paper is ejected. Printing with dust and stain remaining on this area can have a bad effect on the printing result and printer.
3. Load the paper.

Load Limit Mark
Do not load beyond this Load Limit mark.
(1) Insert the paper into the Auto Sheet Feeder with the print side facing up.
When loading the 4"×6"paper, load sheets in the portrait position (short side facing down).
(2) Align the paper stack against the right side of the Auto Sheet Feeder.
(3) Slide the Paper Guide against the left side of the stack of paper.
NOTE
- Do not stack more than 10 sheets in the Paper Output Slot Cover.
- Do not touch the printed surfaces until the ink dries. For specific drying times, refer to the instructions packaged with your media.
Use either DL or US Comm. #10 size envelopes.
IMPORTANT
- Do not use envelopes with embossed or treated surfaces, a double flap, pressure seals or sticker flaps.
- Select either DL Env. or Comm. Env. #10 according to the envelope size you are using.

A:Fold the envelope flap shut.
B:Printing direction
(1) Align the envelope against the right side of the Auto Sheet Feeder.
The flap of the envelope will appear with its flap facing up on the left side.
A maximum of 5 envelopes can be loaded at once.
(2) Slide the Paper Guide against the left side of the envelope.
(3) Select Envelope in Media Type Type, and then select Comm. Env. #10 or DL Env Env. in Page Size Size.
For the printer driver setting, refer to "Printing from Your Computer".
You can print on 4" x 6" size papers.

(1) Align the paper stack against the right side of the Auto Sheet Feeder.
Despite the direction of the photograph, load the paper in the vertical direction.
You can load a maximum of 10 sheets of 4" x 6" paper.
(When using the Photo Paper Plus Double Sided PP-101D, set only one sheet at a time)
(2) Slide the Paper Guide against the left side of the stack of paper.
(3) Select 4 x 6 in in Page Size Size.
For the printer driver setting, refer to "Printing from Your Computer".