


Uninstalling Software
Solusi
If the printer driver or fax driver become unnecessary, follow the procedure below to uninstall them.
NOTE
- Check the following before performing the uninstallation:
- That you have the installation software (if you want to re-install the drivers)
- No applications are running on your computer
- When uninstalling software in Windows 2000/XP/Server 2003/Vista, you must log on as a user with administrator's privileges.
1. On the [Start] menu, point to [Programs] (Windows 2000/Server 2003) or [All Programs] (Windows XP/Vista) -> [Canon Printer Uninstaller] -> select the uninstaller for the driver you want to uninstall.
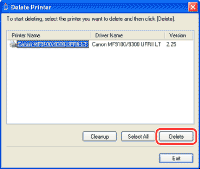
2. Select the printer driver you want to delete in the [Delete Printer] dialog box.

3. Click [Delete].
NOTE
If you click [Cleanup], all the files and registry information related to the selected driver will be deleted. Click [Delete] to perform a normal uninstallation of the driver.
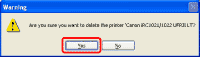
4. Click [Yes] to confirm the deletion.
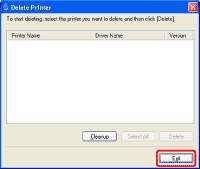
5. Click [Exit] in the [Delete Printer] dialog box.
1. On the [Start] menu, point to [Programs] (Windows 2000/Server 2003) or [All Programs] (Windows XP/Vista) -> [Canon Printer Uninstaller] -> select the uninstaller for the driver you want to uninstall.
2. Select the fax driver you want to delete in the [Delete Fax] dialog box.

3. Click [Delete].

NOTE
If you click [Cleanup], all the files and registry information related to the selected driver will be deleted. Click [Delete] to perform a normal uninstallation of the driver.
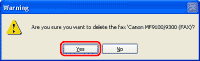
4. Click [Yes] to confirm the deletion.
5. Click [Exit] in the [Delete Fax] dialog box.

The following procedures are explained using sample screens from Windows 2000.
1. From the [Start] menu, select [Settings] -> [Control Panel].
- For Windows XP, from the [start] menu, select [Control Panel].
- For Windows Server 2003, from the [Start] menu, select [Control Panel] -> [Add/Remove Programs] and proceed to step 3.
- For Windows Vista, from the [start] menu, select [Control Panel] -> [Uninstall a Program] and proceed to step 3.
2. Double-click the [Add/Remove Programs] icon.
For Windows XP, double-click the [Add or Remove Programs] icon.
3. Select [Color Network ScanGear Ver.n.n] and click [Change/Remove].
- For Windows Vista, click [Uninstall and change].
- When the deletion of the file is complete, a dialog box appears to signify the end of the deletion.
- Ver. n.n stands for the software version.
4. Click [Finish].