Solusi
1.Plug the power cord into the back left of the printer, then connect the other end to the wall outlet.
IMPORTANT
Do NOT connect the USB cable at this stage.
2.Turn on the printer (A).
3.Confirm that the POWER lamp (B) lights blue.
IMPORTANT
Handle the Print Head carefully. Do not drop or apply excessive pressure to it.
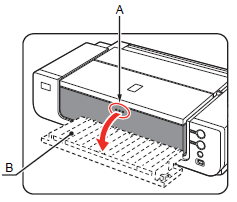
1.Press the

button (A).
The Front Tray (B) opens.
2.Open the Top Cover (C).
The Print Head Holder (D) comes out. (This is where you install the Print Head.)
IMPORTANT
- The Print Head Holder makes a noise as it moves. This is normal operation.
- If the Print Head Holder does not move, make sure that the printer is turned on.
3.Firmly raise the Print Head Lock Lever (E) until it stops.
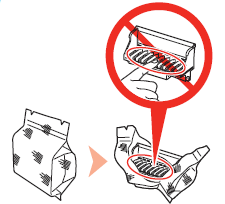
4.Remove the Print Head from the silver package.
5.Remove the orange protective cap.
IMPORTANT
There may be some transparent or light color ink on the inside of the bag the Print Head comes in, or the inside of the protective cap - this has no effect on print quality. Be careful not to get ink on yourself when handling these items. Be careful not to stain your hands.
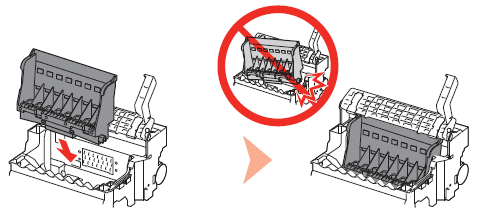
6.Set the Print Head in place.
IMPORTANT
Do not knock the Print Head against the sides of the holder.
7.Lower the Print Head Lock Lever (E) completely.
IMPORTANT
- Pinch the Print Head Lock Lever firmly and lower it gently.
- Once you have installed the Print Head, do not remove it unnecessarily.
IMPORTANT
- Handle the ink tanks carefully. Do not drop or apply excessive pressure to them.
- If the Print Head Holder moves to the right, close and reopen the Top Cover.
- Be sure to use the supplied ink tanks.
1.Remove the ink tank from its package.
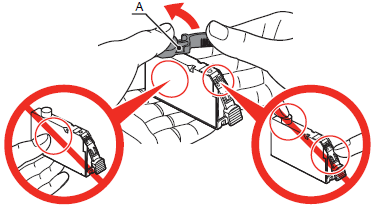
2.Remove and discard the orange protective cap (A) located on the bottom of the ink tank.
IMPORTANT
Do not hold the sides of the ink tank; ink may splash.
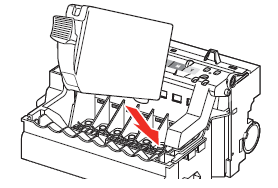
3.Install the ink tank
Insert the ink tank.
4.Press the PUSH mark on the ink tank until it clicks into place.
Make sure the Ink lamp lights red.
5.Install all the other ink tanks in the same way.
Install all the ink tanks.
Make sure all the Ink lamps light red.
IMPORTANT
- Match the labels when installing.
- Once you have installed the ink tanks, do not remove them unnecessarily.
6.Close the Top Cover (B).
Wait for about 3 minutes until the POWER lamp (blue) (C) stops flashing and stays lit then operating noise stops, and go to the next step.
Do not open the Top Cover while the lamp is flashing.
The printer vibrates while the lamp is flashing because ink is stirred inside the printer.
IMPORTANT
- Make sure the Inner Cover (D) is closed.
- If an Alarm lamp (E) flashes orange, make sure that the Print Head and the ink tanks are correctly installed.
This section explains how to load paper in the Rear Tray (A).
NOTE
Pull out the Front Tray Extension (B) beforehand.
1.Open the Paper Support (C).
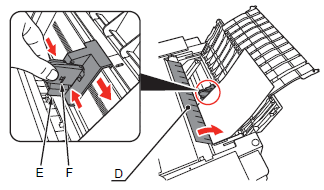
2.Open the Feed Slot Cover (D), then pinch and slide the Paper Guide (E).
3.Load paper straight along the right edge of the Rear Tray.
Load paper in portrait orientation with the printing side facing up.
4.Pinch and slide the Paper Guide (E) against the left edge of the paper, then close the Feed Slot Cover (D).
Confirm that the loaded paper does not exceed the line (F).
NOTE
You can print on large size paper such as 14" x 17"/355.6 x 431.8 mm or thick paper by loading the paper in the Front Tray. For details on how to load paper in the Front Tray, refer to [
Loading Paper ].


 button (A).