Basic Methods for Scanning Documents to a File Server
Solusi
This section describes the basic procedure for sending scanned documents to a computer that acts as a file server on a network.
NOTE
You can specify the file server addresses only with one-touch keys, coded dial codes, or  [Address Book]. You cannot specify a file server using
  –
–  ,
,  [numeric keys] and
  [Tone].
 [Address Book]. You cannot specify a file server using
  –
–  ,
,  [numeric keys] and
  [Tone].
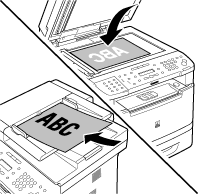
1. Place documents.

NOTE
If you want to scan a multi-page document in color, place it on the ADF.
2. Press  [SEND/FAX].
 [SEND/FAX].
The SEND/FAX indicator lights up and the machine enters the send standby mode.
3. Press  [SEND/FAX] repeatedly to select <E-MAIL:B&W> or <E-MAIL:COLOR>, then press [OK].
 [SEND/FAX] repeatedly to select <E-MAIL:B&W> or <E-MAIL:COLOR>, then press [OK].
NOTE
If you want to send color images to the file server, select <EMAIL: COLOR> as the sending method.
4. Specify the file server's address.
You can specify the file server addresses only with one-touch keys, coded dial codes, or  [Address Book].
 [Address Book].
If you want to start sending without adjusting the optional send settings, skip to step 10.

5. Press [OK] repeatedly until <FILE FORMAT> is displayed.
6. Press  or
or  to select the file format, then press [OK].
 or
or  to select the file format, then press [OK].
- File server (B&W): <PDF>, <TIFF(B&W)>
- File server (Color): <PDF(COMPACT)>, <JPEG>

NOTE
- If you select <JPEG>, skip to step 8.
- If you specify a file server's address from Address Book without selecting the sending method, settings specified in <STANDARD SETTINGS> in <TX SETTINGS> in <TX/RX COMMON SET.> in <TX/RX SETTINGS> are displayed.
7. Press  or
or  to select <OFF> or <ON> for <DIVIDE INTO PAGES>, then press [OK].
 or
or  to select <OFF> or <ON> for <DIVIDE INTO PAGES>, then press [OK].
- <OFF>: Sends multiple images as a single file without dividing them.
- <ON>: Separates multiple images and send them as separate files.

NOTE
If you have selected <JPEG> in step 6, this setting is not available. <DIVIDE INTO PAGES> is automatically set to <ON> when sending documents in JPEG format.
8. Press  or
or  to select the resolution, then press [OK].
 or
or  to select the resolution, then press [OK].
- File server (B&W): <200X200dpi>, <300X300dpi>, <400X400dpi>, <600X600dpi>, <150X150dpi>, <200X100dpi>
- File server (Color): <200X200dpi>, <300X300dpi>, <100X100dpi>, <150X150dpi>

NOTE
If <PDF(COMPACT)> is selected as the file format, only <300X300dpi> can be selected.
9. Press  or
or  to select the original type, then press [OK].
 or
or  to select the original type, then press [OK].
- <TEXT/PHOTO>: For documents that contain text and photos.
- <TEXT>: For text documents.
- <PHOTO>: For documents that contain fine text or photos.

NOTE
If you have selected <PDF(COMPACT)> as the file format in step 6, the original type is automatically set to <TEXT/PHOTO>.
10. Press  [Start].
 [Start].
When you place the documents on the platen glass, press  or
or  to select the document size, then press
  [Start] for each document. When scanning is complete, press [OK] to start sending.
 or
or  to select the document size, then press
  [Start] for each document. When scanning is complete, press [OK] to start sending.
Scanning starts, and the scanned data is sent to the specified file server.
NOTE
- You can also adjust the following scan settings as necessary.
- Density
- 2-Sided
- You can set the document's name and the message body text.


