Placing Documents
Solusi
Learn how to place documents on the machine's Platen. Place documents correctly according to the type of document to be scanned. Otherwise, documents may not be scanned correctly.
IMPORTANT
- Do not place items that weigh 4.4 lbs (2.0 kg) or more on the Platen. Also, do not press on the document with a force exceeding 4.4lbs (2.0 kg). If you press heavily, the scanner may not work correctly or you might break the glass.
- Close the Document Cover when scanning.
- When scanning documents other than film, make sure that the FAU (Film Adapter Unit) Protective Sheet is attached to the Document Cover. Without the FAU Protective Sheet, the document type may not be detected correctly.
Place documents as described below to allow the machine to detect the document type or size automatically.
IMPORTANT
- When scanning by specifying the document type or size in MP Navigator EX or ScanGear (scanner driver), align an upper corner of the document with the corner at the arrow (alignment mark) of the Platen.
- Photos that have been cut to various shapes and documents smaller than 1.18 inches (3 cm) square cannot be cropped accurately when scanning.
- Reflective CD/DVD labels may not be scanned properly.
- When Scanning Photos, Postcards, Business Cards or CD/DVD

- Placing a Single Document
Place the document face-down on the Platen, with 0.39 inches (1 cm) or more space between the edges (diagonally striped area) of the Platen and the document. Portions placed on the diagonally striped area cannot be scanned.
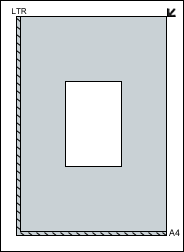
IMPORTANT
Large documents (such as A4 size photos) that cannot be placed away from the edges/arrow (alignment mark) of the Platen may be saved as PDF files. To save in a format other than PDF, scan by specifying the file format.
- Placing Multiple Documents
Allow 0.39 inches (1 cm) or more space between the edges (diagonally striped area) of the Platen and documents, and between documents. Portions placed on the diagonally striped area cannot be scanned.
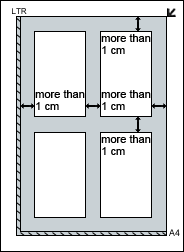
NOTE
- You can place up to 12 documents.
- Positions of slanted documents (10 degrees or less) are corrected automatically.
- When Scanning Magazines, Newspapers or Text Documents
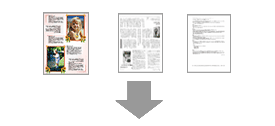
Place the document face-down on the Platen and align an upper corner of the document with the corner at the arrow (alignment mark) of the Platen. Portions placed on the diagonally striped area cannot be scanned.
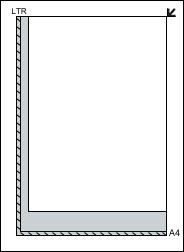
IMPORTANT
- The portion within 2 mm inwards from the alignment mark cannot be scanned.

IMPORTANT
- Hold the film by the edge to avoid smudges and fingerprints.
- Dust on the film or Platen appears in scanned images. Remove dust from the film and Platen.
- Do not block the calibration slot on the Film Guide when scanning. If the slot is blocked, the film cannot be scanned in correct colors.
- A sticker label attached to the margin of the film may be recognized as an image.
- Close the Document Cover gently.
- 35 mm Film Strips
1. Load the film into the Film Guide.
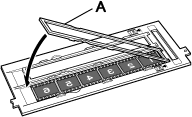
Open the Film Holder (A) and place the film on the Film Guide, with the front side of the film (the side on which images appear correctly) facing down.
NOTE
Make sure that the spaces between frames are aligned with the white lines on the holder.
2. Place the Film Guide on the Platen.
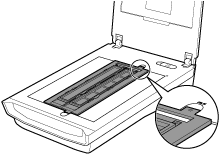
Align the tabs on the Film Guide with the FILM marks on the Platen.
3. Gently close the Document Cover.
- Mounted Slides
1. Place the Film Guide on the Platen.
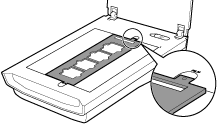
Align the tabs on the Film Guide with the FILM marks on the Platen.
Load the slides so that the film lies flat on the Platen.
2. Load the film into the Film Guide.
Place the film on the Film Guide, with the front side of the film (the side on which images appear correctly) facing down.

3. Gently close the Document Cover.
- 120 Format Film Strips
1. Place the Film Guide on the Platen.
Align the tabs on the Film Guide with the FILM marks on the Platen.
2. Open the Film Holder (A) and remove the Film Retainer Sheet (B).

3. Load the film into the Film Guide.
Load with the front side of the film (the side on which images appear correctly) facing down.

IMPORTANT
- Make sure that there is no gap between the edge of the film (the side closer to the
 mark) and the hinge.
 - When loading two or more 120 Format Films, allow 0.2 inches (5 mm) between films.
4. Gently close the Document Cover.
When the 120 Format Film is Curled (How to Use the Film Retainer Sheet)
If a curled film touches the Platen while scanning, circular stripe patterns (Newton's rings) may appear in scanned images.
To scan a curled 120 Format Film, flatten it using the supplied Film Retainer Sheet.
IMPORTANT
- Do not cover the frames you want to scan with the Film Retainer Sheet.
- Place the Film Retainer Sheet so that the glossy side (the side without illustrations) touches the film. Otherwise, it may damage the film.
- Do not rub the film with the Film Retainer Sheet. It may damage the film.
1. Load the film into the Film Guide correctly, with the front side of the film (the side on which images appear correctly) facing down.
The long sides of the film are curled up.
2. With the glossy side (the side without illustrations) facing up, insert the Film Retainer Sheet (A) under the edge of the film.
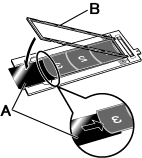
3. Close the Film Holder (B) and secure it into the Film Guide.
The entire film is pressed flat with the Film Holder.
NOTE
- If Newton's rings still appear after scanning with the above method, the film is heavily warped.
Try the following method.
1. Turn over the film and load it into the Film Guide, with the front side of the film (the side on which images appear correctly) facing up.
2. With the rough side (illustrated side) facing up, place the Film Retainer Sheet (A) on the edge of the film.

3. Close the Film Holder and secure it into the Film Guide.
4. After preview, click  (Mirror) on the Toolbar of ScanGear (scanner driver) to invert the images, then click Scan.
 (Mirror) on the Toolbar of ScanGear (scanner driver) to invert the images, then click Scan.


