Copying data from the built-in memory to an SD memory card
Solusi
Movies and photos recorded to the built-in memory can be copied to an SD or SDHC memory card. For details on how to copy data from the built-in memory to an SD or SDHC memory card, please see Related Information. However, data on an SD or SDHC card cannot be copied to the built-in memory.
You can copy original movies or the entire playlist only from the built-in memory to the corresponding location on the memory card. Use this function to copy movies from the built-in memory to the memory card in order to play them back with music tracks.
1. Press <  ( camera/play ) > to open the [Movies] index screen.
 ( camera/play ) > to open the [Movies] index screen.
REFERENCE
To copy scenes in the playlist, press the < AUTO/WEB > button, and to copy video snapshot scenes, press the < VIDEO SNAP > button. To copy video snapshot scenes in the playlist, press both the < AUTO/WEB > and < VIDEO SNAP > buttons at the same time.
2. Select the scene you want to copy to the memory card, or a scene recorded on the date you want to copy.
- Copies to the memory card all the scenes selected in advance (marked with a [
 ] checkmark ).
 - To copy all the scenes that were recorded on a specific date, select one of the scenes within the specified date.
- This step is not necessary to copy all scenes.
3. Press < FUNC. >.
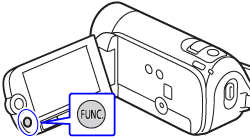
4. Copy the scene(s).
4-1. Select [  Copy (
  ) ] and press < SET >.
 Copy (
  ) ] and press < SET >.
4-2. Select [ All Scenes ] , [ All Scenes (this date) ], [ This Scene ] or [ Selectid Scenes ] , and then press < SET >.
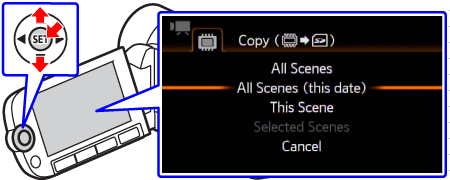
4-3. Select [ Yes ], and then press < SET > to start copying.
Press < SET > to interrupt the operation while it is in progress.

5. After the operation is completed, press < FUNC. >.
CAUTION
- Observe the following precautions while the ACCESS indicator is on or flashing. Failing to do so may result in permanent data loss.
- Do not open the memory card slot cover.
- Do not disconnect the power source or turn off the camcorder.
- Do not change the camcorder’s operating mode.
- In the following cases, you will not be able to copy recordings to the memory card:
- If the memory card slot is open.
- If the LOCK switch on the memory card is set to prevent writing.
- If there is no memory card in the memory card slot.
You can copy photos only from the built-in memory to the memory card.
1. Press <  ( camera/play ) > to open the [Photos] index screen.
 ( camera/play ) > to open the [Photos] index screen.
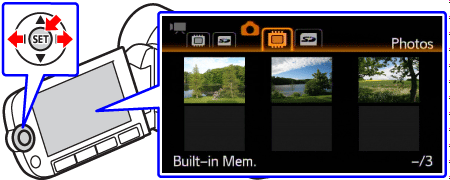
2. Select <  > the photo you want to copy and press < SET >.
 > the photo you want to copy and press < SET >.
3. Press < FUNC. >.

4. Copy a photo.
4-1. Select [  Copy(
Copy(  ) ] and Press < SET >.
 Copy(
Copy(  ) ] and Press < SET >.
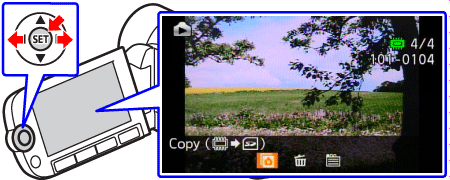
4-2. If you are satisfied with the photo that is displayed on the screen, press < SET > again.
You can select a different photo by operating the joystick left to right.

4-3. Select [ Yes ] and press < SET > to copy the photo.

5. After the operation is completed, press < FUNC. > twice to finish.
You can copy the photos that were selected in advance or all photos at once. You can also select and copy a specific photo from the index screen.
1. Press <  ( camera/play ) > to open the [Photos] index screen.
 ( camera/play ) > to open the [Photos] index screen.
2. Select <  ,
, > the photo you want to copy.
 ,
, > the photo you want to copy.
- Copies all the photos selected in advance (marked with a [
 ] checkmark ).
 - This step is not necessary to copy all photos.
3. Press < FUNC. >.

4. Copy the photos.
4-1. Select [  Copy(
Copy(  ) ] and press < SET >.
 Copy(
Copy(  ) ] and press < SET >.
4-2. Select [ All Photos ], [ This Photo ], or [ Selected Photos ], and then press < SET >.

4-3. Select [ Yes ], and then press < SET > to start copying.
If you selected [ Selected Photos ] or [ All Photos ], you can press < SET > to interrupt the operation while it is in progress.

5. After the operation is completed, press < FUNC. >.
CAUTION
- Observe the following precautions while the ACCESS indicator is on or flashing. Failing to do so may result in permanent data loss.
- Do not open the memory card slot cover.
- Do not disconnect the power source or turn off the camcorder.
- Do not change the camcorder’s operating mode.
- When copying photos onto an Eye-Fi card, photos will be uploaded automatically if you are within the range of a configured network. Always verify that Eye-Fi cards have been approved in the country/region of use.
- In the following cases, you will not be able to copy recordings to the memory card:
- If the memory card slot is open.
- If the LOCK switch on the memory card is set to prevent writing.
- If there is no memory card in the memory card slot.
- If there is not enough space on the memory card, as many photos as possible will be copied before stopping the operation.

