


How to set High-Speed Continuous Shooting (High-speed Burst) and Group Playback
Solusi
You can shoot continuously while the shutter button is pressed and held down fully.
For the PowerShot ELPH 500 HS / IXUS 310 HS, the maximum speed for continuous shooting is approximately 8.2 images/second, and for the PowerShot ELPH 510 HS / IXUS 1100 HS, the maximum speed for continuous shooting is approximately 7.8 images/second.
NOTE
- Recording pixels are fixed to 1984 x 1488 pixels (
 ).
). - Focus, exposure and white balance settings are set with the first shot.
- Depending on the shooting conditions, camera settings and the zoom position, the shooting speed may slow down.
- As the number of images increases, the shooting interval may take longer.
- [ISO speed] is set to [AUTO] (
 ).
). - The main functions that are not available in the [High-speed Burst] (
 ) mode are as follows:
- [Flash] ( ), [Date Stamp], [Self-Timer] (

 )
)
), [Date Stamp], [Self-Timer] (
)For unavailable functions other than the ones indicated above, see the [Camera User Guide] supplied with the product.
- When using the [Touch Shutter] function with the PowerShot ELPH 510 HS / IXUS 1100 HS, even if [High-speed Burst] () mode is selected, only one shot will be taken. Please use the shutter button.
- The position and shape of the operation buttons, screens displayed, and setting items may differ according to the model you use.
1. Set the <Mode Switch> to [Shooting] ( ) and then press the <Power> button.
) and then press the <Power> button.2. The following screen appears on the LCD monitor.
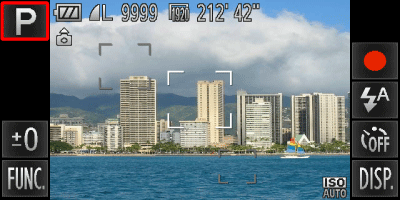
Touch [Rec. Mode] in the upper left-hand corner of the screen.
(If no changes have been made so far, [Program AE] ( ) will be displayed.)
) will be displayed.)3. The following screen appears on the LCD monitor.

If you touch 
 or quickly drag left or right across the screen, other Shooting modes will appear.
or quickly drag left or right across the screen, other Shooting modes will appear.4. The following screen appears on the LCD monitor.

Touch [High-speed Burst] () on the second screen *.
) on the second screen *.* The first page for the PowerShot ELPH 510 HS / IXUS 1100 HS.
5. The following screen appears on the LCD monitor.

Touch [OK] to complete the setting.
6. The following screen appears on the LCD monitor.

If the [High-speed Burst] () icon is displayed on the upper-left part of the screen, the setting is completed.
) icon is displayed on the upper-left part of the screen, the setting is completed.As long as you hold the <shutter button> down, the camera will shoot successive images.
When playing back images, images taken in [High-speed Burst]() mode are displayed in a group with only the first image displayed, however, grouped images can also be viewed individually.
) mode are displayed in a group with only the first image displayed, however, grouped images can also be viewed individually.IMPORTANT
If you erase a grouped image, all the images in the group will also be erased. Be sure to exercise adequate caution.
REFERENCE
To view images taken in [High-speed Burst] () mode as a group...
) mode as a group... Touch [Playback Menu] (
 ) tab.
 Touch [Group Images].
 Touch or to choose [On]. (By default, [On] is selected.)
  Touch (
 ) to complete the setting.
1. Press the <Playback> ( ) button.
) button.2. The following screen appears on the LCD monitor.

Drag left or right across the screen to choose an image that displays ( ).
).
).Touch ().
).3. The following screen appears on the LCD monitor.
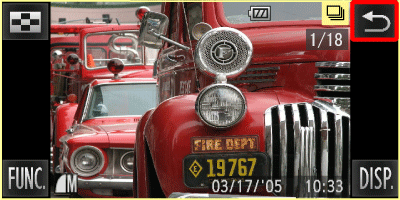
If you drag left or right across the screen only the images in the group will be displayed.
Touch () to exit group playback.
) to exit group playback.