Solusi
This section describes how to make the date and time settings on the camera.
IMPORTANT
- The date and time settings are recorded on images captured with the camera.
Setting the date and time for the first time
When you turn on the camera for the first time after purchase, the [Date/time] settings screen appears.
1. Press the <Power> button on the camera.
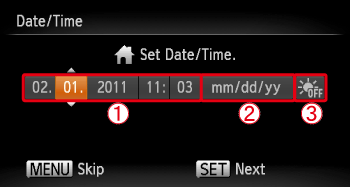
2. The following screen appears.
Operate the <directional buttons> left or right to select an option.
Operate the <directional buttons> up or down, or turn the <control dial> to make the following settings.

Set the year, month, date, and time.

Change the year, month, and date.

Set the daylight saving time (one hour is added to the current time).
After the settings are completed, press the <FUNC./SET> (

) button.
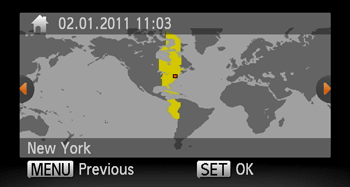
3. The following screen appears.
Operate the <directional buttons> left or right, or turn the <control dial> to choose your time zone.
After the settings are completed, press the <FUNC./SET> (

) button.
Changing the date and time settings
1. Press the <Power> button on the camera.
2. Press the <

> button.
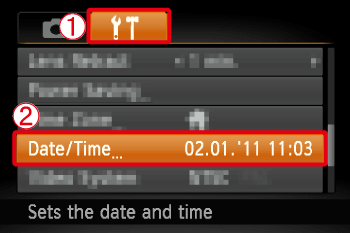
3. The following screen appears.
Operate the <directional buttons> left or right to select

[Set up] (

) tab.
Operate the <directional buttons> up or down, or turn the <control dial> to select the

[Date/Time] settings.
Press the <FUNC./SET> (

) button.
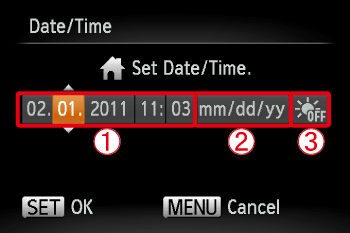
4. The following screen appears.
Operate the <directional buttons> left or right to select an option to change.
Operate the <directional buttons> up or down, or turn the <control dial> to make the following changes.

Set the year, month, date, and time.

Change the year, month, and date.

Set the daylight saving time (one hour is added to the current time).
After the settings are completed, press the <FUNC./SET> (

) button.
NOTE
- If you have not set the date and time, the [Date/Time] screen will appear each time you turn on the camera.
- The camera has a built-in date/time battery (backup battery) that allows the date / time settings to be retained for about three weeks after the battery pack has been removed.
- By inserting a charged battery or connecting an AC adapter kit (sold separately) the date/time battery can be charged in about 4 hours even if the camera is not turned on.
- If the date/time battery is depleted, the [Date/Time] screen will appear when you turn the camera on.
- You can also automatically update the date and time with the GPS function on the PowerShot S100. For details, see here.

 Set the year, month, date, and time.
 Change the year, month, and date.
 Set the daylight saving time (one hour is added to the current time).
 ) button.
 ) button.
 > button.
 [Set up] (
 ) tab.
 [Date/Time] settings.
 ) button.
 Set the year, month, date, and time.
 Change the year, month, and date.
 Set the daylight saving time (one hour is added to the current time).
 ) button.