Solusi
This section describes how to download images from your camera to the computer using EOS Utility.
Same procedures can be used to download movies as well as still images. However, downloading movies requires a much longer time due to their large data size.
Windows Vista is used as an example, but the procedures are mostly the same if you use Windows 8.1, Windows 8, Windows 7, Windows XP, or Mac OS X.
IMPORTANT
- Install all software from the Solution Disk supplied with the camera(*) before performing the following procedures.
- When downloading images to the computer, please log on to the computer as an administrator.
- EOS Utility is exclusively for Windows 8.1, Windows 8, Windows 7, Windows Vista, Windows XP, and Mac OS X.
* If the Solution Disk was not included with your camera, please download it from the Canon homepage.
Downloading all images that have not been transferred to the computer
1. Connect the camera to the computer with the interface cable supplied with the camera.
- Set the camera's Auto Power Off settings to [Off] or [Disable] before making the connection.
- Please see the related information for how to connect a camera to a computer.
2. Set the camera's power to <ON>.
3. EOS Utility starts automatically.
If EOS Utility does not start automatically, click the [Start] button, then select [All Programs] , [Canon Utilities] , [EOS Utility] and then [EOS Utility2] or [EOS Utility].
NOTE
- In Windows 8, right-click the [Start] screen and click [All Apps] displayed on the lower right of the screen. Then, click [EOS Utility2] on the [Apps] screen.
- In Windows 8.1, click
 displayed on the lower left of the [Start] screen to display the [Apps] screen, and then click [EOS Utility2].
- If you use Mac OS X, click the [EOS Utility] icon registered in the Dock.
IMPORTANT
When using EOS Utility Ver.2.14 or later, please perform the following procedure before connecting the camera to the computer:
1. Open EOS Utility before connecting the camera. The [EOS Utility Launcher] screen shown in the image below will be displayed.
2. Click [Close] to close the [EOS Utility Launcher] screen.
3. Connect the camera to the computer.
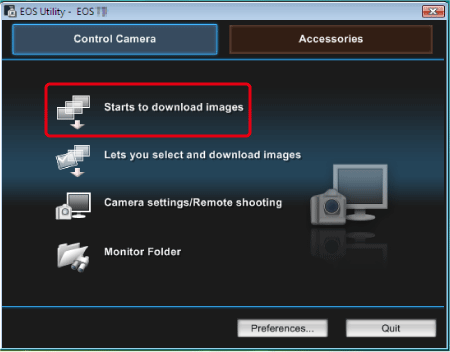
4. When the following window appears, start the operation for downloading images.
To download all images saved in the memory card, click [Starts to download images] in the EOS Utility window.
* The image displayed may differ depending on which model is connected.
NOTE
By default, the downloaded images are sorted into folders by their shooting date, and are saved in the [Pictures] folder on the computer. If you wish to change the destination for the downloaded images, click [Preferences] and specify the settings in the dialog box.
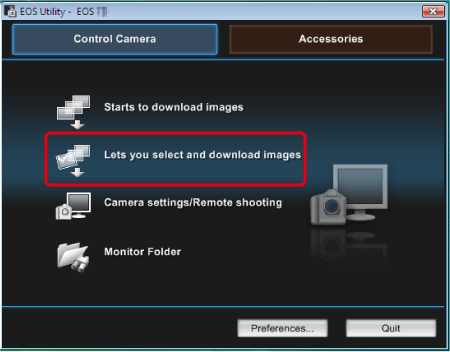
If you click [Lets you select and download images], the images saved in the memory card will be displayed in the EOS Utility window so that you can select the images to be downloaded. For the details, please see the "Downloading selected images" section below.
5. The images are downloaded to the computer.
6. When all the images have been downloaded, Digital Photo Professional starts and the downloaded images are displayed.
NOTE
If you wish to edit images using Digital Photo Professional or ImageBrowser EX, refer to the Software Instruction Manuals supplied on the CD-ROM bundled with your camera.*
*If the Instruction Manuals were not included with you camera, please download them from the Canon homepage.
Downloading selected images
With EOS Utility, you can select the images you want from the images shot and download them to your computer.
If you wish to download only the images you want, follow the procedures below.
1. Connect the camera to the computer with the interface cable supplied with the camera.
- Set the camera's Auto Power Off settings to [Off] or [Disable] before making the connection.
- Please see the related information for how to connect a camera to a computer.
2. Set the camera's power to <ON>.
3. EOS Utility starts automatically.
If EOS Utility does not start automatically, click the [Start] button, then select [All Programs] , [Canon Utilities] , [EOS Utility] and then [EOS Utility2] or [EOS Utility].
NOTE
- In Windows 8, right-click the [Start] screen and click [All Apps] displayed on the lower right of the screen. Then, click [EOS Utility2] on the [Apps] screen.
- In Windows 8.1, click
 displayed on the lower left of the [Start] screen to display the [Apps] screen, and then click [EOS Utility2].
- If you use Mac OS X, click the [EOS Utility] icon registered in the Dock.
If you use Mac OS X, click the [EOS Utility] icon registered in the Dock.
IMPORTANT
When using EOS Utility Ver.2.14 or later, please perform the following procedure before connecting the camera to the computer:
1. Open EOS Utility before connecting the camera. The [EOS Utility Launcher] screen shown in the image below will be displayed.
2. Click [Close] to close the [EOS Utility Launcher] screen.
3. Connect the camera to the computer.
4. When the following window appears, click [Lets you select and download images].
* The image displayed may differ depending on which model is connected.
5. A viewer window appears, and images in the memory card will be displayed.
From the images displayed, check the images that you want to download, and then click [Download]. (Four images are selected here.)
NOTE
- The images with the [
 ] icon in the upper-left corner are movie files.
- You can click the [
 ] button and extract images by a variety of criteria to select images to download.
6. The [Download image] dialog box will appear. If you want to change the destination, click [Destination Folder] and make the settings in the dialog box displayed.
NOTE
By default, the downloaded images are sorted into folders by their shooting date, and are saved in the [Pictures] folder on the computer.
7. If you click [OK] in the image above, it starts downloading the images to your computer.
When all the selected images are downloaded, Digital Photo Professional starts automatically and the images that have been downloaded will be displayed.
This completes the process of downloading images.
 displayed on the lower left of the [Start] screen to display the [Apps] screen, and then click [EOS Utility2].


 displayed on the lower left of the [Start] screen to display the [Apps] screen, and then click [EOS Utility2].


 ] icon in the upper-left corner are movie files.
  ] button and extract images by a variety of criteria to select images to download.