04-Jul-2012
8201584400

| Setting | Setting Value | Description |
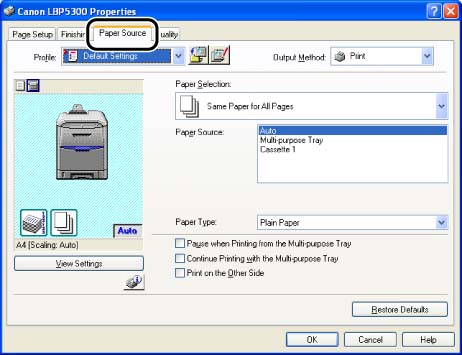
| [Paper Selection] | [Same Paper for All Pages] | Feeds all the pages from the same paper source. |
| [Different for First, Others, and Last] | Paper can be selected for each page, such as for printing the front cover on a different type of paper. | |
| [Different for First, Second, Others, and Last] | ||
| [Different for Cover and Others] | ||
| [Paper Source] | [Auto] [Multi-purpose Tray] [Cassette 1] [Cassette 2] * | Select a paper source. Options to be specified differ depending on the setting for [Paper Selection]. |
| [First Page] | ||
| [Second Page] | ||
| [Cover Page] | ||
| [Other Pages] | ||
| [Last Page] | ||
| [Paper Type] | [Plain Paper] [Plain Paper H] [Heavy Paper 1] [Heavy Paper 2] [Heavy Paper 3] [Transparency] [Label] [Coated Paper] [Rough Paper] | Specify the type of paper. |
| [Pause when Printing from the Multi-purpose Tray] | - | Specify whether the printer should pause a job with a message displayed or continue the job when feeding paper from the multi-purpose tray. |
| [Continue Printing with the Multi-purpose Tray] | - | Allows you to specify whether the printer should switch the paper source to the multi-purpose tray automatically when the cassette has run out of paper during feeding from the paper cassette, and paper of the size specified in [Output Size] in the [Page Setup] sheet is not loaded in any paper cassette. |
| [Print on the Other Side] | - | It is not recommended to print the other side of previously printed paper. However, if you have to print on both sides of paper, select the [Print on the Other Side] check box when printing the other side of the previously printed paper. |
