


Setting the Date and Time (EOS M)
Solusi
When you turn on the camera for the first time, the Time zone and Date/Time setting screen will appear. First set the time zone, then set the date and time.
Note that the shooting date/time appended to the captured images will be based on this date/time setting. Be sure to set the correct date/time.
1. Set the power to <ON>.
2. Press <MENU> button to display the menu.

3. Under the [  ] tab, select [Date/Time].
] tab, select [Date/Time].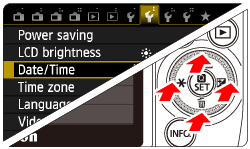
4. Press the <Main Dial> button to select the [  ] tab.
] tab.Press the <Main Dial> button to select [Date/Time], then press < /SET>.
/SET>.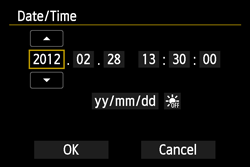
5. Select [OK], then press </SET> button.
/SET> button.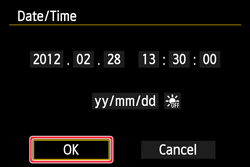
6. The date/time and daylight saving time will be set and the menu will reappear.
NOTE
- To synchronize the seconds, in step 5, press </SET> at 0 sec.
- If you remove the battery or the battery is exhausted, the time zone and date/time might be reset. If this happens, set the Time zone and Date/Time again.