How to load envelopes in the multi-purpose tray
30-Jul-2012
8201640600
Solusi
You can load envelopes at sizes of DL, COM10, C5, Monarch, and B5 in the multi-purpose tray. Load envelopes in the multi-purpose tray using the following procedure.
IMPORTANT
Operational requirements and restrictions are indicated at the end of this page. Be sure to read these items carefully in order to operate the printer correctly, and to avoid damage to the printer.
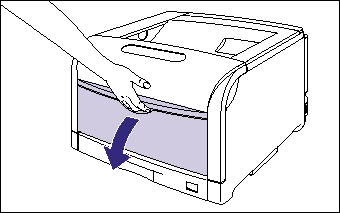
1. Open the multi-purpose tray.
Holding the opening at the center of the printer, open the multi-purpose tray.
2. Spread the paper guides a little wider than the actual envelope width.

3. Place the stack of envelopes on a flat surface, flatten them to release any remaining air, and be sure that the edges are pressed tightly.

4. Loosen any stiff corners of the envelopes and flatten curls as shown in the figure.
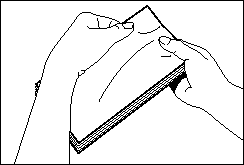
5. Align the edges of the envelopes on a flat surface.
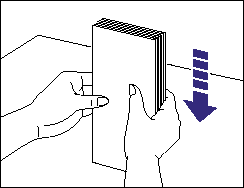
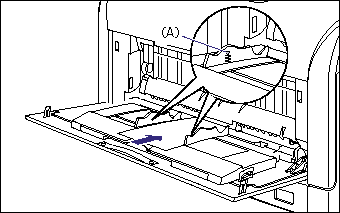
6. Gently load the stack of envelopes with the address side facing down and with the flaps closed and on the right side, until it touches the back of the multi-purpose tray as shown in the figure.
IMPORTANT
Up to approximately 10 envelopes can be loaded in the multi-purpose tray. Make sure that the stack of envelopes does not exceed the load limit marks (A).
7. Align the paper guides with both sides of the stack.

Next, specify the size and type of the loaded paper using the control panel.
8. Press  on the control panel.
 on the control panel.
9. Select FEEDER MENU using  and
and  , then press
  .
.
 and
and  , then press
  .
. 
10. Select TRAY PAPER SIZE using  and
and  , then press
  .
.
 and
and  , then press
  .
.
11. Select the paper size using  and
and  , then press
  .
.
 and
and  , then press
  .
.
"=" is displayed on the left of the paper size, and the paper size for the multi-purpose tray is specified.
12. Select TRAY PAPER TYPE using  and
and  , then press
  .
.
 and
and  , then press
  .
.
13. Select ENVELOPE  and
and  , then press
  .
.
 and
and  , then press
  .
.
"=" is displayed on the left of the paper size, and the paper size for the multi-purpose tray is specified.
When printing from the printer driver, configure the printer driver next.
When printing from DOS or UNIX, specify the settings for STD PAPER SIZE and STD PAPER TYPE using the control panel. For more details on the settings for STD PAPER SIZE and STD PAPER TYPE, see "Chapter 5 Printing Environment Settings" of User's Guide (PDF manual) in the CD-ROM supplied with the printer.
14. Specify the following options in the printer driver.
| Sheet | Setting | Description |
| [Page Setup] Sheet | [Page Size] | Select the paper size of the document created by an application. |
| [Output Size] | Select the size of the loaded paper as needed. Leave the setting at [Match Page Size] when the page size and the size of the paper loaded in the multi-purpose tray are the same, since there is no need to change the setting. | |
IMPORTANT
a. The print will be automatically reduced or enlarged to fit on the page when the settings for [Page Size] and [Output Size] are different.
b. If you are using PCL Printer Driver, set [Paper Type] in the [Paper Source] sheet to [Envelope].
NOTE
If you are using UFR II Printer Driver, and if you set [Page Size] to [Envelope Monarch], [Envelope COM10], [Envelope DL], [Envelope C5], or [Envelope B5], [Paper Type] is automatically specified.
IMPORTANT
a. Match the settings for TRAY PAPER SIZE and TRAY PAPER TYPE in the SETUP menu of the printer and those in the printer driver. If they do not match, the message <PC LOAD "size"> appears. In this case, the settings for TRAY PAPER SIZE and TRAY PAPER TYPE are changed to those in the printer driver by pressing [Online], allowing you to continue printing.
b. For more details on the usable paper, see "Usable paper" in Related Information at the end of this page.
c. For details on handling the multi-purpose tray, see "Precautions for handling the multi-purpose tray or paper cassette" in Related Information at the end of this page.
d. The envelopes that can be used with this printer are Envelope DL, Envelope COM10, Envelope C5, Envelope Monarch, and Envelope B5 with the following structures only.
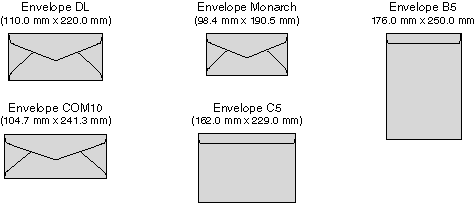
* You cannot use envelopes at sizes of DL, COM 10, Monarch, and C5 that have a flap on the short edge.
e. Do not use the envelopes with adhesive on the surface. This may result in poor print quality or damage to the printer.
f. When printing envelopes, you cannot print on any area within 10 mm of the edges of paper. (If you have selected the [Print with Upper Left of Sheet as Starting Point] check box in the [Finishing Details] dialog box in the UFR II printer driver, you can extend the printable area to near the edges of the paper. For more details, see Help of the UFR II printer driver.)
g. Printing speed drops when printing envelops.
h. You cannot print on the reverse side (glued side) of envelopes.
i. When loading envelopes at a size of DL, COM10, C5, or Monarch, load them so that the flap is toward the right of the printer when viewed from the front.
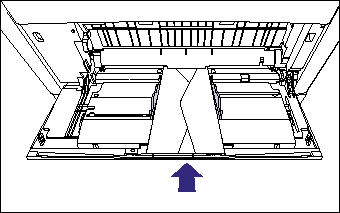
j. When printing envelopes of the Envelope B5 size, close the flaps and load them so that the envelopes are printed from the top (the edge with the flap).
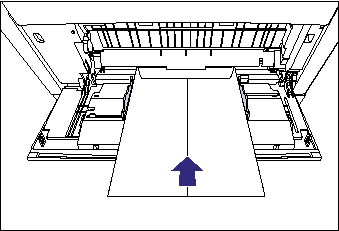
k. Make sure that there is no space between the paper guides and the envelopes, and be careful not to press the envelopes so hard that they are distorted. They may result in misfeeds or paper jams.
l. Do not touch the envelopes in the multi-purpose tray or pull them out during printing. This may result in a faulty operation.
m. When you change the paper loaded in the multi-purpose tray frequently, it is convenient if TRAY PAPER SIZE in the control panel is set to MIXED SIZES. If TRAY PAPER SIZE is set to MIXED SIZES, you do not need to specify the setting for TRAY PAPER SIZE each time you load the different size paper. However, when specifying MIXED SIZES, make sure that the size of the paper loaded in the multi-purpose tray matches the paper size specified in the printer driver before printing. If they do not match, the printer may stop printing, displaying the message <41 CHK PAPER SZE>, or a paper jam may occur. Be sure to check if the paper size specified in the printer driver matches the size of the paper loaded in the multi-purpose tray before using the printer. However, if SPECIAL MODE J is set to ON, the printer prints without checking the paper size even when the paper size specified in the printer driver and the size of the paper loaded in the multi-purpose tray do not match.
n. If the type of the paper practically loaded in the multi-purpose tray and the setting for TRAY PAPER TYPE do not match, this may result in crucial damage to the engine. Be sure to match the paper type.
o. If TRAY PAPER TYPE is set to MIXED TYPES, the printer does not check the type of the loaded paper against the paper type specified in the printer driver. Be sure to check if the paper type specified in the printer driver matches the type of the paper loaded in the multi-purpose tray before using the printer.
NOTE
a. If you are printing from an operating system on which the printer driver cannot be used, previously specify the paper source to TRAY.
b. When printing envelopes, they may be creased.