Solusi
You can confirm the settings for [Receive/Print Range Setting] with a web browser (Remote UI).
1. Run the web browser, enter the following URL in [Location] or [Address], and then press the [ENTER] key on your keyboard.
http://<the IP address or name of the printer>/
http://192.168.0.215/
When you want to specify the settings with the Remote UI using SSL encrypted communication, enter "https://<the IP address or name of the printer>/". If the [Security Alert] dialog box or other dialog box appears, follow the directions in the message.
NOTE
a. Use Netscape Navigator/Communicator 4.7 or later or Internet Explorer 4.01SP1 or later as the web browser.
b. You cannot connect the computer to the printer via a proxy server. If you are using a proxy server, perform the following settings. (The setting varies depending on the network environment.)
- On the settings for the proxy server of the web browser, add the IP address of this printer to [Exceptions] (The addresses that do not use the proxy server).
c. Configure the web browser so that you can use Cookie.
d. If multiple Remote UIs are running simultaneously, the latest setting is effective. It is recommended that only one Remote UI should be running at a time.
e. SSL encrypted communication can be used only when an optional hard disk is installed. To use SSL encrypted communication, a key and its certificate need to have been created and the key needs to have been registered as the default key. For details on the SSL encrypted communication function and the procedure for registering the default key, see "Remote UI Guide" (PDF manual) in the CD-ROM supplied with the printer.
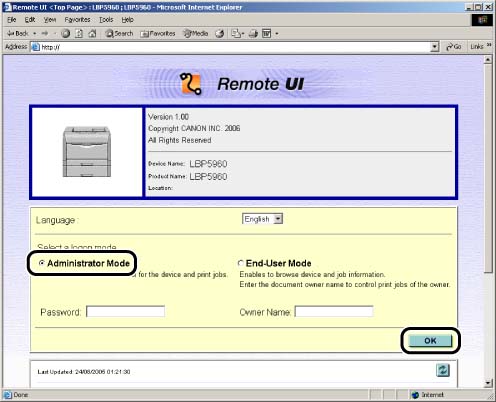
2. Select a mode ([Administrator Mode] or [End-User Mode]) to log on to the Remote UI, and then click [OK].
If you select [Administrator Mode], enter the values for [Password], and then click [OK].
NOTE
If a password is specified for the printer, enter the password, and then click [OK]. If the password has not been specified yet, it is not required to enter the password.
3. Click [Information] from the [Device Manager] menu on the left.
4. In [Reject Receive/Print] or [Permit Receive/Print] in [IP Address Range], confirm that the IP address is not restricted to perform printing.
Check whether the IP address for installing the printer driver is permitted to perform printing when [Reject Receive/Print] or [Permit Receive/Print] is specified.
If the IP address is restricted to perform printing, consult the administrator of the printer.


