Solusi
When in

(Auto) mode, the mark displayed will automatically change to the one for the set image stabilization mode depending on the shooting situation.
When in

(Manual) mode, the image stabilization mode can be selected according to how you are shooting.
The different Intelligent IS marks in

(Auto) mode and how to set the image stabilization in

(Manual) mode are as follows.
Setting the image stabilization mode
1. Set the mode switch to <M> or <CINEMA>.
2. Turn on the camcorder.
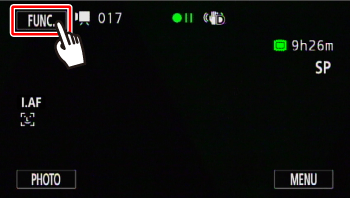
3. Touch [

].
4.

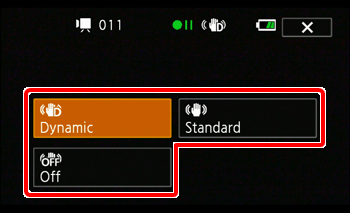
Drag your finger up/down, and then

touch [Image Stabilizer].
6. Touch [

].
REFERENCE
- After setting an assignable button to [
 Powered IS ], you can use Powered IS to make the image stabilization even more powerful. Powered IS is most effective when you are stationary and zooming in on far subjects using high zoom ratios (the more you approach the telephoto end). Holding the LCD panel with your left hand will add to the stability of the shot.
- Press and hold the assignable button as long as you want to activate Powered IS.
- (
 ) appears in yellow while Powered IS is activated.
NOTE
- If the degree of camcorder shake is too high, the image stabilizer may not be able to fully compensate.
- For surveying and following shots, when you pan the camcorder from side to side or tilt it up and down, we recommend setting [Image Stabilizer] to [Dynamic] or [Standard].
- Powered IS is available even when [Image Stabilizer] is set to [Off].
 (Auto) mode, the mark displayed will automatically change to the one for the set image stabilization mode depending on the shooting situation.
  (Manual) mode, the image stabilization mode can be selected according to how you are shooting.
  (Auto) mode and how to set the image stabilization in
  (Manual) mode are as follows.
  (Auto).
  (Dynamic IS)
 (Powered IS)*
 (Macro IS)
 (Tripod mode)
 ].
].
 Drag your finger up/down, and then
  touch [Image Stabilizer].

 Dynamic
 Standard
 Off
Off ].
]. Powered IS ], you can use Powered IS to make the image stabilization even more powerful. Powered IS is most effective when you are stationary and zooming in on far subjects using high zoom ratios (the more you approach the telephoto end). Holding the LCD panel with your left hand will add to the stability of the shot.
 ) appears in yellow while Powered IS is activated.