Solusi
Step 1: Connect the smartphone to the wireless LAN
IMPORTANT
- Please refer to the "Related information" section at the bottom of this page for specifications and system requirements of the smartphones which can be connected wirelessly.
- To communicate with a smartphone, the camera needs to be connected to the smartphone using the dedicated application Camera Connect.
- Camera Connect can be downloaded from the App Store or Google Play. Install Camera Connect on the smartphone and then perform the procedures to establish the connection.
- Interface or functions of Camera Connect are subject to change, for application improvement or update. In such a case, features of Camera Connect may differ from sample screens or operation instructions in this explanation.
NOTE
<


>: the Main Dial’s top, bottom, left, and right keys/ [

]: Set-up tab 2 / [

]: Connect to smartphone / <

>: Main Dial
*The icons and markings indicating the camera’s buttons, dials, and settings correspond to the icons and markings on the camera and on the LCD monitor.
1. Set the camera’s power to <ON>.
2. Press the <MENU> button to display the menu screen.
3. Press the <


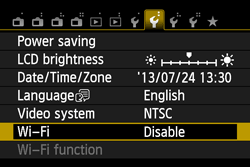
> keys to select [Wi-Fi] under the [

] tab, then press <SET>.
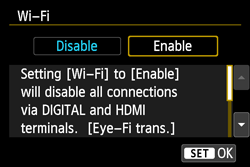
4. Select [Enable], then press <SET>.
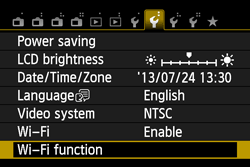
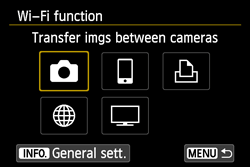
[Wi-Fi function] is now selectable.
IMPORTANT
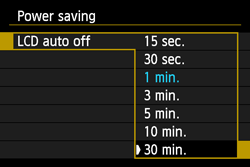
If necessary, set [Auto power off] under the [

] tab to [Disable].
- If the camera’s auto power off is activated during the wireless LAN connection, the wireless LAN function will turn off.
5. Select [Wi-Fi] under the [

], then press <SET>.
REFERENCE
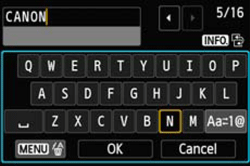
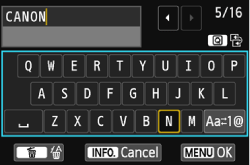
When you first use this setting, a screen appears prompting you to register a nickname for your camera.
When the camera is connected to another device via a wireless LAN, the nickname will be displayed on the device. Be sure to set a nickname for your camera.
- Enter a nickname. (Up to 16 characters can be entered.)
- After you have completed the settings, press the [MENU] button.
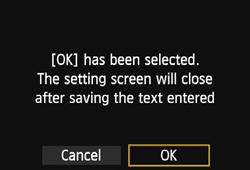
- Select [OK] on the confirmation screen, then press <SET>.
- The nickname is registered, and the [Wi-Fi function] screen will appear.
NOTE
Virtual Keyboard Operation
- Switching to other input areas.
To switch between top and bottom input areas, press the <INFO> button.
To move the cursor, press the <

> key in the top area.
In the bottom input area, press the <

> or <

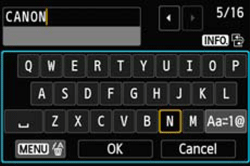
> button to select characters and press <SET> to enter them.
You can check how many characters you have entered, and how many more can be entered, by referring to [*/*] on the upper right of the screen.
- Switching to other input modes*
Select [

] at the lower right of the bottom area. Each time you press <SET>, the input mode changes. The input mode changes in the following order: lower-case characters > numbers/symbols > numbers/symbols > upper-case characters.
* When [Touch control: Disable] is set, you can enter all characters on one screen.
Press the <

> button to erase one character.
You can complete the text entry and return to the screen by tapping [OK]. If a confirmation screen is displayed, select [OK] to exit.
You can cancel the text entry and return to the screen by tapping [Cancel]. If a confirmation screen is displayed, select [OK] to exit.
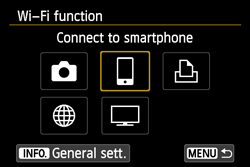
6. Select [

] (Connect to smartphone) and press <SET>.
- The camera’s <
 > lamp will blink.
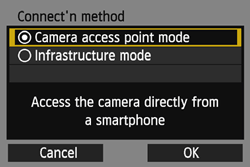
7. Press the <

> key to select [Camera access point mode], then press <SET>.
Select [OK] and press <SET> to go to the next screen.
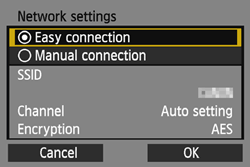
8. Press the <

> key to select [Easy connection], then press <SET>.
Select [OK] and press <SET> to go to the screen shown in step 9.
REFERENCE
When [Manual connection] Is Selected
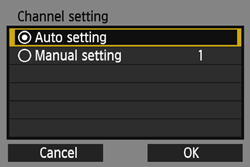
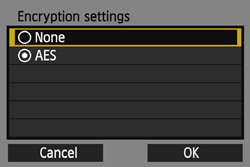
If you have selected [Manual connection] , set [SSID], [Channel setting], and [Encryption settings] on each screen displayed.
Enter any character using the virtual keyboard.
When you are finished, select [OK], then press <SET>.
- Select [Auto setting] and press <SET>.
Select [OK] and press <SET> to go to the next screen.
To select manually, select [Manual setting] and turn the <

> dial.
- Select [None] and press <SET>.
Select [OK] and press <SET>. The screen shown in step 9 will appear.
For encryption, select [AES], then enter any encryption key using the virtual keyboard.
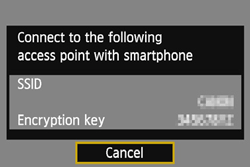
9. On the Wi-Fi settings menu of the smartphone, select the SSID (network name) displayed on the camera’s LCD monitor.
For the password, enter the encryption key displayed on the camera’s LCD monitor.
-> The next screen may be automatically displayed even when the operation on the smartphone is not completed.
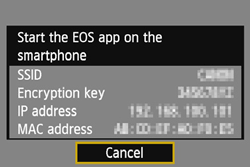
Do not press [Cancel] until you have completed the setting.
10. When the Wi-Fi settings are completed, start EOS Remote on the smartphone. Do not press [Cancel] until you have completed the setting.
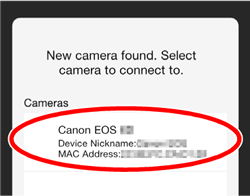
11. Select and touch the camera to connect to from [Cameras] on Camera Connect to establish a connection.
12. Connect to the camera.
Press the <

> key to select [OK], then press <SET>.
- To specify viewable images, press the <INFO.> button.
13. The camera's <

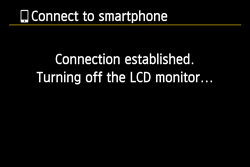
> lamp will light up in blue.
After the following message is displayed, the camera’s LCD monitor will turn off.
The settings for communicating with a smartphone are now complete.
Step 2: Sending images to the smartphone
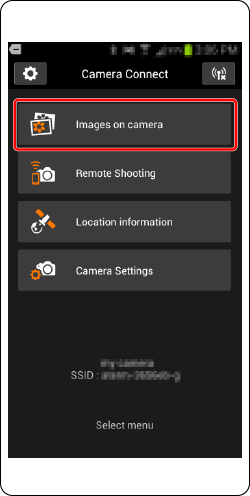
1. Select [Images on camera] from the Camera Connect main window on the smartphone.
2. Save images from the camera to the smartphone.
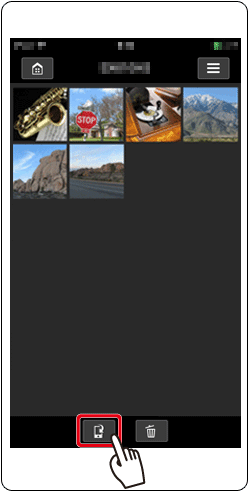
When the connection has been established, the images stored in the camera will be displayed in [Camera Connect] as shown in the example image below.
Tap the [

] button appearing at the bottom of the screen.
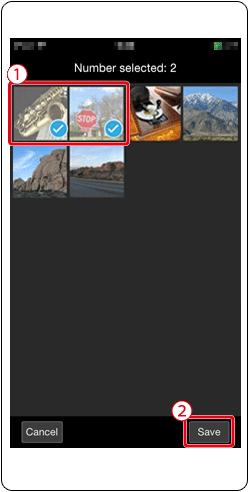
3. When the selection screen is displayed, choose the desired images

, and then tap [Save]

. The selected images will be saved to the smartphone.
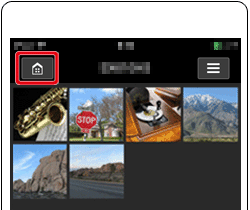
4. After the images have been saved, tap the home button in the top left of the screen to return to the menu.
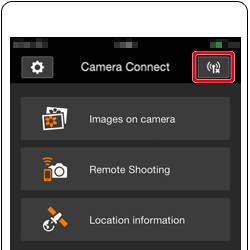
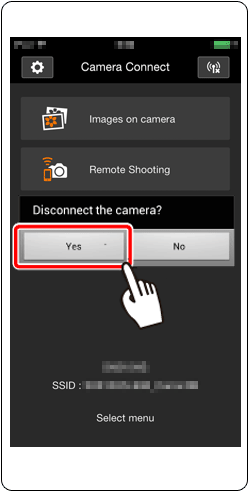
5. To end the connection, tap the [

] icon in the upper right of the screen, then tap [Yes] when the confirmation screen appears.
This concludes the procedure for sending images to a smartphone via a wireless LAN.
IMPORTANT
- When viewable images are specified, functions of Camera Connect will be limited.
- While connected, a picture cannot be taken even if the camera’s shutter button is pressed.
- Depending on the connection status, image display or shutter release may become slower than usual.
NOTE
- The connection will also be terminated if you set the power switch to [
 ], turn the Mode Dial, or open the card slot/battery compartment cover.
- When saving RAW images to a smartphone, they are saved as JPEG images.
- While connected, disabling the smartphone’s power saving function is recommended.
The camera cannot be connected via Wi-Fi using Camera Connect
The information registered to the smartphone for EOS Remote cannot be used for Camera Connect. Therefore, it will be necessary to re-register connection information for Camera Connect.
The procedures for making connections with Camera Connect are explained below.
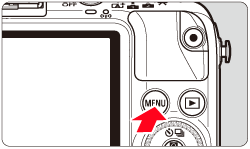
1. Press the <MENU> button to display the menu screen.
2. Under the [

] tab, select [Wi-Fi], then press <SET>.
3. Select [

] (Connect to smartphone) and press <SET>.
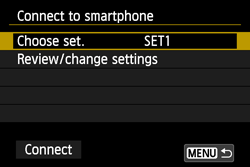
4. In [Choose set.] on the [Connect to smartphone] screen, select the settings to be used when connecting with EOS Remote.
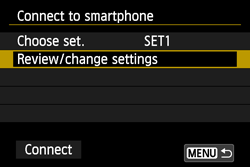
5. Select [Review/change settings] and press <SET>.
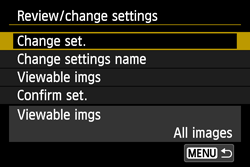
6. On the [Review/change settings] screen, select [Change set.] and press <SET>.
*Android™, and Google Play™ are trademarks of Google Inc.

 >: the Main Dial’s top, bottom, left, and right keys/ [
  ]: Set-up tab 2 / [
  ]: Connect to smartphone / <
 >: Main Dial

 > keys to select [Wi-Fi] under the [
  ] tab, then press <SET>.
 ] tab to [Disable].
 ], then press <SET>.

 > key in the top area.
 > or <
 > button to select characters and press <SET> to enter them.
 ] at the lower right of the bottom area. Each time you press <SET>, the input mode changes. The input mode changes in the following order: lower-case characters > numbers/symbols > numbers/symbols > upper-case characters.
 > button to erase one character.
 ] (Connect to smartphone) and press <SET>.
 > lamp will blink.
 > key to select [Camera access point mode], then press <SET>.
 > key to select [Easy connection], then press <SET>.
 > dial.
 > key to select [OK], then press <SET>.
 > lamp will light up in blue.
 ] button appearing at the bottom of the screen.
 , and then tap [Save]
  . The selected images will be saved to the smartphone.
 ] icon in the upper right of the screen, then tap [Yes] when the confirmation screen appears.
 ], turn the Mode Dial, or open the card slot/battery compartment cover.
 ] tab, select [Wi-Fi], then press <SET>.
 ] (Connect to smartphone) and press <SET>.
