Adjusting Picture Styles (EOS M3)
Solusi
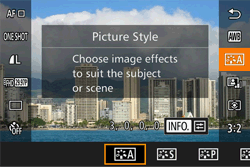
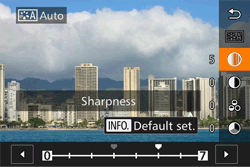
You can customize a Picture Style by adjusting individual parameters such as [Sharpness] and [Contrast]. To see the resulting effects, take test shots.
To change Picture Style values, follow the steps below.
1. Set the camera’s power to ON.

2. Press the [  ] button.
 ] button.

3. Press the [  ], [
], [  ] buttons to select [
  ], and then press the [
  ], [
], [  ] buttons to choose the desired picture style.
 ], [
], [  ] buttons to select [
  ], and then press the [
  ], [
], [  ] buttons to choose the desired picture style.

4. Press the [  ] button.
 ] button.
5. Press the [  ], [
], [  ] buttons to choose a setting, then press the [
  ], [
], [  ] buttons, or turn the [
  ] dial or [
  ] dial to choose the desired setting.
 ], [
], [  ] buttons to choose a setting, then press the [
  ], [
], [  ] buttons, or turn the [
  ] dial or [
  ] dial to choose the desired setting.
Press the [  ] button to undo any changes.
 ] button to undo any changes.
 Sharpness Sharpness | Adjusts the sharpness of the subject. Lower values produce softer (more blurred) effects; higher values produce sharper results. |
 Contrast Contrast | Adjusts the sharpness. Lower values produce weaker contrast; higher values produce stronger contrast. |
 Saturation * 1 Saturation * 1 | Adjusts the color saturation in the image. Lower values produce shallower colors; higher values produce deeper colors. |
 Tone * 1 Tone * 1 | Adjusts skin color tone. Lower values produce redder hues; higher values produce colors that are more yellow. |
 Filter Effect * 2 Filter Effect * 2 | Emphasizes white clouds in monochrome images, or the greens of trees. N: Normal black-and-white image with no filter effects. Ye: The blue sky will look more natural, and the white clouds will look crisper. Or: The blue sky will look slightly darker. Sunsets will look more brilliant. R: The blue sky will look quite dark. Fall leaves will look crisper and brighter. G: Skin tones and lips will appear muted. Green tree leaves will look crisper and brighter. |
 Tint * 2 Tint * 2 | The following monochrome colors can be selected: [N:None], [S:Sepia], [B:Blue], [P:Purple] or [G:Green]. |
 ] mode.
 *2 Only available in [
 ] mode.
 6. When finished, press the [  ] button.
 ] button.
REFERENCE
Press the [  ] button in step 5 to revert the Picture Style to its defaults.
 ] button in step 5 to revert the Picture Style to its defaults.
Increasing the [Contrast] will make the [Filter effect] more pronounced.
Basic styles like [  ] and [
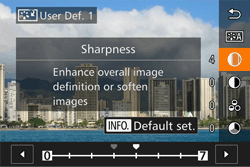
  ] can be adjusted to your liking and saved for later. You can save multiple Picture Styles with different settings for parameters such as sharpness and contrast.
 ] and [
  ] can be adjusted to your liking and saved for later. You can save multiple Picture Styles with different settings for parameters such as sharpness and contrast.
You can save a customized picture style after performing steps 1 through 3 above.
4. Select a Picture Style to save.
Follow the steps in the previous section to select [  ], [
], [  ] or [
  ].
].
 ], [
], [  ] or [
  ].
].
5. Select the base Picture Style.
Press the [  ] button.
 ] button.
Press the [  ], [
], [  ] buttons or turn the [
  ] dial or [
  ] dial to select the Picture Style that will serve as a base.
 ], [
], [  ] buttons or turn the [
  ] dial or [
  ] dial to select the Picture Style that will serve as a base.
REFERENCE
● In step 5, you can also select styles added to the camera using the EOS Utility software.
6. Adjust the style.
Press the [  ], [
], [  ] buttons to select the item to adjust, then press the [
  ], [
], [  ] or turn the [
  ] dial or [
  ] dial to adjust the item.
 ], [
], [  ] buttons to select the item to adjust, then press the [
  ], [
], [  ] or turn the [
  ] dial or [
  ] dial to adjust the item.
7. When finished, press the [  ] button.
 ] button.


