Solusi
Gradation refers to the dark to light continuum of shades of a color. The more shades in the gradations of colors that are printed, the more natural printouts seem. If color reproducibility becomes poor and the density and brightness of printouts differs markedly from the originals, perform the appropriate auto adjustment. Before adjusting the gradation, check the remaining toner level. Gradation adjustments require significant toner. There are three types of adjustments: Full Adjust, Quick Adjust, and Adjust Copy Image.
Fewer shades in the gradations
More shades in the gradations
NOTE
Adjustments may not be performed effectively if there is not sufficient toner.
This adjustment optimizes reproducibility for color printing. When the machine performs full adjustment, it obtains information to optimize color reproducibility. The machine maintains this information until the next time you perform full adjustment. For making full adjustment, an adjustment image will be printed twice and scanned twice. Note that you cannot perform this adjustment while performing some functions, including, scanning, and printing.
NOTE
This machine adjusts the toner and print speed according to the paper type. To make effective adjustments, select the correct paper type.
2. Tap <Adjustment/Maintenance>.
3. Tap <Auto Adjust Gradation>

<Full Adjust (Plain Paper 1/2)>, <Full Adjust (Plain Paper 3)>, or <Full Adjust (Heavy Paper)>.
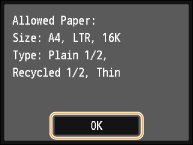
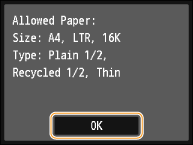
4. Check that the size and type of paper displayed on the screen is loaded in the machine, and tap <OK>.
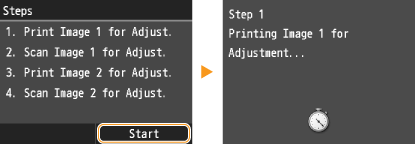
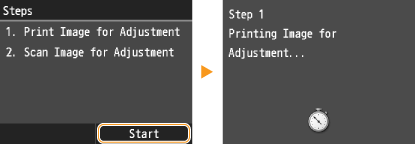
5. Confirm the procedure tap <Start>.
- Adjustment starts. In a few minutes, an adjustment image is printed.
6. Open the feeder after the screen displayed during printing disappears.
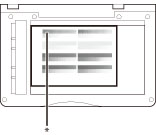
7. Place the adjustment image on the platen glass with the print side face down.
* Place the test page face down on the platen glass, with the black bar along the inner edge of the platen glass.
8. Gently close the feeder.
9. Press

.
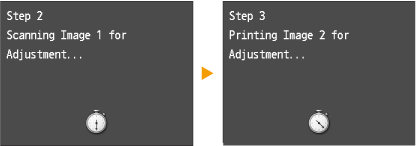
- The adjustment image is scanned and adjustment starts. In approximately 10 seconds, the second adjustment image is printed.
10. Open the feeder, remove the first adjustment image, and then place the second adjustment image on the platen glass with the print side face down.
* Place the test page face down on the platen glass, with the black bar along the inner edge of the platen glass.
11. Gently close the feeder.
12. Press

.
- The adjustment image is scanned and adjustment starts. In a few minutes, the adjustment is finished.
13. Open the feeder, and remove the second adjustment image.
14. Gently close the feeder.
NOTE
If the <Correction failed.> message is displayed
- Did you load the paper indicated on the screen in step 4 into the paper drawer?
- Did you place the adjustment image with the print side face down, with the black stripe toward the back side of the machine?
- Has a paper jam occurred?
- Is the amount of toner required for correction sufficient?
This adjustment maintains the optimized status that was acquired by <Full Adjust>. Note that you cannot perform this adjustment while performing some functions, including, scanning, and printing. If the result of this adjustment is not satisfactory, perform <Full Adjust>. This adjustment may be automatically performed after you replace a toner cartridge.
2. Tap <Adjustment/Maintenance>.
3. Tap <Auto Adjust Gradation>

<Quick Adjust>.
- Adjustment starts. In a few minutes, the adjustment is finished.
NOTE
You can set the machine to perform this adjustment automatically after the power is turned ON.
This adjustment improves the result of copies and printing from a USB memory device. For correcting copy images, an adjustment image will be printed and scanned. Note that you cannot perform this adjustment while performing some functions, including, scanning, and printing.
2. Tap <Adjustment/Maintenance>.
3. Tap <Auto Adjust Gradation>

<Adjust Copy Image>.
4. Check that the size and type of paper displayed on the screen is loaded in the machine, and tap <OK>.
5. Confirm the procedure, and tap <Start>.
- Adjustment starts. In a few minutes, an adjustment image is printed.
6. Open the feeder after the screen displayed during printing disappears.
7. Place the adjustment image on the platen glass with the print side face down.
* Place the test page face down on the platen glass, with the black bar along the inner edge of the platen glass.
8. Gently close the feeder.
9. Press

.
- The adjustment image is scanned and adjustment starts. In a few minutes, the adjustment is finished.
10. Open the feeder, and remove the adjustment image.
11. Gently close the feeder.
NOTE
If the <Correction failed.> message is displayed
- Did you load the paper indicated on the screen in step 4 into the paper drawer?
- Did you place the adjustment image with the print side face down, with the black stripe toward the back side of the machine?
- Has a paper jam occurred?
- Is the amount of toner required for correction sufficient?


 <Full Adjust (Plain Paper 1/2)>, <Full Adjust (Plain Paper 3)>, or <Full Adjust (Heavy Paper)>.
 .
.

 .
.

 <Quick Adjust>.

 <Adjust Copy Image>.

 .
.