Solusi
Follow the procedure below to register a Picture Style file in your camera.
1. Save the Picture Style file that you will register in your camera to your PC.
NOTE
There are two ways to prepare Picture Style files.
(1) Use the files that were installed along with Digital Photo Professional
(2) Create your own file using the Picture Style Editor software that came with your camera.
The steps will be explained here using a file from option (1) above. Note that the steps of operation are the same for files from option (2).
For information on how to use Picture Style Editor, please see the Picture Style Editor Instruction manual.
2. Connect your camera and computer using an interface cable.
3. Set the camera's power switch to <ON>, and set the mode dial to a Creative Zone mode (such as [P]).
IMPORTANT
If the camera's dial is set to a Basic Zone mode, you cannot register a Picture Style file to the camera.
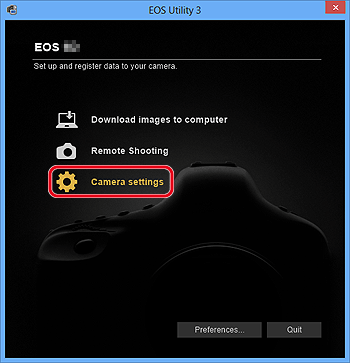
4. After starting EOS Utility Ver. 3.2, click [Camera settings].
5. Click [Register Picture Style File].
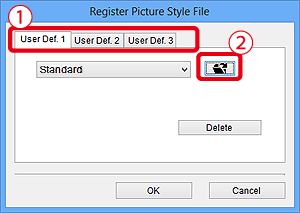
6. The [Register Picture Style File] dialog box appears.

. Select a tab from one of [User Def. 1] to [User Def. 3]. (The following example shows the procedure when [User Def. 1] has been selected.)
If you have already registered another Picture Style file with the same setting number, the previous setting will be overwritten.

. Click the

button.
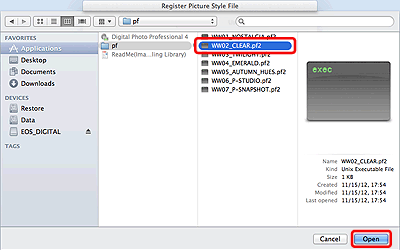
7. In the [Open] dialog box that appears, select the Picture Style file (with the ".pf2" extension) saved in the PC and click [Open].
Picture Style files are installed in different locations depending on the computer's OS.
- Windows: Computer > Windows (C:) > Program Files > Canon > Digital Photo Professional 4 > pf
- Mac OS X: Macintosh HD > Applications > Canon Utilities > Digital Photo Professional 4> pf
8. When the desired Picture Style is displayed, click [OK].
The Picture Style file is registered in the camera after the following steps are performed.
9. Set the camera’s power switch to [OFF], and then disconnect the interface cable from the camera and the computer.
10. Set the camera’s power switch to [ON] again.
11. Press the camera’s [MENU] button and select [Picture Style] in the menu to display the picture style selection screen.
- You can confirm that the Picture Style file registered with EOS Utility Ver. 3.2 is applied to [User Def. 1].
This completes to the process of registering a Picture Style file to your camera.


 . Select a tab from one of [User Def. 1] to [User Def. 3]. (The following example shows the procedure when [User Def. 1] has been selected.)
 . Click the
  button.


