Hiding information displayed on the screen during shooting (PowerShot G3 X)
Solusi
The following explains the method for hiding information displayed on the screen during shooting.
Customize what screen is displayed when you press the [ DISP.] button on the shooting screen.
NOTE
You can also customize what information is displayed.
1. Press the power button to turn the camera on.
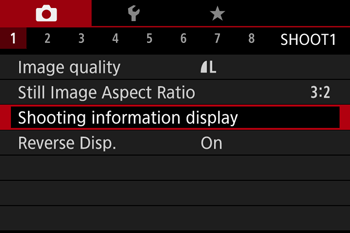
2. Press the [MENU] button.
3. Move the zoom lever to choose the [  ] tab.
 ] tab.
Press the [  ], [
], [  ] buttons to choose [
  ].
].
 ], [
], [  ] buttons to choose [
  ].
].Press the [  ], [
], [  ] buttons to choose [Shooting information display], and then press the [
  ] button.
 ], [
], [  ] buttons to choose [Shooting information display], and then press the [
  ] button.
4. Press the [  ], [
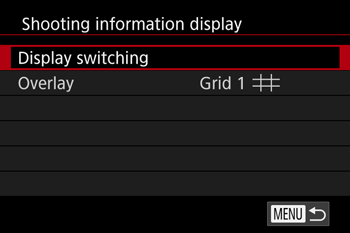
], [  ] buttons to choose [Display switching], and then press the [
  ] button.
 ], [
], [  ] buttons to choose [Display switching], and then press the [
  ] button.
5. Press the [  ], [
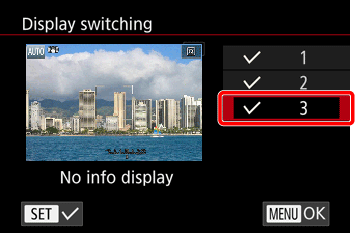
], [  ] buttons to choose [No info. display 3], and then press the [
  ] button to add a [
  ] mark.
 ], [
], [  ] buttons to choose [No info. display 3], and then press the [
  ] button to add a [
  ] mark.
6. Press the [MENU] button three times to return to the shooting screen.
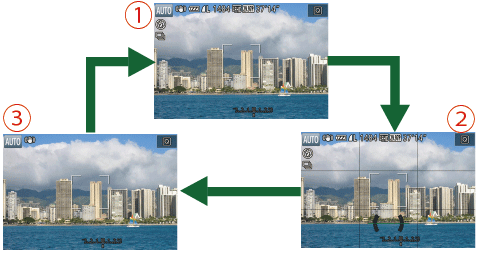
7. Press the [DISP.] button to switch display modes.

Each time you press the button, the display mode will change (see below).

 : Custom Display 1
 : Custom Display 2
 : No Display
REFERENCE
- Screen brightness is automatically increased by the night view function when you are shooting under low light, making it easier to check how shots are composed. However, on-screen image brightness may not match the brightness of your shots. Note that any on-screen image distortion or jerky subject motion will not affect recorded images.
This concludes the explanation for hiding information displayed on the screen during shooting.


