Solusi
If you set [

: Highlight tone priority ] in the [C.Fn II] menu to [1: Enable] on your camera, the settable ISO range will be limited to ISO 200-12800 (6400 during movie shooting), so "ISO 100" cannot be selected.
The [D+] icon will be displayed on the LCD panel and in the viewfinder when highlight tone priority is enabled.
To make the "ISO 100" or "H"(equivalent to ISO 25600 for still images or 12800 for movies) setting (ISO expansion), change the setting as follows.
Changing the [C.Fn II -3: Highlight tone priority] setting to [Disable]
IMPORTANT
The position and shape of the operation buttons may differ depending on the model you use.
1. Set the camera’s power switch to [ON].
2. Press the [MENU] button to display the menu screen.
3. Press the [

], [

] keys to select the

] tab.
4. Press the [

], [

] keys to select [Custom Functions (C.Fn)], then press [

].
5. Press the [

], [

] keys to select Custom Function [3:Highlight tone priority], then press [

].
6. Press the [

], [

] keys to select [Disable], and then press [

].
7. Press the shutter button halfway, and the camera will be ready for shooting.
Confirm that [D+], which indicates Highlight tone priority, is not displayed on the LCD monitor and in the viewfinder.
NOTE
About Highlight tone priority
- With setting [1: Enable], improves the highlight detail. The dynamic range is expanded from the standard 18% gray to bright highlights. The gradation between the grays and highlights becomes smoother.
- With setting [1: Enable], the Auto Lighting Optimizer is automatically set to [Disable] and the setting cannot be changed.
- With setting [1: Enable], noise (grainy image, banding, etc.) may become slightly more pronounced than with setting [0: Disable].
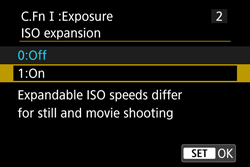
Changing the [C.Fn I -2: ISO expansion] setting to [On].
1. Press the [MENU] button to display the menu screen.
2. Press the [

], [

] keys to select the [

] tab.
3. Press the [

], [

] keys to select [Custom Function (C.Fn)], then press [

].
4. Press the [

], [

] keys to select Custom Function [2: ISO expansion], then press [

].
5. Press the [

], [

] keys to select [1: On], and then press [

].
6. Press the shutter button halfway, and the camera will be ready for shooting.
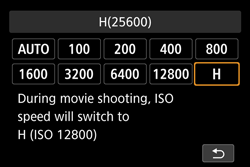
When you set the ISO speed, you will be able to set "H" (equivalent to ISO 25600 for still images or 12800 for movies).
NOTE
Note that if [C.Fn-3: Highlight tone priority] is set to [1: Enable], "H" cannot be set.
 : Highlight tone priority ] in the [C.Fn II] menu to [1: Enable] on your camera, the settable ISO range will be limited to ISO 200-12800 (6400 during movie shooting), so "ISO 100" cannot be selected.

 ], [
], [  ] keys to select the
  ] tab.
 ], [
], [  ] keys to select [Custom Functions (C.Fn)], then press [
  ].
].
 ], [
], [  ] keys to select Custom Function [3:Highlight tone priority], then press [
  ].
].
 ], [
], [  ] keys to select [Disable], and then press [
  ].
].


 ], [
], [  ] keys to select the [
  ] tab.
 ], [
], [  ] keys to select [Custom Function (C.Fn)], then press [
  ].
].
 ], [
], [  ] keys to select Custom Function [2: ISO expansion], then press [
  ].
].
 ], [
], [  ] keys to select [1: On], and then press [
  ].
].
