Compositing Images in Digital Photo Professional Ver.4.x
Solusi
You can combine two images into a single image. You can further combine images by adding another image to the composited image. Since the composited image is saved as a separate image, the original images remain as they are.
IMPORTANT
On 32-bit Windows OSs, this function is not available.
NOTE
- This function can be used with all image types supported by Digital Photo Professional.
- The color space of a composited image will be the color space of the background image.
- Image information is not appended to a composited image.
1. Select a background image in the main window.

2. Select the [Tools] menu -> [Start Compositing tool].
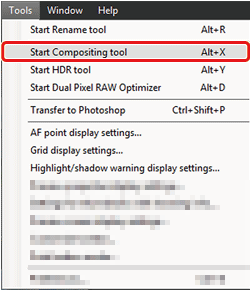
- The compositing tool window appears.
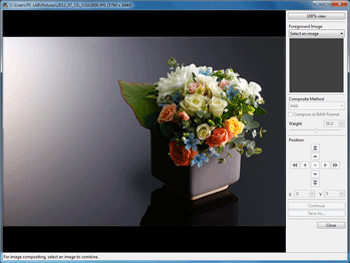
3. Select the image to combine.
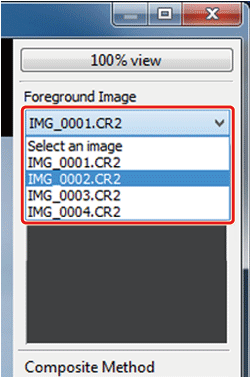
- Select the image to combine from the [Foreground Image] list box.
- The selected image is displayed in the [Foreground Image] thumbnail display.
- A preview of the combined background image and [Foreground Image] is displayed in the composite preview.
NOTE
- The following images can be combined.
- When a background image is selected in the main window: images in same folder as background image
- When a background image is selected in the [Collection] window: images in the [Collection] window
- When a background image is selected in the edit image window: images displayed in the thumbnail display area
- You can also combine images of different sizes.
4. Select a compositing method.
- Select a compositing method from the [Composite Method] list box.
- The compositing method selected in the composite preview is applied.
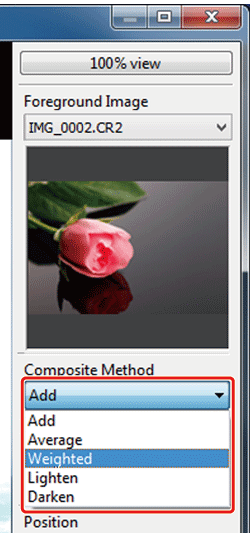
NOTE
- If you select [Weighted], you can set the proportion of the image to be combined. Use the [Weight] slider at the bottom of the [Composite Method] list box or directly enter a value to set the proportion.
- By clicking the [100% view], the image is displayed at 100% magnification (actual pixel size).
<Compositing Methods>
| Composite Method | Contents |
| Add | The background image and [Foreground Image] are added and images are combined. |
| Average | The background image and the [Foreground Image] are combined in proportions of 50% each. If you want to change the proportion of the [Foreground Image], select [Weighted]. |
| Weighted | Set the proportion of the [Foreground Image] and then combine the background image and [Foreground Image]. |
| Lighten | The background image and the [Foreground Image] are compared, with only brighter portions of the [Foreground Image] being combined. |
| Darken | The background image and the [Foreground Image] are compared, with only darker portions of the [Foreground Image] being combined. |
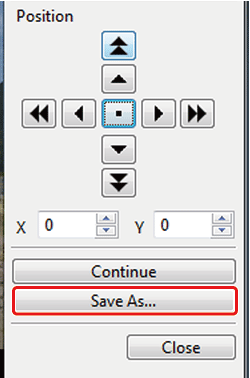
5. Position the images.
- By default, the background image and the [Foreground Image] are displayed with their centers aligned.
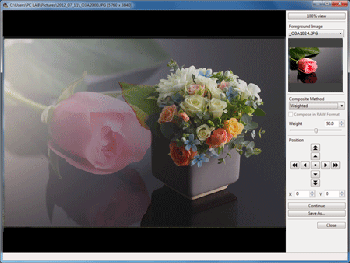
- [Compose in RAW Format] : Checkmark the [Compose in RAW Format] checkbox as necessary.
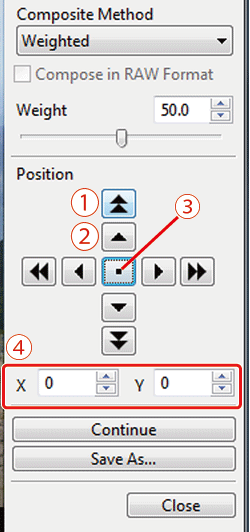
 Shift large amount (50 pixels)
 Shift small amount (1 pixel)
 Align image centers
 You can also directly enter the position coordinates of the [Foreground Image] to align it.
NOTE
1. You can set [Compose in RAW Format] under the following conditions. Both the background image and [Foreground Image] are RAW images, and all the following conditions are met.
- The cameras used to shoot were of the same model
- The ISO speed setting at the time of shooting was the same
- The highlight tone priority setting at the time of shooting was the same
- The image sizes (original size) are the same
2. The following functions are not available for images composited with [Compose in RAW Format].
- Auto Lighting Optimizer
- Picture Style Auto (automatically set to Standard)
6. Click the [Save As].
- Specify the required settings in the window that appears and then click the [Save].
- By clicking the [Continue], images are combined to create a new background image, and you can continue by combining another image.
- To finish, click the [Close].
