Solusi
This camcorder features 2-channel linear PCM audio recording and playback with a sampling frequency of 48 kHz. You can record audio using a commercially available external microphone (INPUT terminals, MIC terminal), analog line input (INPUT terminals) or the built-in stereo microphone.
Audio is not recorded during slow & fast motion recording mode.
Using the MIC Terminal / Built-in Microphone while the Microphone Adapter is Attached
To use an external microphone connected to the MIC terminal or use the built-in microphone while the supplied microphone adapter is attached to the camcorder, follow the procedure below to deactivate the INPUT terminals.
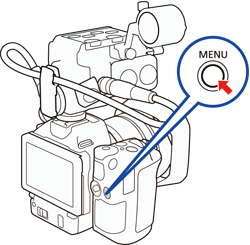
1. Press the [MENU] button.
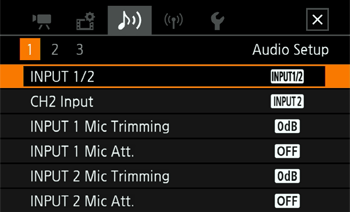
2. Touch [

: Audio Setup ] -> [INPUT 1/2].
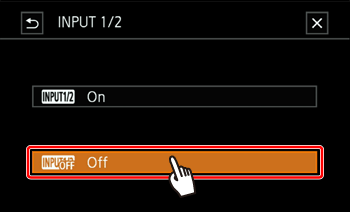
3. Select [

: Off].
REFERENCE
- Select [
 : On ] to reactivate the INPUT terminals.
4. touch [

].
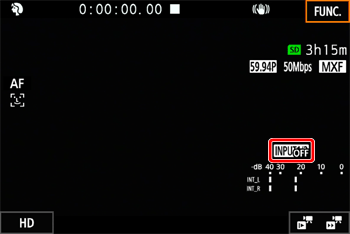
5. [

] will appear on the bottom right of the screen.
Using the INPUT 1/INPUT 2 Terminals
When the supplied microphone adapter is attached to the camcorder, you can use the INPUT terminals to record audio independently to two audio channels from a microphone or analog audio input source.
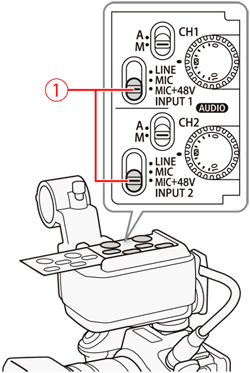
1 : To select the audio source, set the INPUT 1 or INPUT 2 switch (

) to LINE or MIC as necessary.
IMPORTANT
- To supply a microphone with phantom power, set the switch to MIC+48V instead. Make sure to connect the microphone first, before turning the phantom power on. Keep the microphone connected when turning off the phantom power.
- When using the INPUT terminals to record to only one channel, use the INPUT 1 terminal.
CAUTION
- When connecting a microphone or device that does not support phantom power, make sure to set the corresponding INPUT switch to MIC or LINE, respectively. If you set the switch to MIC+48V, the microphone or device may be damaged.
2 : Recording a Single Audio Input to Two Audio Channels (INPUT Terminals)
By default, each audio input is recorded to a separate audio channel (INPUT 1 to CH1 and INPUT 2 to CH2). If necessary (for example, as an audio backup recording), you can record the audio input into the INPUT 1 terminal to both audio channels, CH1 and CH2. In that case, you can adjust the audio recording levels of each channel independently of each other.
2-1. Press the [MENU] button.
2-2. Touch [

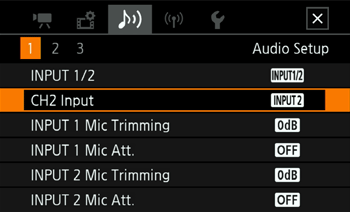
: Audio Setup ] -> [CH2 Input].
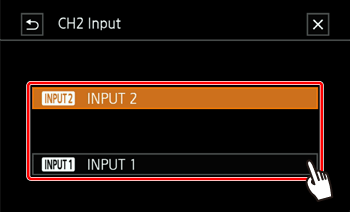
2-3. Select the desired option.
IMPORTANT
- [
 INPUT 2] : Records audio to each channel separately. Audio input into INPUT 1 is recorded to CH1, while audio input into INPUT 2 is recorded to CH2.
- [
 INPUT 2] : Audio input into INPUT 1 is recorded to both channels. Audio input into INPUT 2 will not be recorded.
2-4. Touch [

].
Audio Recording Level (INPUT Terminals)
You can set the audio recording level for audio input from the INPUT terminals to automatic or manual level, independently for each channel.
1 : Automatic Audio Level Adjustment
- Set the audio level switch (
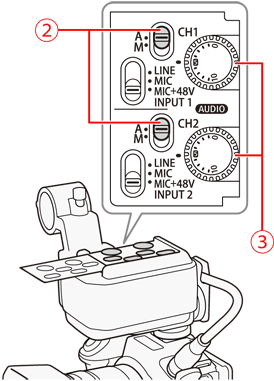
 ) of the desired channel to A (automatic) to let the camcorder automatically adjust that channel's audio level.
NOTE
- When both CH1 and CH2 are set to the same audio source (external microphone or external line input), if the audio level is set to automatic, you can use the [
 : Audio Setup] -> [INPUT 1/2 ALC Link] setting to link the audio level adjustment of both channels.
2 : Manual Audio Level Adjustment
- You can set the audio level for each channel manually from -∞ to +18 dB.
2-1. Set the audio level switch (

) of the desired channel to M (manual).
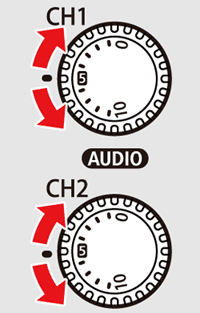
2-2. Turn the corresponding [

] dial (

) to adjust the audio level.
REFERENCE
- For reference, the 0 corresponds to -∞, 5 corresponds to 0 dB, and 10 corresponds to +18 dB.
- As a guideline, adjust the audio recording level so that the audio level meter on the screen will go to the right of the –18 dB mark (one mark right of the –20 dB mark) only occasionally.
NOTE
- If at least one of the channels is set to manual audio level adjustment, you can also activate the audio peak limiter to prevent audio distortions. When activated, the audio peak limiter will limit the amplitude of audio input signals when they exceed approximately –6 dBFS. Use the [
 : Audio Setup] -> [INPUT 1/2 Limiter] setting.
- We recommend using headphones when adjusting the audio level. If the input level is too high, audio may become distorted even if the audio level indicator shows an appropriate level.
- When the audio level meter reaches the red point (0 dB), the sound may be distorted.
- If the sound is distorted even though the audio level indicator shows an appropriate level, activate the microphone attenuator.
- We recommend using headphones to check the sound level while adjusting the audio recording level or when the microphone attenuator is activated.
3 : Adjusting the Microphone's Sensitivity (INPUT Terminals)
- When the INPUT 1 or INPUT 2 switch is set to MIC or MIC+48V, you can select the external microphone's sensitivity.
3-1. Press the [MENU] button.
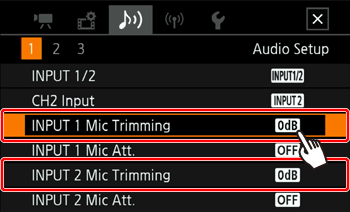
3-2. Touch [

: Audio Setup ] -> [INPUT 1 Mic Trimming] or [INPUT 2 Mic Trimming].
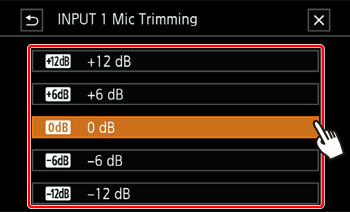
3-3. Select the desired option.
REFERENCE
- You can select one of 5 sensitivity levels from –12 dB to +12 dB.
3-4. Touch [

].
4 : Activating the Microphone's Attenuator (INPUT Terminals)
- When the INPUT 1 or INPUT 2 switch is set to MIC or MIC+48V, you can activate the external microphone’s attenuator (20 dB).
4-1. Press the [MENU] button.
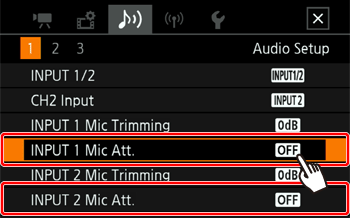
4-2. Touch [

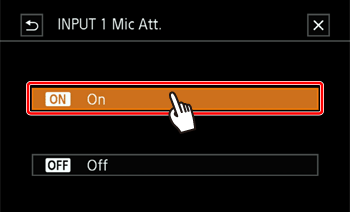
: Audio Setup ] -> [INPUT 1 Mic Att.] or [INPUT 2 Mic Att.].
4-3. Select the desired option.
4-4. Touch [

].
Audio Recording Level (MIC Terminal/Built-in Microphone)
You can adjust the audio recording level of the built-in microphone or an external microphone connected to the MIC terminal.
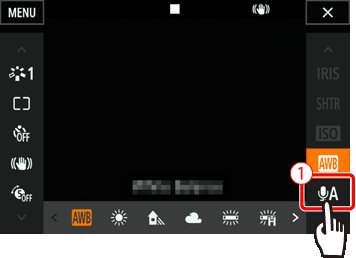
1. Touch [

].
2. Touch [

] : Mic Level ].
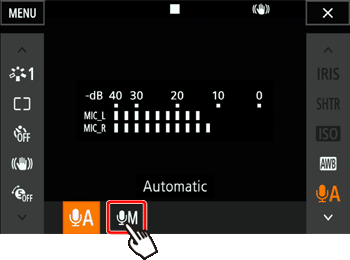
3. Touch [

: Manual ] to set the audio recording level to manual.
REFERENCE
- Touch [
 : Automatic ] instead to return the camcorder to automatic audio recording level.
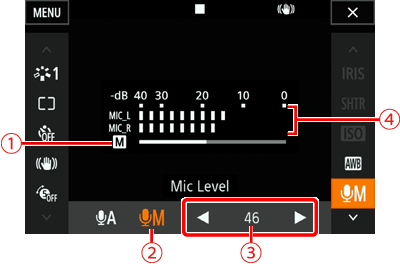
4. Touch [

] to adjust the audio recording level.

: Audio level adjustment bar

: Manual audio level adjustment

: Current audio recording level

: Audio level indicator
- As a guideline, adjust the audio recording level so that the audio level meter will go to the right of the -10 dB mark only occasionally.
5. Touch [

].
NOTE
- When the audio level meter reaches the red point (0 dB), the sound may be distorted.
- We recommend using headphones to check the sound level while adjusting the audio recording level or when the microphone attenuator is activated.
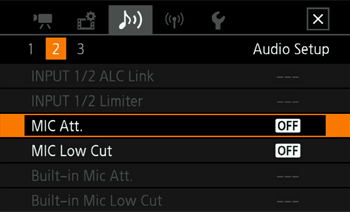
Microphone Attenuator (MIC Terminal)
You can activate the microphone attenuator (20 dB) for a microphone connected to the MIC terminal to prevent audio from being distorted if the audio level is too high.
1. Press the [MENU] button.
2. Touch [

: Audio Setup ] -> [MIC Att.].
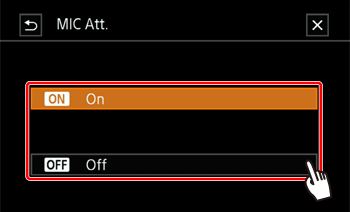
3. Select the desired option.
NOTE
- [
 On ] : he microphone attenuator will be activated at all times to reproduce more faithfully the sound dynamics.
- [
 Off ] : The microphone attenuator will be deactivated at all times.
4. Touch [

].
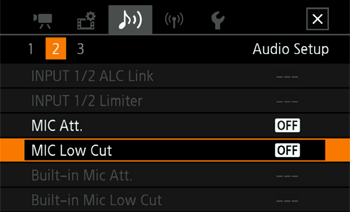
Low-Cut Filter (MIC Terminal)
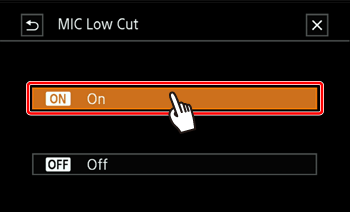
When you are recording using a microphone connected to the MIC terminal, you can activate the low-cut filter to reduce the sound of blowing wind, a car’s engine and similar ambient sounds.
1. Press the [MENU] button.
2. Touch [

: Audio Setup ] -> [MIC Low Cut].
3. Select the desired option.
4. Touch [

].
 : Audio Setup ] -> [INPUT 1/2].
 : Off].
 : On ] to reactivate the INPUT terminals.
 ].
]. ] will appear on the bottom right of the screen.
 ) to LINE or MIC as necessary.

 : Audio Setup ] -> [CH2 Input].
 INPUT 2] : Records audio to each channel separately. Audio input into INPUT 1 is recorded to CH1, while audio input into INPUT 2 is recorded to CH2.
 INPUT 2] : Audio input into INPUT 1 is recorded to both channels. Audio input into INPUT 2 will not be recorded.
 ].
].
 ) of the desired channel to A (automatic) to let the camcorder automatically adjust that channel's audio level.
 : Audio Setup] -> [INPUT 1/2 ALC Link] setting to link the audio level adjustment of both channels.
 ) of the desired channel to M (manual).
 ] dial (
 ) to adjust the audio level.
 : Audio Setup] -> [INPUT 1/2 Limiter] setting.
 : Audio Setup ] -> [INPUT 1 Mic Trimming] or [INPUT 2 Mic Trimming].
 ].
].
 : Audio Setup ] -> [INPUT 1 Mic Att.] or [INPUT 2 Mic Att.].
 ].
]. ].
].
 ] : Mic Level ].
 : Manual ] to set the audio recording level to manual.
 : Automatic ] instead to return the camcorder to automatic audio recording level.
 ] to adjust the audio recording level.
 : Audio level adjustment bar
 : Manual audio level adjustment
 : Current audio recording level
 : Audio level indicator
 ].
].
 : Audio Setup ] -> [MIC Att.].
 On ] : he microphone attenuator will be activated at all times to reproduce more faithfully the sound dynamics.
 Off ] : The microphone attenuator will be deactivated at all times.
 ].
].
 : Audio Setup ] -> [MIC Low Cut].
 ].
].