


Registering Destinations for One-Touch Dial
Solusi
You can conveniently register frequently used destinations for One-Touch Dial. Destinations can be quickly displayed by tapping One-Touch buttons in the <Home> Screen. You can edit or delete destinations that you have registered. You can register up to 4 destinations for One-Touch Dial.
NOTE
- E-mail addresses can be registered as destinations on the MF249dw / MF246dn only.
1. Press  and tap <Addr. Book>.
and tap <Addr. Book>.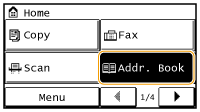
2. Tap <Regist Dest.>.
- If a screen appears prompting you to enter a PIN, enter the correct PIN using the numeric keys, and tap <Apply>. For details, see the "User's Guide" from the Canon website (canon.com/oip-manual).
3. Select <One-Touch>  Select type of address to register.
Select type of address to register.
- According to the address being registered, tap <Fax>/<E-Mail>.
4. Tap the number to register.
- You can change this number to another number later.
5. Tap <Name>.
- Registering <Name> is optional. If you register <Name>, the destination can be searched alphabetically.
6. Enter the name using the numeric keys and tap <Apply>.
7. Tap <Fax Number> or <E-Mail Address>.
8. Enter the destination using the numeric keys and tap <Apply>.
 Making detailed settings (only when registered for fax)
After tapping <Details>, a screen similar to the following is displayed.
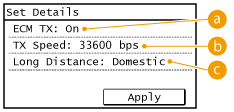
 <ECM TX>
- If an error occurs in an image that is being sent, the error is checked and corrected to prevent an improper image from being sent when setting <On>.
 <TX Speed>
- If it takes time for transmissions to start, such as when there is a poor telephone connection, you can adjust the transmission start speed downward incrementally starting from "33600 bps".
 <Long Distance>
- Specify <International (1) > to <International (3)> according to the transmission conditions when registering overseas fax numbers.
NOTE
You can also make detailed settings for destinations from <Menu> <Fax Settings>. However, settings made from <Addr. Book> are enabled for the detailed settings of destinations registered in the Address Book.
<Fax Settings>. However, settings made from <Addr. Book> are enabled for the detailed settings of destinations registered in the Address Book.9. Tap <Apply>.

After registering destinations, you can change the content of registered information. For example, you can change the fax number or name of a registered destination, change the type from fax number to e-mail, change the numbers registered to One-Touch Dial, and so on.
1. Press and tap <Addr. Book>.
and tap <Addr. Book>.2. Tap <Details/Edit>.
3. Select < > using
  /
/  , and tap the destination you want to change.
> using / , and tap the destination you want to change.4. Tap <Edit>.
- If a screen appears prompting you to enter a PIN, enter the correct PIN using the numeric keys, and tap <Apply>. For details, see the "User's Guide" from the Canon website (canon.com/oip-manual).
5. Tap the item you want to edit, perform editing, and then tap <Apply>.
6. Tap <Apply>.
1. Press and tap <Addr. Book>.
and tap <Addr. Book>.2. Tap <Details/Edit>.
3. Select <> using / , and tap the destination you want to delete.
> using / , and tap the destination you want to delete.4. Tap <Delete>.
- If a screen appears prompting you to enter a PIN, enter the correct PIN using the numeric keys, and tap <Apply>. For details, see the "User's Guide" from the Canon website (canon.com/oip-manual).
5. Tap <Yes>.