Solusi
You can save images from the camera to a smartphone using the following methods.
- Connecting via Bluetooth*
When you connect the camera to a Bluetooth-compatible smartphone via Bluetooth, you can establish a Wi-Fi connection by operating only the camera or the smartphone.
Note that pairing between the camera and smartphone is required to connect the camera to a smartphone via Bluetooth. Pairing will be done as part of the Bluetooth connection procedure.
*This camera is Bluetooth 4.1 (Bluetooth low energy technology) compliant. To connect, your smartphone must be compatible with Bluetooth low energy technology.
- Connecting via NFC
NFC-compatible smartphones can be connected via Wi-Fi by touching them to the camera.
- Connecting with the <

> button
You can establish a Wi-Fi connection by displaying the Wi-Fi function menu with the <

> button.
In some steps below, the example screen images are shown for both EOS 77D (on the left) and EOS Rebel T7i/EOS 800D (on the right).
IMPORTANT
- Before connecting to the camera, you must install the dedicated application Camera Connect (free of charge) on the smartphone.
- Make sure that the smartphone's Wi-Fi function is on.
Preparation: Installing Camera Connect on a Smartphone
To communicate with a smartphone, the dedicated smartphone application Camera Connect (free of charge) is necessary.
- Camera Connect can be downloaded from the App Store or Google Play. Install Camera Connect on the smartphone and then perform the procedures to establish the connection.
- To use Camera Connect, a smartphone on which iOS or Android installed is necessary.
- When an NFC-enabled smartphone on which Camera Connect is not installed is touched to the camera, the download screen of Camera Connect will be displayed on the smartphone.
IMPORTANT
- Please refer to the "Related information" section at the bottom of this page for specifications and system requirements of the smartphones which can be connected wirelessly.
- Interface or functions of Camera Connect are subject to change, for application improvement or update. In such a case, features of Camera Connect may differ from sample screens or operation instructions in this explanation.
Step 1: Basic Camera Settings
Configure necessary settings before using the wireless LAN functions of the camera.
1. Turn on the camera.
- Set the camera's power switch to <ON>.
2. Press the <

> button.
3. Select [Wi-Fi settings].
6. When the screen below appears, press <

>.
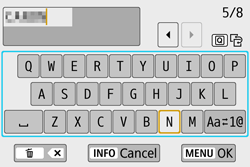
7. Enter the nickname. You can enter any characters between 1 to 8 characters in length.
When you finish entering, press the <MENU> button.
*For more information on using the keyboard, please refer to "Additional Information: Using the Virtual Keyboard".
NOTE
When making Wi-Fi settings for the first time, a screen will appear for you to register a nickname for the camera (for identification).
This nickname will be displayed on the screen of target devices when connecting to other devices via Wi-Fi. Be sure to set a nickname as otherwise you cannot go to the wireless LAN settings screen.
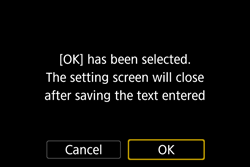
8. When the following screen appears, select [OK], and then press <

>.
To return to the screen that appears when the <

> button is pressed, press the <MENU> button.
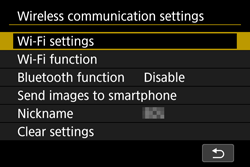
9. The [Wireless communication settings] screen will appear.
This concludes the explanation for basic camera settings.
Depending on the connection method, choose one of the following and proceed to:
- Step 2-A: Connecting via Bluetooth
- Step 2-B: Connecting via NFC
- Step 2-C: Connecting with the Wi-Fi Button
Step 2-A: Connecting via Bluetooth
IMPORTANT
- This camera is Bluetooth 4.1 (Bluetooth low energy technology) compliant. To connect, your smartphone must be compatible with Bluetooth low energy technology.
- Pairing is not possible while shooting with the camera.
- The camera cannot be connected to two or more devices at the same time via Bluetooth.
- Bluetooth connection consumes battery power even after the camera’s auto power off has activated. Therefore, the battery level may be low when you use the camera.
2-A-1. Select [Bluetooth function].
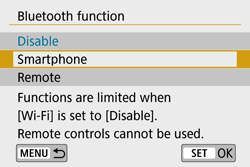
2-A-2. Select [Bluetooth function].
2-A-3. Select [Smartphone].
NOTE
In the case of EOS 77D, <

> will be displayed on the camera’s LCD panel.
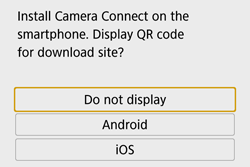
2-A-5. Select [Do not display].
2-A-6. Activate the smartphone’s Bluetooth function, then start Camera Connect.
2-A-7. Select the camera to pair with.
- Tap on the nickname of the camera to be paired.
- iOS: When the screen below appears, tap on [Pair].
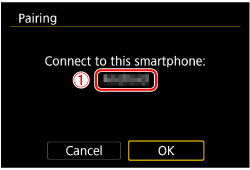
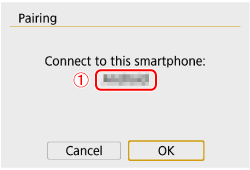
2-A-8. Select [OK].

: The device name set on Camera Connect
2-A-9. Press <

>.
Pairing will complete and the camera will be connected to the smartphone via Bluetooth.
Proceed to "Step 3-A: Sending Images to a Bluetooth-compatible Smartphone".
Step 2-B: Connecting via NFC
IMPORTANT
- The camera cannot be connected via Wi-Fi to two or more smartphones at the same time.
- When touching the smartphone to the camera, be careful not to drop the camera or smartphone.
- Do not touch the smartphone to the camera with too much force. Doing so can scratch the camera or smartphone.
- Just holding the smartphone close to the camera may not establish a connection. Be sure to touch the camera with the smartphone so that they come into contact with each other.
- Recognition may be difficult depending on the smartphone. Touch slowly while changing the position or rotating horizontally. If connection is not established, keep the camera and smartphone together until the camera screen is updated.
- Another application on the smartphone may start depending on how you touch. Check the position of the
 mark, then touch again.
- When touching the smartphone to the camera, do not leave anything between the camera and smartphone. In addition, when a case is attached to the camera or smartphone, Wi-Fi connection with the NFC function may not be possible.
- A Wi-Fi connection cannot be established with the NFC function between this camera and a smartphone while they are connected via Bluetooth.
- To connect this camera to an NFC-compatible smartphone via Wi-Fi, the smartphone’s Wi-Fi and NFC functions must be enabled.
- A Wi-Fi connection cannot be established with the NFC function between this camera and another NFC-compatible device such as a camera or printer.
- A Wi-Fi connection cannot be established with the NFC function while shooting with this camera, when there is no card, when the LCD monitor is closed with the screen facing inward, or while the camera is connected to another device with an interface cable.
2-B-1. Enable the NFC function on the camera and smartphone.
When a message indicating the connection is being established is displayed on the camera’s LCD monitor, move the smartphone away from the camera.
Camera Connect starts on the smartphone and establishes a connection.
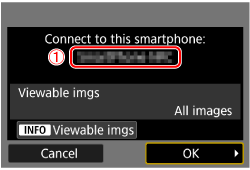
2-B-3. When a connection is established, the screen below will appear on the camera’s LCD monitor.
Select [OK] and press <

>.

: The device name set on Camera Connect
2-B-4. After a message is displayed, the [

Wi-Fi on] screen will appear.
NOTE
If the camera screen switches to another one during the smartphone operation procedures, press the <

> button to go back to the [

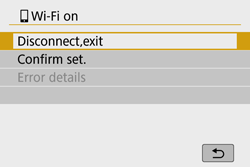
Wi-Fi on] screen.
Proceed to "Step 3-B: Viewing and Saving Images with a Smartphone".
Step 2-C: Connecting with the Wi-Fi Button
2-C-1. Select [Wi-Fi function].
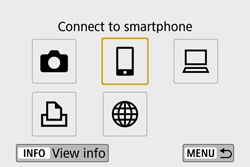
2-C-2. Select [

] (Connect to smartphone).
2-C-3. Select [Register a device for connection].
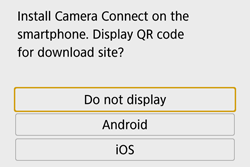
2-C-4. Select [Do not display].
2-C-5. Check the SSID and password.
- Check the SSID (network name) (
 ) and password (
  ) displayed on the camera’s LCD monitor.
- In [Wi-Fi settings], if you set [Password] to [None], the password will not be displayed or required.
NOTE
"_Canon0A" is displayed at the end of the SSID.
2-C-6. Operate the smartphone to establish a Wi-Fi connection.
- Activate the smartphone’s Wi-Fi function, then select the SSID (network name) (
 ) checked in step 2-C-5.
- For the password, enter the password (
 ) checked in step 2-C-5.
2-C-7. When the [Waiting to connect] screen is displayed on the camera’s LCD monitor, start Camera Connect on the smartphone.
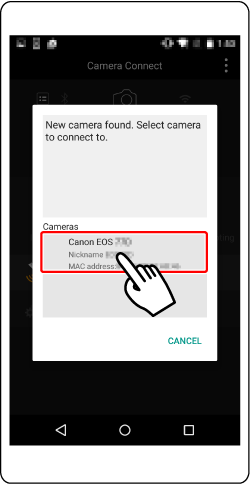
2-C-8. Select and tap on the camera to connect to via Wi-Fi from [Cameras] on Camera Connect.
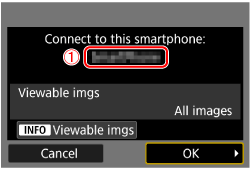
2-C-9. When a connection is established, the screen below will appear on the camera’s LCD monitor.
Select [OK] and press <

>.

: The device name set on Camera Connect
2-C-10. After a message is displayed, the [

Wi-Fi on] screen will appear.
NOTE
If the camera screen switches to another one during the smartphone operation procedures, press the <

> button to go back to the [

Wi-Fi on] screen.
Proceed to "Step 3-B: Viewing and Saving Images with a Smartphone".
Step 3-A: Sending Images to a Bluetooth-compatible Smartphone
3-A-1. Touch [Images on camera] in Camera Connect.
- Android: When you select [Images on camera] in Camera Connect, a Wi-Fi connection will be automatically established.
- iOS: On the smartphone’s Wi-Fi function screen, select the SSID (network name) and password displayed on the camera to establish a connection.
3-A-2. The [

Wi-Fi on] screen will appear.
NOTE
If the camera screen switches to another one during the smartphone operation procedures, press the <

> button to go back to the [

Wi-Fi on] screen.
3-A-3. Operate the smartphone to send images stored in the camera to the smartphone.
When a list of images in the camera appears on the smartphone, tap [Select] on the upper right of screen.
3-A-4. When the selection screen appears, choose the desired images (

), and then touch [Save] [

] (

). The selected images will be saved to the smartphone.
3-A-5. After the images have been sent, touch [

] on the top right, then touch [

] on the upper left of the screen to return to the menu.
3-A-6. To end the connection, touch the [

] icon on the upper right of the screen, then tap [Yes] when the confirmation screen appears.
NOTE
- To terminate the Wi-Fi connection, perform either of the following operations.
- On the smartphone’s Camera Connect screen, tap on [

].
- On the camera’s [

Wi-Fi on] screen, select [Disconnect, exit].
- Terminating the Wi-Fi connection will switch the camera to the Bluetooth connection.
- You can check the Bluetooth communication status on the Camera Connect screen.
IMPORTANT
- With a Wi-Fi connection to a smartphone established, certain functions are unavailable.
- Depending on the communication status, image display may be delayed.
- When saving images to a smartphone, you cannot take a picture even if you press the camera’s shutter button. Also, the camera’s LCD monitor may turn off.
NOTE
- The Wi-Fi connection will be terminated if you set the camera’s power to <OFF> or open the card slot cover or battery compartment cover.
- RAW images cannot be saved to a smartphone. When a RAW image is selected, it will be saved as a JPEG image.
- With a Wi-Fi connection established, the camera’s auto power off does not function.
- With a Wi-Fi connection established, disabling the smartphone’s power saving function is recommended.
Step 3-B: Viewing and Saving Images with a Smartphone
3-B-1. Touch [Images on camera] in Camera Connect.
3-B-2. Use the smartphone to import images from the camera to the smartphone.
When a list of images in the camera appears on the smartphone, tap [Select] on the upper right of the screen.
3-B-3. When the selection screen appears, choose the desired images (

), and then touch [

] (

) on the bottom right of the screen. The selected images will be saved to the smartphone.
3-B-4. After the images have been saved, touch [

] on the top right, and then touch [

] on the upper left of the screen to return to the menu screen.
3-B-5. To end the connection, touch the [

] icon on the upper right of the screen, and then tap [YES] when the confirmation screen appears.
*Android™, and Google Play™ are trademarks of Google Inc.
Additional Information: Using the Virtual Keyboard
The following section describes how to set the camera’s nickname using the virtual keyboard.
The nickname can be changed later from the [Wireless communication settings] screen.
| Changing the entry area | Press the <  > button to toggle between the top and bottom entry areas. > button to toggle between the top and bottom entry areas. |
| Moving the cursor | Press the <  > < > <  > keys in the top area to move the cursor. > keys in the top area to move the cursor. |
| Entering text | In the bottom area, press the <  > < > <  > or < > or <  > < > <  > keys to select a character, then press < > keys to select a character, then press <  > to enter it. > to enter it.
You can check how many characters you have entered and how many more can be entered by referring to [*/*] on the upper right of the screen. |
| Changing the entry mode* | Select [  ] at the bottom right of the bottom entry area. Each time you press < ] at the bottom right of the bottom entry area. Each time you press <  >, the entry mode will change as follows: Lower case > Numerals / Symbols 1 > Numerals / Symbols 2 > Upper case. >, the entry mode will change as follows: Lower case > Numerals / Symbols 1 > Numerals / Symbols 2 > Upper case.
* When [Touch control: Disable] is set, you can enter all characters on one screen. |
| Deleting a character | Press the <  > button to delete one character. > button to delete one character. |
| Finishing the text entry | Press the < MENU > button to confirm what you have entered and exit. If a confirmation dialog is displayed, select [OK] to exit. |
| Canceling the text entry | Press the < INFO > button to cancel text entry and exit. If a confirmation dialog is displayed, select [OK] to exit. |
 > button
 > button.
 > button.


 >.
>.


 >.
>. > button is pressed, press the <MENU> button.



 > will be displayed on the camera’s LCD panel.




 : The device name set on Camera Connect
 >.
>.

 mark, then touch again.

 > button to end the playback.
 mark on the smartphone to that on the camera so that they come into contact with each other.
 mark are NFC-compatible.
 mark. In such a case, check the NFC antenna position by referring to the smartphone’s instruction manual.

 >.
>.

 : The device name set on Camera Connect
 Wi-Fi on] screen will appear.
 > button to go back to the [
  Wi-Fi on] screen.

 ] (Connect to smartphone).


 ) and password (
  ) displayed on the camera’s LCD monitor.

 ) checked in step 2-C-5.
 ) checked in step 2-C-5.

 >.
>.

 : The device name set on Camera Connect
 Wi-Fi on] screen will appear.

 > button to go back to the [
  Wi-Fi on] screen.
 Wi-Fi on] screen will appear.

 > button to go back to the [
  Wi-Fi on] screen.
 ), and then touch [Save] [
  ] (
] (  ). The selected images will be saved to the smartphone.
 ] on the top right, then touch [
  ] on the upper left of the screen to return to the menu.


 ] icon on the upper right of the screen, then tap [Yes] when the confirmation screen appears.


 ].
]. Wi-Fi on] screen, select [Disconnect, exit].


 ), and then touch [
  ] (
] (  ) on the bottom right of the screen. The selected images will be saved to the smartphone.
 ] on the top right, and then touch [
  ] on the upper left of the screen to return to the menu screen.


 ] icon on the upper right of the screen, and then tap [YES] when the confirmation screen appears.


 > button to toggle between the top and bottom entry areas.
 > <
> <  > keys in the top area to move the cursor.
 > <
> <  > or <
  > <
> <  > keys to select a character, then press <
  > to enter it.
 ] at the bottom right of the bottom entry area. Each time you press <
  >, the entry mode will change as follows: Lower case > Numerals / Symbols 1 > Numerals / Symbols 2 > Upper case.
 > button to delete one character.