


Sending Images from a Camera to an iPhone (EOS M200)
Solusi
Send images to a smartphone as follows.
- Connecting to a Bluetooth-compatible Smartphone via Wi-Fi
By connecting to a Bluetooth-compatible smartphone via Bluetooth in advance, you can connect via Wi-Fi simply by performing an operation on the camera or smartphone.
- Wi-Fi Connection Without Using Bluetooth
You can use Wi-Fi to connect to a smartphone that is not compatible with Bluetooth or a smartphone that cannot use its Bluetooth function.
IMPORTANT
- Before connecting to the camera, you must install the free dedicated Camera Connect app on the smartphone.
- Please refer to "Related information" for details on the smartphones which can be connected with a camera wirelessly.
- Camera Connect can be installed from the App Store. You can also access the App Store from a QR code that you can display on the camera when registering the smartphone on the camera.
- Use the latest version of the smartphone OS.
- Activate Bluetooth and Wi-Fi on the smartphone. Note that pairing with the camera is not possible from the smartphone's Bluetooth settings screen.
*Bluetooth low energy technology (hereafter referred to as "Bluetooth")
NOTE
- In the following explanation, smartphone setting procedures are indicated by the
 icon, and camera setting procedures are indicated by the
  icon.
icon. - For convenience, smartphones, tablets, and other compatible devices are collectively referred to as "smartphones".
1. Confirm the smartphone's settings.- Make sure that [Airplane mode] is not set.
- Turn [Wi-Fi] to [ON].
- Set the [Bluetooth] switch to [ON].
2. Download Camera Connect from the App Store and install it on the smartphone. 3. Turn the camera on. 4. Press the <
  > button.
 5. Press the <
  > <
> <  > to choose the [
  ] tab, and press <
  >.
>.
 6. Press the < > < > to choose the [ 1 ] tab.
 7. Press the <
  > <
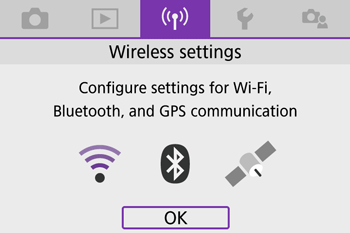
> <  > to choose [ Wi-Fi/Bluetooth connection ], and press < >.
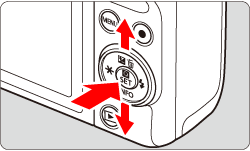
NOTE
If the history is displayed, switch the screen with the < > < > keys.
> < > keys.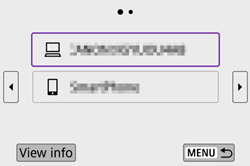
 8. Press the < > < > to choose [ Connect to smartphone ], and press < >.
 9. Press the < > < > to choose [ Add a device to connect to ], and press < >.
 10. Press the < > < > to choose [ Do not display ], and press < >.
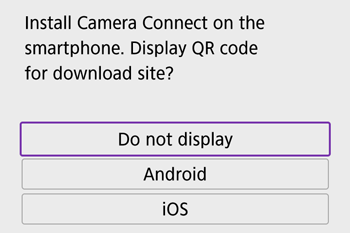 11. Press the < > < > to choose [ Pair via Bluetooth ], and press < >.
 12. Press < >.
 13. A message is displayed indicating that pairing is in progress.
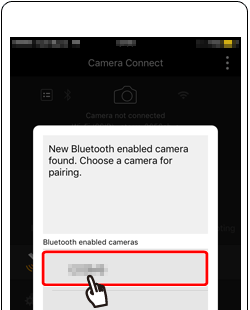
 14. Touch the [Camera Connect] (
  ) application icon on the smartphone to start Camera Connect.
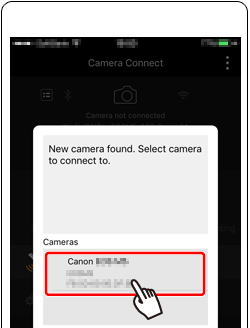
 15. After the camera is recognized, a camera selection screen is displayed.
- Touch the camera to connect.
 16. Choose the camera nickname, touch [Pair] to connect.
 17. Press the < > < > to choose [ OK ], and press < >.
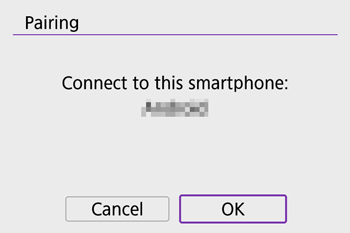 18. Press < > of this screen.
- The Pairing between the camera and the smartphone should be complete, and connected.

IMPORTANT
- Battery life may be shorter when you use the camera after pairing with a smartphone, because power is consumed even when the camera is off.
19. Choose [Images on camera] in Camera Connect. 20. Changing to Wi-Fi connection.
- When the following screen appears, touch [Join].
 21. Use the smartphone to import images from the camera to the smartphone.
- When the camera is connected to the smartphone, a list of the images on the camera will appear in Camera Connect. Tap [Select] appearing in the upper right of the screen.
 22. After the screen refreshes, choose the desired images (
 ), and then touch [
  ] on the bottom of the screen (
 ).
).- To select all images at once, press the [
 ] icon in the upper right of the screen.

NOTE
- A screen to set [JPEG format save size] may be displayed, so choose an option and press [OK].
23. After the images have been saved, touch [  ] appearing in the upper right of the screen.
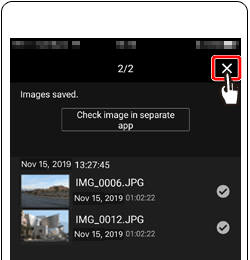 24. Touch [
  ] in the upper left of the screen to return to the menu screen.
 25. To end the connection, touch the [
  ] icon displayed in the upper right of the screen.
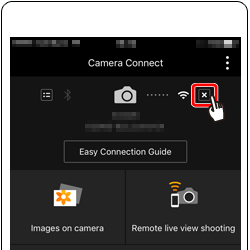 26. Touch [Yes].
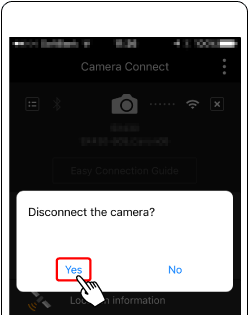
IMPORTANT
- To turn off Wi-Fi signal transmission, choose [ Wireless communication settings ] -> [ Wi-Fi settings ] -> [ Wi-Fi ] -> [ Disable ] or [ Airplane mode ] -> [ On ].
- You can change the camera nickname in [ Wireless communication settings ] -> [ Nickname ].
- You can send images to a smartphone connected via Wi-Fi or paired via Bluetooth by choosing the images from the camera’s playback screen. Press the < > button and choose [
 ].
].
1. Confirm the smartphone's settings.- Make sure that [Airplane mode] is not set.
- Turn [Wi-Fi] to [ON].
2. Download Camera Connect from the App Store and install it on the smartphone. 3. Turn the camera on. 4. Press the < > button. 5. Press the < > < > to choose the [ ] tab, and press < >.
6. Press the < > < > to choose the [ 1 ] tab. 7. Press the < > < > to choose [ Wi-Fi/Bluetooth connection ], and press < >.
NOTE
If the history is displayed, switch the screen with the < > < > keys.
> < > keys.
8. Press the < > < > to choose [ Connect to smartphone ], and press < >. 9. Press the < > < > to choose [ Add a device to connect to ], and press < >. 10. Press the < > < > to choose [ Do not display ], and press < >. 11. Press the < > < > to choose [ Connect via Wi-Fi ], and press < >. 12. The SSID (
  ) and password (
  ) will be displayed on the screen.
 13. Turn Wi-Fi settings to ON in your smartphone, choose the SSID ( ) from step 12.
 14. Input password from step 12 ( ).
  15. Once the connection between the camera and the smartphone has been confirmed, press the home button to return to the home screen. 16. Touch the [Camera Connect] ( ) application icon on the smartphone to start Camera Connect. 17. After the camera is recognized, a camera selection screen is displayed.
- Touch the camera to connect.
 18. Press the < > < > buttons to choose [OK], and press < >.
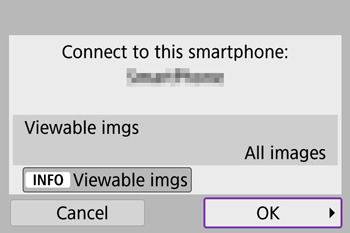 19. The camera screen will show [Wi-Fi on]. 20. Choose [Images on camera] in Camera Connect. 21. Use the smartphone to import images from the camera to the smartphone.
- Touch [Select] in the upper right of the screen.
22. After the screen refreshes, choose the desired images (), and then touch [ ] on the bottom of the screen ().- To select all images at once, press the [ ] icon in the upper right of the screen.
NOTE
- A screen to set [JPEG format save size] may be displayed, so choose an option and press [OK].
23. After the images have been saved, touch [ ] appearing in the upper right of the screen. 24. Touch [ ] in the upper left of the screen to return to the menu screen. 25. To end the connection, touch the [ ] icon displayed in the upper right of the screen. 26. Touch [Yes].IMPORTANT
- To turn off Wi-Fi signal transmission, choose [ Wireless communication settings ] -> [ Wi-Fi settings ] -> [ Wi-Fi ] -> [ Disable ] or [ Airplane mode ] -> [ On ].
- You can change the camera nickname in [ Wireless communication settings ] -> [ Nickname ].
- You can send images to a smartphone connected via Wi-Fi or paired via Bluetooth by choosing the images from the camera’s playback screen. Press the < > button and choose [ ].
Use the on-screen keyboard to enter information. Note that the length and type of information you can enter varies depending on the function you are using.
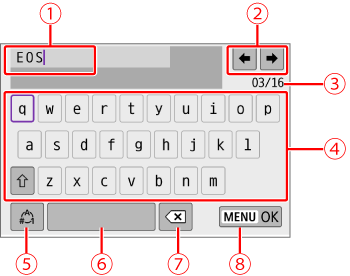
 Input area, for entering text Input area, for entering text |
 Cursor keys, for moving in the input area Cursor keys, for moving in the input area |
 Current no. of characters/no. available Current no. of characters/no. available |
 Keyboard Keyboard |
 Switch input modes Switch input modes |
 Space Space |
 Delete a character in the input area Delete a character in the input area |
 Finish the text entry Finish the text entry |
- To move the cursor within , turn the <
 > dial.
 - To move within and –, use the <
 > cross keys.
 - Press < > to confirm input or when switching input modes.