Solution
When FINE Cartridges run out of ink, replace them using the following steps.
IMPORTANT
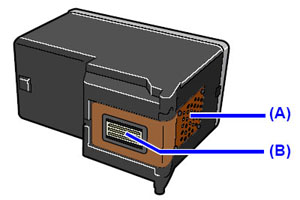
- Do not touch the electrical contacts or Print Head Nozzles on a FINE Cartridge. The machine may not print out properly if you touch them.
(A) Electrical Contacts
(B) Print Head Nozzles
- To maintain optimal printing quality, we recommend the use of specified Canon brand FINE Cartridges.Refilling ink is not recommended.
- Once you remove a FINE Cartridge, replace it immediately. Do not leave the machine with FINE Cartridges removed.
- Replace empty cartridges with new ones. If you insert FINE Cartridges that has been removed once, the machine may not print out properly due to some reasons such as clogging of the nozzles.Furthermore, with such cartridges, the Low Ink Warning may not be displayed properly.
- Once a FINE Cartridge has been installed, do not remove it from the machine and leave it out in the open. This will cause the FINE Cartridge to dry out, and the machine may not operate properly when it is reinstalled. To maintain optimal printing quality, use a FINE Cartridge within six months of first use.
- Color ink may be consumed even when printing a black-and-white document or when black-andwhite printing is specified. Color ink is also consumed in Print Head Cleaning and Print Head Deep Cleaning, which may be necessary to maintain the machine’s performance. When a FINE Cartridge is out of ink, replace it immediately with a new one.
- When a FINE Cartridge runs out of ink, you can continue printing with either Black or Color ink only by changing Ink Cartridge Settings. Even when printing with one ink only, print with leaving the empty FINE Cartridge installed. If either of the Color FINE Cartridge or Black FINE Cartridge is not installed, the machine does not print.
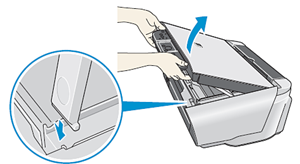
1.Make sure that the machine is on, and then open the Scanning Unit (Printer Cover).
The FINE Cartridge Holder moves to the left.
Pull the Scanning Unit Support down into place.
CAUTION
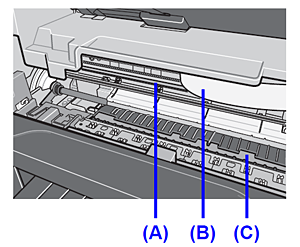
- Do not hold the FINE Cartridge Holder to stop or move it.
- Do not touch the transparent film (A), film cable (B), ink absorber (sponge part) (C), or any metal parts.
IMPORTANT
If the Scanning Unit (Printer Cover) is left open for more than 10 minutes, the FINE Cartridge
Holder moves to the right. Close and reopen the Scanning Unit (Printer Cover) to return the
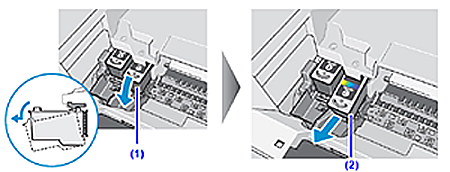
2.Remove the empty FINE Cartridge.
(1) Push down the FINE Cartridge.
(2) Remove the FINE Cartridge.
IMPORTANT
- Handle FINE Cartridges carefully to avoid staining your clothes or surrounding work area.
- Discard empty FINE Cartridges according to the local laws and regulations regarding disposal of consumables.
3.Prepare the replacement cartridge.
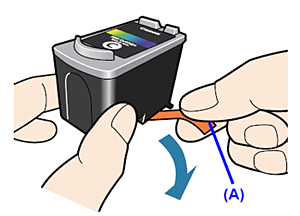
(1) Unpack a new FINE Cartridge and remove the protective tape (A) gently.
IMPORTANT
- Handle FINE Cartridges carefully to avoid staining your clothes or surrounding work area.
- Do not re-attach the protective tape once you have removed it. Discard it according to the local laws and regulations regarding disposal of consumables.
- Do not touch the electrical contacts or Print Head Nozzles on a FINE Cartridge. The machine may not print out properly if you touch them.
- Be careful not to stain your clothes and hands with ink on the removed protective tape.
4.Install the FINE Cartridge.
(1) Insert a new FINE Cartridge all the way into the appropriate slot.
The Black FINE Cartridge should be installed into the left slot (

)and the Color FINE
Cartridge should be into the right slot (

).
(2) Push up the FINE Cartridge until it clicks into place.
IMPORTANT
The machine cannot be used unless both the FINE Cartridges are installed.
5.Close the Scanning Unit (Printer Cover).
Lift the Scanning Unit (Printer Cover) slightly and put the Scanning Unit Support back to its
original position.
Then close the Scanning Unit (Printer Cover).
The FINE Cartridge Holder moves to the right.
REFERENCE
- When you start printing after replacing the FINE Cartridge, Print Head Cleaning is performed automatically. Do not perform any other operations until Print Head Cleaning finishes.
- If the straight line is misaligned or the Print Head position is misaligned, align the Print Head position. See [ Aligning the Print Head ].
 )and the Color FINE
 ).
).