


How do I add the date and time to my pictures?
Solution
These instructions explain how to insert the date in images.
CAUTION
- As the actual locations of buttons / switches on cameras vary depending on the camera model, the illustrations that appear on this page may differ from your camera.
- The position and shape of the operation buttons, screens displayed, and setting items may differ according to the model you use.
- The [Date Stamp] cannot be deleted from the image data once it has been recorded because the date is written in as an image.
- In the following shooting modes, you cannot insert a date onto images (Date Stamp).
- [Movie] ( ), [ISO 3200] (
 ), [Stitch Assist] (
 )
)
), [ISO 3200] (), [Stitch Assist] ()1. Press the < Power > button on the camera.

2. Press the < MENU > ( ) button.
) button.
3. The following screen will appear on the LCD monitor.
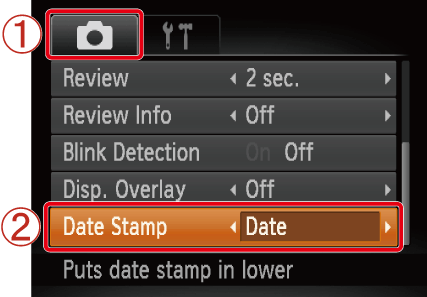
 Operate the < directional button > to select the [Shooting] (
 ) menu.
 Operate the < directional button > to set [Date Stamp] to [Date] or [Date & Time].
After making these settings, press the < MENU > () button.
) button.4. If you set [Date Stamp], [DATE] will appear on the LCD monitor.*
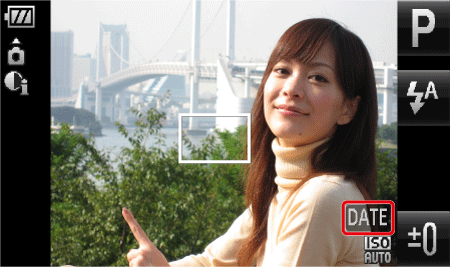
* The icon display location differs depending on the model being used.
If [DATE] does not appear, press the down < directional button > ( ) several times to switch the display on the monitor.
) several times to switch the display on the monitor.5. When shooting with this setting, the date will be embedded in the image as shown below.
 [Date] [Date & Time]
WARNING
The date, its font and color, and the position where it is displayed cannot be changed. Also, dates and times recorded with [Date Stamp] cannot be deleted.