Shooting subjects up close (PowerShot G12)
Solution
If you are shooting a subject at a close distance, and if the subject cannot be easily focused within the normal shooting range, switching the normal mode to the [Macro] ( ) mode will make it easier to focus on the subject.
 ) mode will make it easier to focus on the subject.
 NOTE
The distance of each focusing range is as follows (from the end of the lens).
- [Normal] (
 ) :1 cm (0.4 in.) - infinity (W)*, 30 cm (12 in.) - infinity (T)**
 - [Macro] (
 ) : 1 cm (0.4 in.) - 50 cm (1.6 ft.) (W)*, 30 cm (12 in.) - 50 cm (1.6 ft.) (T)**
* (W) : When the camera is at maximum wide angle with the <Zoom Button> pressed and <Wide Angle> ( ) selected (at the Wide-end).
 ) selected (at the Wide-end).
** (T) : When the camera is at maximum telephoto with the <Zoom Button> pressed and <Telephoto> ( ) selected (at the Tele-end).
 ) selected (at the Tele-end).
CAUTION
- The following explanations are provided based on the assumption that the [Shooting Mode] is set to [Program] (
 ).
). - In macro shooting, the edges of the image may be darkened if the flash fires.
- To set the [Macro] (
 ), it is necessary to set the [Shooting Mode] to one of the following modes.
- [Manual] ( ), [Aperture Priority] (
 ), [Shutter Speed Priority] (
 ), [Program] (
 ), [Color Accent] (
 ), [Color Swap] (
 ), [Nostalgic] (
 ), [Stitch Assist] (
 ), [Standard (Movie) ] (
 ), [Color Accent (Movie) ] (
 ), [Color Swap (Movie) ] (
 )
)
 ), [Aperture Priority] (
 ), [Shutter Speed Priority] (
 ), [Program] (
 ), [Color Accent] (
 ), [Color Swap] (
 ), [Nostalgic] (
 ), [Stitch Assist] (
 ), [Standard (Movie) ] (
 ), [Color Accent (Movie) ] (
 ), [Color Swap (Movie) ] (
 )
)1. Press the <Power> button on the camera.
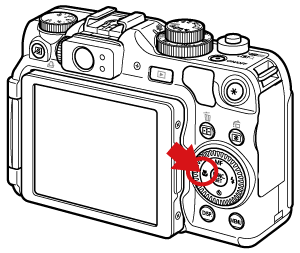
2. Press the <Macro> ( ) button.
 ) button.
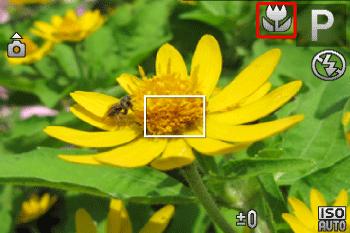
3. The following screen appears.

You can switch between [Normal] and [Macro] by pressing the < Macro > button ( ).
).
 ).
).If [Macro] ( ) is indicated on the LCD Monitor, the camera is in [Macro] (
 ) mode.
 ) is indicated on the LCD Monitor, the camera is in [Macro] (
 ) mode.
REFERENCE
In macro shooting, try attaching the camera to a tripod and shooting with the selftimer to prevent the camera from moving and blurring the image.


