Alarm Lamp Flashes Orange
Issue
- Alarm Lamp Flashes Orange
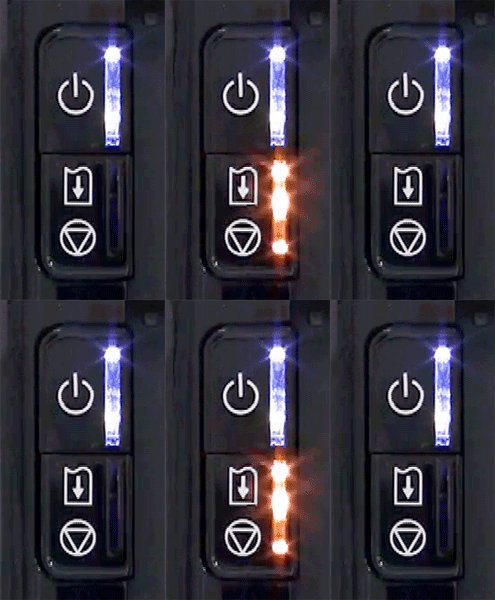
When a printer error occurs, the Alarm lamp flashes orange as shown below. The number of flashes indicates the type of error that has occurred. Count the flashes and take the appropriate action to correct the error.

- POWER Lamp Flashes and Alarm Lamp Flashes Orange Alternately
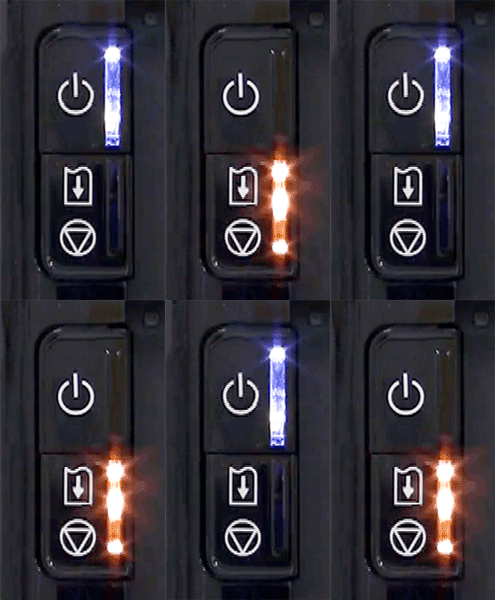
If the POWER lamp flashes and the Alarm lamp flashes orange alternately, it may be possible that an error requiring you to contact the service center has occurred.

Cause and Solution
- Alarm Lamp Flashes Orange
- POWER Lamp Flashes and Alarm Lamp Flashes Orange Alternately
- Alarm Lamp Flashes Orange
Support Code=1001, 1002, 1007, 1008 / Number of flashes=Two flashes:Printer is out of paper/The disc tray is not attached/Paper does not feed
Reload paper in the cassette and press the RESUME/CANCEL button on the printer.
When printing on printable discs (BD/DVD/CD, etc.), use the disc tray supplied with this printer ("J" is on the upper side). Place a printable disc on the disc tray, attach the disc tray to the printer, then press the RESUME/CANCEL button.
The paper may be jammed. Remove the jammed paper, reload paper properly in the printer, then press the RESUME/CANCEL button on the printer.
Paper Jams
See[Paper Jams]
Support Code=1600, 1660 / Number of flashes=Four flashes:The ink tank is not installed/Ink tank is not installed properly/Ink may have run out
- The ink tank is not installed. Install the ink tank.
- If the lamp on the ink tank is not lit, the ink tank may not be installed properly. Install an appropriate ink tank.
- If the lamp on the ink tank is flashing, ink may have run out. Replacing the ink tank is recommended.
If printing is in progress and you want to continue printing, press the printer's RESUME/CANCEL button with the ink tank installed. Then printing can continue. Replacing the ink tank is recommended after the printing. The printer may be damaged if printing is continued under the ink out condition.
Replacing an Ink Tank
When you need to replace an ink tank, follow the procedure below.
Support Code=1401, 1403, 1405 / Number of flashes=Five flashes:Print head is not installed/Print head is defective
The print head may be damaged.
Contact the service center.
Support Code=1830, 1850, 1851, 1855, 1856, 1857, 1858 / Number of flashes=Six flashes:A certain period of time has elapsed while disc label printing is in progress/The inner cover (the cover of the disc tray) is opened or closed
- If a certain period of time has elapsed while disc label printing is in progress, the printer stops initializing. The printer resumes initializing by pressing the RESUME/CANCEL button. Try the operation again following the on-screen instructions.
- If the inner cover (the cover of the disc tray) is open while printing other than disc label printing is in progress, close the inner cover, then press the RESUME/CANCEL button.
- If the inner cover is closed when starting disc label printing, open the inner cover, place the disc tray, then press the RESUME/CANCEL button on the printer. When you start printing on paper, close the inner cover, then press the RESUME/CANCEL button on the printer. Do not open or close the inner cover while printing is in progress, as this can damage the printer.

Support Code=1680, 1681 / Number of flashes=Seven flashes:Ink tank is not installed in the correct position
- Some ink tanks are not installed in the correct position. (The lamps on the ink tanks flash.)
- More than one ink tanks of the same color are installed. (The lamps on the ink tanks flash.)
Confirm that the ink tanks are installed in the appropriate positions.
Replacing an Ink Tank
When you need to replace an ink tank, follow the procedure below.
The ink absorber is almost full.
The printer has a built-in ink absorber to hold the ink used during Print Head Cleaning.
Press the printer's RESUME/CANCEL button to continue printing. Contact the service center.
The size of paper may not be compatible with automatic duplex printing. The sizes of media suitable for auto duplex printing are A4, Letter, A5, and B5. Make sure that the size of the paper loaded in the printer is correct. Pressing the RESUME/CANCEL button will eject the paper and restart printing from the front side of the next paper. The reverse side of the ejected sheet will not be printed.
- Print head nozzles are clogged. Press the RESUME/CANCEL button to dismiss the error, and print the nozzle check pattern to check the status of the print head.
- Paper of size other than A4 or Letter is loaded in the cassette (lower). Press the RESUME/CANCEL button to dismiss the error, then load one sheet of A4/Letter-sized Canon Matte Photo Paper MP-101 with the printing side (whiter side) facing UP.
- The paper output slot is exposed to strong light. Press the RESUME/CANCEL button to dismiss the error, and then adjust your operating environment and/or the position of the printer so that the paper output slot is not exposed directly to strong light.
- Turn off the machine and perform Print Head Deep Cleaning after 24 hours.
After carrying out the above measures, if the problem continues after aligning the print head again, press the RESUME/CANCEL button to dismiss the error, and then perform Manual Print Head Alignment.
Support Code=4100 / Number of flashes=Twelve flashes:Cannot print the contents on CREATIVE PARK PREMIUM
You cannot print the contents on CREATIVE PARK PREMIUM.
When you print the contents on CREATIVE PARK PREMIUM, confirm the message on the computer screen, make sure that genuine Canon ink tanks are installed properly for all colors, then start printing again.
The remaining ink level cannot be correctly detected. (The lamp on the ink tank flashes.)
Replace the ink tank and close the top cover.
Printing with an ink tank that was once empty may damage the printer.
If you want to continue printing in this condition, you need to release the function for detecting the remaining ink level. Press and hold the printer's RESUME/CANCEL button for at least 5 seconds, and then release it.
With this operation, releasing the function for detecting the remaining ink level is memorized. Please be advised that Canon shall not be liable for any machine malfunction or damage caused by refilled ink tanks.
REFERENCE
- If the function for detecting the remaining ink level is disabled, the ink tank is displayed in gray on the printer status monitor.
Replacing an Ink Tank
When you need to replace an ink tank, follow the procedure below.
The ink tank cannot be recognized.
Printing cannot be executed because the ink tank may not be installed properly or may not be compatible with this printer.
Install the appropriate ink tank.
If you want to cancel printing, press the printer's RESUME/CANCEL button.
Replacing an Ink Tank
When you need to replace an ink tank, follow the procedure below.
Support Code=1410, 1411, 1412, 1413, 1414, 1415 / Number of flashes=Fifteen flashes:Ink tank cannot be recognized
The ink tank cannot be recognized. (The lamp on the ink tank is off.)
Replace the ink tank.
Replacing an Ink Tank
When you need to replace an ink tank, follow the procedure below.
The ink has run out. (The lamp on the ink tank flashes.)
Replace the ink tank and close the top cover.
Printing under the current condition may damage the printer.
If you want to continue printing in this condition, you need to release the function for detecting the remaining ink level. Press and hold the printer's RESUME/CANCEL button for at least 5 seconds, and then release it.
With this operation, releasing the function for detecting the remaining ink level is memorized. Please be advised that Canon shall not be liable for any malfunction or trouble which may be caused by continuation of printing under the ink out condition.
REFERENCE
- If the function for detecting the remaining ink level is disabled, the ink tank is displayed in gray on the printer status monitor.
Replacing an Ink Tank
When you need to replace an ink tank, follow the procedure below.
The paper output tray did not open.
Open the paper output tray, then press the RESUME/CANCEL button.
Support Code=4101 / Number of flashes=No flashes:The paper size you specified is not available for the printer
The printer does not support the paper size you specified.
Press the RESUME/CANCEL button, specify the proper paper size, then print again.
- POWER Lamp Flashes and Alarm Lamp Flashes Orange Alternately
Cancel printing, and turn off the printer. Then clear the jammed paper or protective material that is preventing the print head holder from moving, and turn on the printer again.
IMPORTANT
- Be careful not to touch the components inside the printer. The printer may not print out properly if you touch it.
- If the problem is not resolved, contact the service center.
If any object is placed in front of the printer, remove it.
Turn off the printer, and unplug the power cord of the printer from the power supply.
Plug the printer back in and turn the printer back on.
If the problem is not resolved, contact the service center.
IMPORTANT
- Do not place any objects in front of the printer; otherwise, the paper output tray does not open and an error will occur.
- Do not close the paper output tray while the printer is in operation; otherwise, an error will occur.
Turn off the printer, and unplug the power cord of the printer from the power supply.
Contact the service center.
Support Code=5200, 5400, 5B00, 5B10, 5C00, 5C20, 6500, 6502, 6800, 6801, 6900, 6901, 6902, 6910, 6911, 6930, 6931, 6932, 6933, 6940, 6941, 6942, 6943, 6944, 6945, 6946, 6A81, 6B10, 6B20, C000 / Number of flashes=Other cases than above
Turn off the printer, and unplug the power cord of the printer from the power supply.
Plug the printer back in and turn the printer back on.
If the problem is not resolved, contact the service center.


