Solution
The machine's IPv4 address can be either assigned automatically by a dynamic IP addressing protocol, such as DHCP, or entered manually.
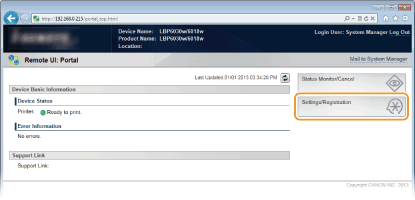
1. Start the Remote UI and log on in System Manager Mode.
2. Click [Settings/Registration].
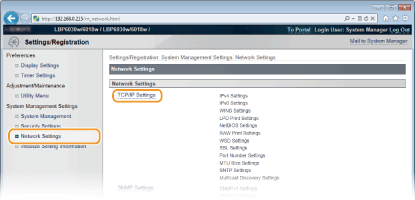
3. Click [Network Settings]

[TCP/IP Settings].
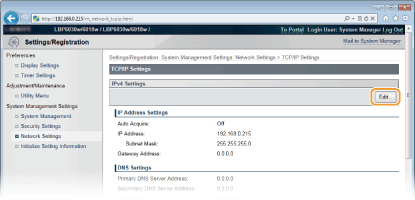
4. Click [Edit] in [IPv4 Settings].

Automatically assigning an IP address
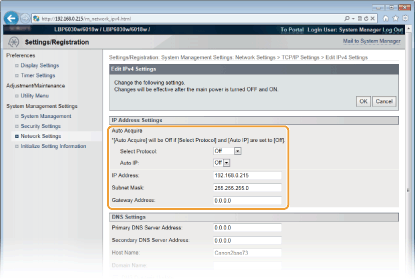
5-A-1. In the [Select Protocol] list, select [DHCP], [BOOTP], or [RARP].
NOTE:
If you do not want to use DHCP/BOOTP/RARP to assign an IP address automatically
- Select [Off]. If you select the [DHCP], [BOOTP], or [RARP] protocol when these services are unavailable, the machine will waste time and communications resources searching the network for these services.
5-A-2. Check that [Auto IP] is set to [On].
- If [Off] is selected, change the setting to [On].
NOTE:
Even if Auto IP is enabled, IP addresses assigned via DHCP/BOOTP/RARP override an address obtained via Auto IP.

Manually entering an IP address
5-B-1. Select [Off] for [Select Protocol] and [Auto IP].
5-B-2. Set the [IP Address], [Subnet Mask], and [Gateway Address] fields.
7. Restart the machine.
- Turn OFF the machine, wait for at least 10 seconds, and turn it back ON.
NOTE
Checking whether the settings are correct
- Make sure that the Remote UI screen can be displayed with your computer.
If you change the IP address after installing the printer driver
- If you are using an MFNP port, and the machine and the computer are in the same subnet, then the connection will be maintained. You do not need to add a new port. If you are using a standard TCP/IP port, then you need to add a new port.

 [TCP/IP Settings].


 Automatically assigning an IP address

 Manually entering an IP address