Transferring Clips from the Camcorder via an Access Point (FTP File Transfer) (XF200 / XF205)
Solution
After connecting the camcorder to a network, you can transfer clips from the camcorder to another device connected to the network using the FTP protocol. In [CAMERA] mode, you can transfer the last MP4 clip just recorded. In [MEDIA] mode, you can transfer multiple clips or photos stored in the recording media in the camcorder.
The following explanations assume that the FTP server is on, ready and correctly configured.
The procedure for making the necessary settings to use the FTP File Transfer feature are explained in the following steps. Please proceed in order from step one.
 Step 1: Making FTP Transfer Preparations
 Step 2: Connecting in Infrastructure Mode
 Step 3-A: Transferring a Newly Recorded MP4 Clip.
 Step 3-B: Transferring a Clip or Photo
*A correctly configured and working network, and network device(s).
NOTE
The procedure for connecting the camcorder to a network device in infrastructure mode (*1) with Wi-Fi and performing FTP file transfers using an access point is explained in the following sections.
For information on making direct Wi-Fi connections between the camcorder and network devices using Camera Access Point mode (*2), please refer to Transferring Clips from the Camcorder via a Wi-Fi Network (FTP File Transfer) (XF200 / XF205).
For information on making connections between the camcorder and network devices via a wired network, please refer to Transferring Clips from the Camcorder via a Wired Network (FTP File Transfer) (XF200 / XF205).
*1 Connection to a Wi-Fi network via an external access point (wireless router, etc.)
*2 Direct connection to one Wi-Fi-enabled device where the camcorder serves as the Wi-Fi access point.
- When using the camcorder's Wi-Fi functions, do not cover the Wi-Fi antenna with your hand or other object. Covering it may interfere with wireless signals.

 : Built-in Wi-Fi Antenna
- Do not open either of the CF card slot covers or the SD card slot cover while using network functions.
- The camcorder is Wi-Fi certified and can connect to a Wi-Fi network using an external access point (wireless router) or can itself serve as a Wi-Fi access point. The camcorder can connect to wireless routers (access points) compliant with the 802.11a/b/g/n protocol and are Wi-Fi certified (bear the logo shown below). The connection method you use will depend on the type and specifications of the access point and network you want to use.

IMPORTANT
- The instructions in this section assume you already have a correctly configured and working network, network device(s). If necessary, refer to the documentation provided with the network devices you want to use.
- Configuring the network settings requires adequate knowledge about configuring and using wired (Ethernet) and/or wireless (Wi-Fi) networks. Canon cannot provide support regarding network configurations.
CAUTION
- Canon shall not be liable for any loss of data or damage resulting from incorrect network configuration or settings. Additionally, Canon shall not be liable for any loss or damage caused by the use of network functions.
- Note that using an unprotected Wi-Fi network can expose your data to monitoring by unauthorized third parties. Be aware of the risks involved.

NOTE
You can wirelessly transfer files (recordings) directly to a computer or an FTP server. You will need a correctly configured FTP server. During the manual setup procedure, you will need to enter the FTP server's IP address, port, user name, password and file transfer destination (where the files will be transferred to). Please confirm this information in advance.
1. Hold down the button on the <POWER> switch and slide the switch to <CAMERA>.

2. Press the <MENU> button.
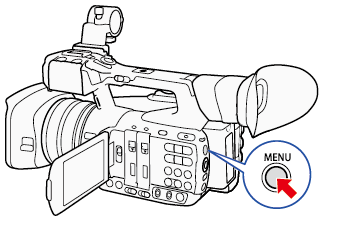
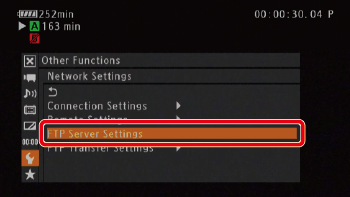
3. Push the joystick up/down to select [  Other Functions] > [Network Settings] > [FTP Server Settings] and then press <SET>.
 Other Functions] > [Network Settings] > [FTP Server Settings] and then press <SET>.
 : Joystick
 : In the following procedures, 'Press <SET>' refers to the action of pressing the joystick straight down to select the desired setting.
4. Enter the [FTP Server].
Select [Input] and then press <SET>.

Enter the FTP server’s IP address or host name (such as 192.168.XX.XX ) using the keyboard screen.
After you have finished entering the information, select [OK] and press <SET>.
REFERENCE
Using the Virtual Keyboard Screen
Use the joystick to select a character and then press <SET> to add it.
Use the arrows ( [  ] / [
] / [  ] / [
] / [  ] / [
] / [  ]) to change the position of the cursor and the backspace character [
  ] to delete the last character entered.
 ] / [
] / [  ] / [
] / [  ] / [
] / [  ]) to change the position of the cursor and the backspace character [
  ] to delete the last character entered.
After entering the desired text, select [OK] and then press <SET> to close the keyboard screen.
5. Enter the [User Name] in the same way.
Select [Input] and then press <SET>.

Enter the [User Name].
After you have entered the information, select [OK] and then press <SET>.
6. Enter the [Password].
Select [Input] and then press <SET>.
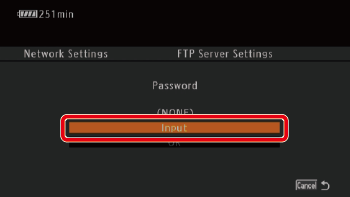
Enter the [Password].
After you have entered the information, select [OK] and then press <SET>.
7. Enter the [Destination Folder] if necessary.
Select [Input] and then press <SET>.

Enter the [Destination Folder]. ('/' has been entered in the example image above.)
After you have entered the information, select [OK] and then press <SET>.
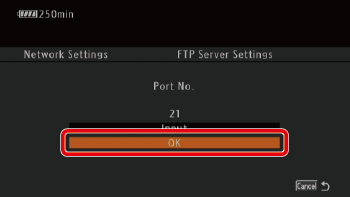
8. Enter the [Port No.] if necessary.
Select [Input] and then press <SET>.
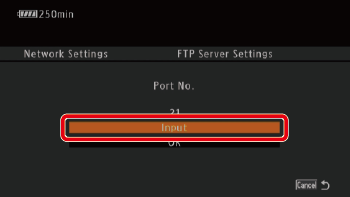
9. Push the joystick up/down to select a value for the first digit and then press <SET> to move to the next digit.

Make sure to enter all the digits ('21' has been entered in the example image above).
10. Select [Set] appearing on the right side of the screen, and then press <SET>.

11. Select [OK] and then press <SET>.
12. Select whether to turn the passive mode [On] or [Off] and then press <SET>.
([Off] has been selected in the example image below.)
- [On] (passive mode) is more appropriate for FTP transfers within a network behind a firewall.
- [Off] is the standard setting for most cases.
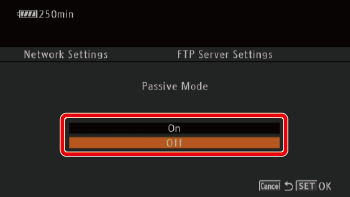
13. Select [OK] and then press <SET>.
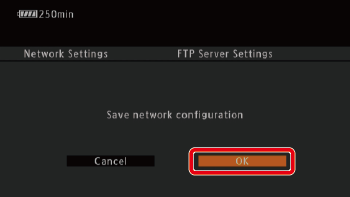
14. Press <SET>.

15. Perform the FTP Transfer settings.
These settings determine the handling of files and folders on the FTP server.
15. Select [  Other Functions] -> [Network Settings] -> [FTP Transfer Settings], and then press <SET>.
 Other Functions] -> [Network Settings] -> [FTP Transfer Settings], and then press <SET>.
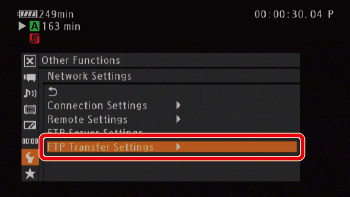
16. Select [Create Folder by Date] and press <SET>.
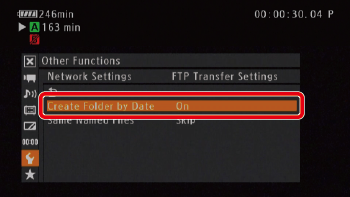
17. Select the desired option and then press <SET>.
[On]: A new subfolder under the transfer destination folder "YYYYMMDD\HHMMSS" will be created for every transfer operation.
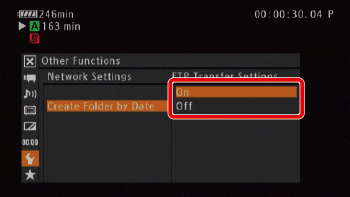
18. Select [  Other Functions] -> [Network Settings] -> [FTP Transfer Settings] -> [Same Named Files] and then press <SET>.
 Other Functions] -> [Network Settings] -> [FTP Transfer Settings] -> [Same Named Files] and then press <SET>.
19. Select the desired option and then press <SET>.
- [Skip]: If a file with the same name already exists in the destination folder, the file will not be transferred.
- [Overwrite]: Even if a file with the same name already exists in the destination folder, the file will be transferred, overwriting any file with the same name in the destination folder.

20. Press the <CANCEL> button to return to the previous menu. ([Network Settings] submenu of [  Other Functions]).
 Other Functions]).

NOTE
You can check the FTP-related settings on the status screens.

The following four methods can be used to connect to Wi-Fi networks in Infrastructure Mode.
| WPS (button)*1 | If your wireless router supports Wi-Fi Protected Setup (WPS), setup will be easy and require minimal configuring and no passwords. To check if your wireless router has a WPS button and for details about how to activate the Wi-Fi protected setup, refer to the instruction manual of your wireless router. |
| WPS (PIN code)*1 | Even if your wireless router does not have a dedicated WPS button, it may support WPS using a PIN code instead. For setup using a PIN code, you will need to know in advance how to activate the wireless router’s WPS function. For details refer to the instruction manual of your wireless router. |
| Searching for Access Points | If your access point does not support the WPS (*1) function or you cannot activate it, you can have the camcorder search for access points in the area. |
| Manual Setup | If the access point you want to use has stealth mode activated and it cannot be automatically detected by the camcorder, you can enter all the necessary settings manually. This requires more advanced knowledge of Wi-Fi and network settings. |
1. [  Other Functions] -> [Network Settings] -> [Connection Settings] -> [Set Up New] and then press <SET>.
 Other Functions] -> [Network Settings] -> [Connection Settings] -> [Set Up New] and then press <SET>.
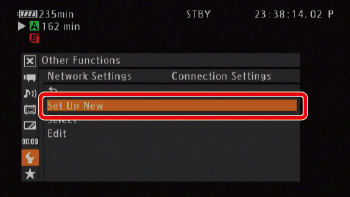
2. Select [Wi-Fi] and then press <SET>.

3. Select [Infrastructure] and then press <SET>.

[WPS: Button] method: Please proceed to step 4-a-1.
[WPS: PIN Code] method: Please proceed to step 4-b-1.
Search for Access Points: Please proceed to step 4-c-1.
Manual Setup: Please proceed to step 4-d-1.
[WPS: PIN Code] method: Please proceed to step 4-b-1.
Search for Access Points: Please proceed to step 4-c-1.
Manual Setup: Please proceed to step 4-d-1.
4-a-1. [WPS: Button] method
Select [WPS: Button] and then press <SET>.

4-a-2. Press and hold the WPS button on the wireless router.
The length of time required to hold down the WPS button depends on the wireless router. Refer to the instruction manual of your wireless router and make sure the wireless router’s WPS function is activated.
4-a-3. Within 2 minutes, press <SET> on the camcorder.
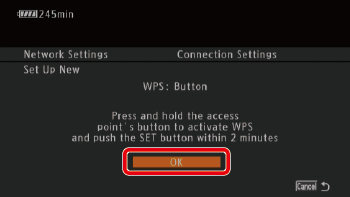
Connection to the access point will be established.
While [Connecting] appears on the screen, you can press <SET> or the <CANCEL> button to cancel the operation.

After the connection is correctly established, continue with the procedure to configure the IP address assignment.

NOTE
The [WPS: Button] method may not work correctly if there are several active access points in the area. In such case try using [WPS: PIN Code] or [Search for Access Points] instead.
4-b-1. WPS using a PIN code
Select the [WPS: PIN Code] method and then press <SET>.

In 7 to 8 seconds, The camcorder will generate and display an 8-digit PIN code.
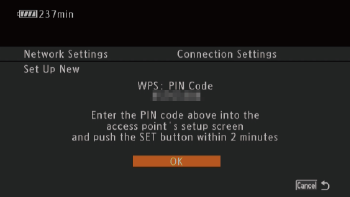
4-b-2. Enter the PIN code from step 4-b-1 into the wireless router’s WPS (PIN code) setup screen*.
*For most wireless routers, you must use a Web browser to access the setup screen.
For details about how to access your wireless router’s settings and activate the Wi-Fi Protected Setup
(WPS) using a PIN code, refer to the instruction manual of your wireless router.
4-b-3. Within 2 minutes of completing step 4-b-2, press <SET> on the camcorder.

Connection to the access point will be established.
While [Connecting] appears on the screen, you can press <SET> or the <CANCEL> button to cancel the operation.

After the connection is correctly established, continue with the procedure to configure the IP address assignment

4-c-1. Searching for Access Points
The camcorder will automatically detect access points in the vicinity. After you select the desired access point, you only need to enter the selected network’s encryption key (password) to connect the camcorder.
Select the [Search for Access Points] method and then press <SET>.

The camcorder will search for active access points in your area and display a list of available options.
4-c-2. Select the desired access point.
Push the joystick up/down to select the desired access point and then press <SET>.

4-c-3. Enter the encryption key.
If the access point is encrypted, enter the encryption key (password) with the following procedure. For information on the encryption key, please refer to the access point’s instruction manual, or the network administrator. Otherwise, with the procedure to configure the IP address assignment. (Proceed to Step 5.)
If the access point is encrypted, enter the encryption key (password) with the following procedure. For information on the encryption key, please refer to the access point’s instruction manual, or the network administrator. Otherwise, with the procedure to configure the IP address assignment. (Proceed to Step 5.)
4-c-4. If necessary, select the WEP index key.
This step is only necessary if the Wi-Fi network’s authentication method is set to [Shared Key] or if the encryption method is set to [WEP].
Select [WEP Index] and then press <SET>.

4-c-5. To enter the [Encryption Key] (password), select [Input] and then press <SET>.

Valid encryption keys vary depending on the encryption method.
| Encryption Method | ASCII characters*1*3 | Hexadecimal*2*3 |
|---|---|---|
| 64-bit WEP encryption | 5 | 10 |
| 128-bit WEP encryption | 13 | 26 |
| AES / TKIP encryption | 8 to 63 | 64 |
*2: Hexadecimal characters comprise the numbers 0 to 9 and the letters a to f and A to F.
*3: Distinction between ASCII and Hexadecimal will be made automatically based on the number of characters entered.
The IP address assignment screen appears.

4-d-1. Manual Setup
If you prefer, you can enter manually the details of the Wi-Fi network you want to connect to. Follow the instructions on the screen to complete the procedure.
Select the [Manual] method and then press <SET>.

4-d-2. To enter the [SSID] (network name), select [Input] and then press <SET>.

Enter the SSID.
When you are finished, select [OK] and then press <SET>.
4-d-3. Select the Wi-Fi network’s authentication method.
Select [Open], [WPA-PSK], or [WPA2-PSK] and then press <SET>.

4-d-4. Select the Wi-Fi network’s encryption method.
- If the authentication method is [Open], select [WEP], or [No encryption], and then press <SET>.

If you selected [WEP], please proceed to 4-d-5.
If you selected [No encryption], please proceed to Step 5.- If the authentication method is [WPA-PSK] or [WPA2-PSK], select [TKIP] or [AES], and then press <SET>.

4-d-5. Enter the encryption key.
Select [Input] and then press <SET>.

Valid encryption keys vary depending on the encryption method.
| Encryption Method | ASCII characters*1*3 | Hexadecimal*2*3 |
|---|---|---|
| 64-bit WEP encryption | 5 | 10 |
| 128-bit WEP encryption | 13 | 26 |
| AES / TKIP encryption | 8 to 63 | 64 |
*2: Hexadecimal characters comprise the numbers 0 to 9 and the letters a to f and A to F.
*3: Distinction between ASCII and Hexadecimal will be made automatically based on the number of characters entered.
The IP address assignment screen will be displayed.

5. Select the method for assigning the IP address and then press <SET>.
- [Automatic]: IP settings will be assigned automatically. If you selected [Automatic], please proceed to step 11.
- [Manual]: The IP address, Subnet Mask, and Default Gateway must be entered in manually. If you selected [Manual], please proceed to step 6.
The steps for performing [Manual] settings are explained below.

6. Enter the IP address, Subnet Mask, and Default Gateway.
Push the joystick up/down to select a value for the first field and then press <SET>.

The cursor will move to the next field.
Repeat the process for all four fields.
7. Select [Set] on the right side of the screen and then press <SET> to confirm the address.
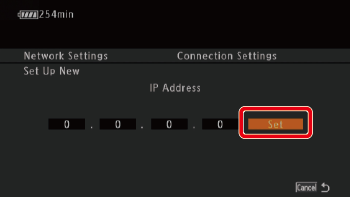
8. Enter the [Subnet Mask] and [Default Gateway] addresses in the same way.

9. Select the desired method for setting up the DNS server, and then press <SET>.

- [Do not use DNS]: A DNS server will not be used.
- [Manual]: Enter DNS server information manually.
The [Manual] setting procedure is explained below.

10. Enter the [Primary DNS Server] and [Secondary DNS Server] using the method described for entering the IP address.

11. Confirm the settings.
Push the joystick up/down to review additional settings before pressing <SET>.

12. Save the settings.
Push the joystick up/down to select the desired configuration number and then press <SET>.

13. If necessary, enter the [Network Configuration Name].
Select [Input] and then press <SET>.

Enter the network configuration name.
Select [OK] and then press <SET>.
14. Select [OK] and then press <SET>.
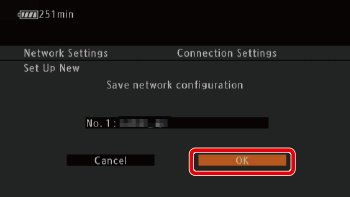
You can save up to 5 different network configuration profiles in the camcorder. If you select a configuration number that was already in use, the previous configuration will be overwritten by the new one.
15. Press <SET>.

16. Press the <CANCEL> button twice to return to the menu before the previous menu ( [  Other functions]).
 Other functions]).
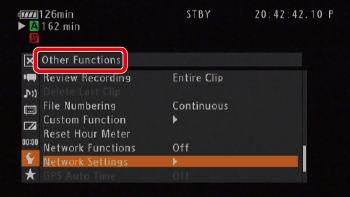
To transfer a newly recorded MP4 clip, please proceed to Step 3-A.
To transfer a clip or photo, please proceed to Step 3-B.
To transfer a clip or photo, please proceed to Step 3-B.

If you activate the FTP transfer function and set in advance an assignable button to [MP4 FTP Transfer], you can press the button to add the last MP4 clip recorded to the FTP transfer queue (up to 5 clips). MP4 clips are then transferred to the FTP server one by one. The FTP transfer is performed in the background so you can continue recording while the files are transferred. In fact, the transfer will not be interrupted even if you set the camcorder to [MEDIA] mode.
The following section explains the procedure for assigning [MP4 FTP Transfer] to assignable button 5 and adding clips to the FTP transfer queue.
REFERENCE
To send newly recorded clips with the FTP transfer function, the video format must be set to [MXF(CF)+MP4] in advance. For more information on changing the format to MP4, please refer to Recording MP4 Video Files (XF200 / XF205).
1. Select [  Other Functions] -> [Assignable Buttons] and choose the desired button (5 has been selected in the example image below). Then, press <SET>.
 Other Functions] -> [Assignable Buttons] and choose the desired button (5 has been selected in the example image below). Then, press <SET>.
2. Select [MP4 FTP Transfer] and press <SET>.
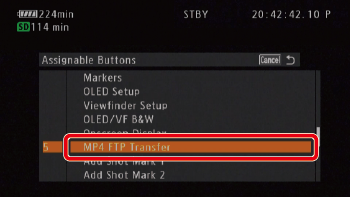
3. Press the <CANCEL> button to return to the previous menu. ([  Other Functions]).
 Other Functions]).
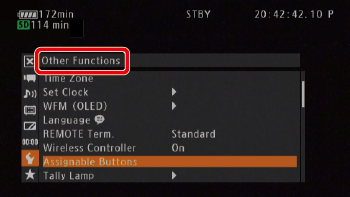
4. Select [  Other Functions] -> [Network Settings] -> [Connection Settings] -> [Select] and then press <SET>.
 Other Functions] -> [Network Settings] -> [Connection Settings] -> [Select] and then press <SET>.
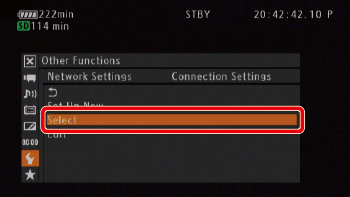
5. Select the configuration number you saved in step 2, and then press <SET>.

Immediately after making new network settings, the setting number for the new network will be selected automatically, so this step will not be necessary.
6. Press [CANCEL] twice to return to the menu before the previous menu ([  Other Functions]).
 Other Functions]).
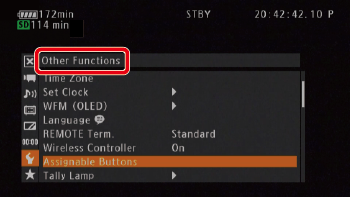
7. Activate the FTP transfer function.
Select [  Other Functions] -> [Network Functions] -> [FTP Transfer] and then press <SET>.
 Other Functions] -> [Network Functions] -> [FTP Transfer] and then press <SET>.
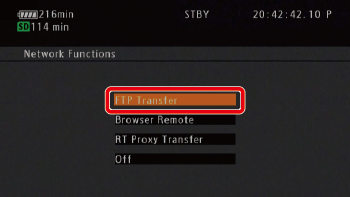
- [FTP] will appear on the top of the screen, next to the connection type icon. When the icons turn white, the camcorder is ready to transfer files.
The [  ] icon will appear on the screen, and the camcorder will be set to FTP transfer mode.
 ] icon will appear on the screen, and the camcorder will be set to FTP transfer mode.
8. After recording an MP4 clip, press assignable button 5 (which you set to [MP4 FTP Transfer] in the previous steps).
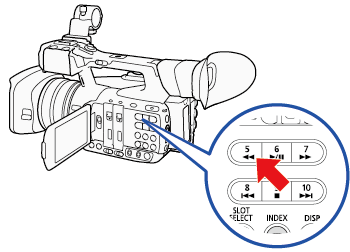
The MP4 clip just recorded will be added to the FTP transfer queue.
The number of MP4 clips in the FTP transfer queue will appear next to the [  ] icon.
 ] icon.
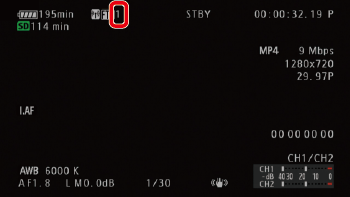
9. When you have finished transferring the desired clips, turn off the network functions.
Set [  Other Functions] > [Network Functions] to [Off] and then press <SET>.
 Other Functions] > [Network Functions] to [Off] and then press <SET>.
The network icons will turn yellow and then disappear from the screen.

You can transfer to the FTP server MXF clips recorded on the CF card and MP4 clips or photos recorded on the SD card. The procedure for sending clips is explained below, but photos can be sent in the same way.
1. Hold down the button on the <POWER> switch and slide the switch to <MEDIA>.

2. Press the <MENU> button.

3. Select [  Other Functions] -> [Network Settings] -> [Connection Settings] -> [Select] and then press <SET>.
 Other Functions] -> [Network Settings] -> [Connection Settings] -> [Select] and then press <SET>.
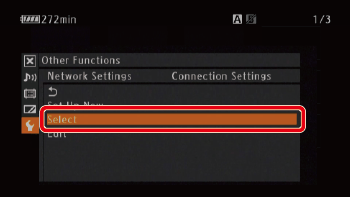
4. Select the configuration number you saved in step 14 of the previous section (Step 2), and then press <SET>.

Immediately after making new network settings, the setting number for the new network will be selected automatically, so this step will not be necessary.
5. Press the <MENU> button.
To transfer one clip or photo, please proceed to 6-a.To transfer multiple clips or photos, please proceed to 6-b.
6-a. Transferring one clip or photo.
6-a-1. Press the <INDEX> button to open the index screen that contains the clips or photos you want to transfer.

6-a-2. Select the desired clip or photo and then press <SET> to open the clip/photo menu.
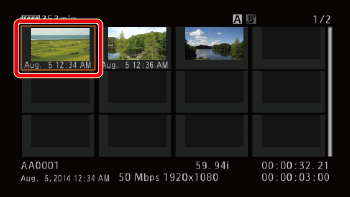
6-a-3. Select [FTP Transfer] and then press <SET>.

6-a-4. Select [OK] and then press <SET>.

FTP will appear on the top of the screen, next to the connection type icon. When the icons turn white, the clip/photo will be transferred to the FTP server.
Select [Cancel] instead to cancel the operation.
When the transfer is completed, the network icons will turn yellow and then disappear from the screen.
6-a-5. When the confirmation message appears, press <SET>.
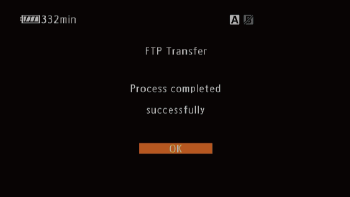
6-b. Transferring Multiple Clips or Photos.
6-b-1. Press the <INDEX> button to open the index screen that contains the clips or photos you want to transfer.

6-b-2. Select [  Other Functions] > [Clips] or [Photos] > [FTP Transfer] and then press <SET>.
 Other Functions] > [Clips] or [Photos] > [FTP Transfer] and then press <SET>.
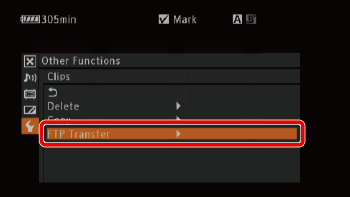
6-b-3. Select [Select] to select which clips/photos to transfe, or [All] to transfer all the clips/photos and then press <SET>.
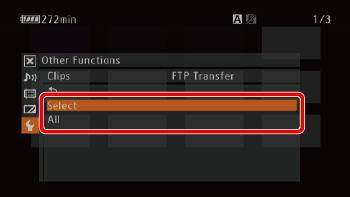
6-b-4. If you selected [Select].
Select the desired clip and press <SET>.
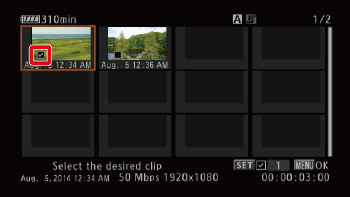
6-b-5. Repeat the process to select all the clips you would like to transfer.
6-b-6. Press the <MENU> button.
6-b-7. Select [OK] and then press <SET>.

FTP will appear on the top of the screen, next to the connection type icon.
6-b-8. When the icons turn white, all the applicable clips/photos will be transferred to the FTP server. When using a LAN connection, the LAN access indicator will flash quickly while the files are being transferred.
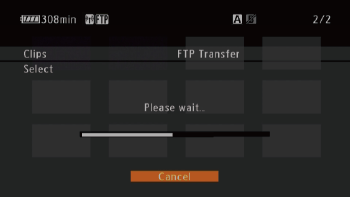
Select [Cancel] instead to cancel the operation.
6-b-9. When the transfer is completed, the network icons will turn yellow and then disappear from the screen.
6-b-10. When the confirmation message appears, press <SET>.

This concludes the procedure for transferring multiple clips or photos.
IMPORTANT
- Observe the following precautions when transferring files. Failing to do so may interrupt the transfer and incomplete files may remain at the transfer destination.
- Do not open the CF card slot cover or SD card slot cover.
- Do not disconnect the power source or turn off the camcorder.
- If incomplete files remain at the transfer destination, check the content and make sure they are safe to delete before deleting them.
NOTE
Depending on the access point’s settings and capabilities, it may take some time to transfer files.
- Wi-Fi is a registered trademark of the Wi-Fi Alliance.
- Wi-Fi Certified, WPA, WPA2, and the Wi-Fi Certified logo are trademarks of the Wi-Fi Alliance.


