


Shooting with Your Favorite Settings (Creative Assist) (EOS M3)
Solution
Even if you don’t know much about photography, you can select from onscreen options written in plain English to change the brightness, blur the background, and take pictures that are all your own. You can also save your favorite settings and easily load them back in later. Settings can even be applied from images shot in [Creative Assist ] ( ) mode.
) mode.When you display images shot in [ ] mode, the camera can show you which [ ] mode settings correspond to which camera settings, making it easier to step up to the Creative Auto shooting modes ([  ], [
], [  ], [
], [  ], or [
  ]).
]).
] mode, the camera can show you which [ ] mode settings correspond to which camera settings, making it easier to step up to the Creative Auto shooting modes ([ ], [ ], [ ], or [ ]).
NOTE
- [
 ] cannot be set.
 - [Creative Assist] mode is indicated by the [ ] icon in the following explanation.
The following options can be changed.
 Background Background | This lets you define how much to blur the background. The higher the value this is, the more blurred the background gets. The lower the value, the sharper the background. |
|---|---|
 Brightness Brightness | This lets you adjust the image brightness. The higher this value, the brighter the image is. |
 Contrast Contrast | This lets you adjust the contrast. The higher this is, the stronger the contrast between light and dark colors. |
 Saturation Saturation | This lets you define how vivid the colors are. The higher this value, the more colorful the image; the lower it is, the more subdued and refined it becomes. |
 Color tone Color tone | This lets you define the tone of the colors. Higher values result in warmer colors, while lower ones make the colors seem colder. |
 Monochrome Monochrome | You can choose from five color tones in Monochrome: [  B/W], [ B/W], [  Sepia], [ Sepia], [  Blue], [ Blue], [  Purple] and [ Purple] and [  Green]. Green]. Set this to [  ] to shoot in color. If this is set to anything besides [ ], [Saturation] and [Color tone] are not available. ] to shoot in color. If this is set to anything besides [ ], [Saturation] and [Color tone] are not available. |
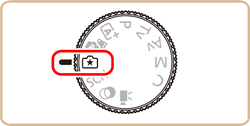
1. Press the power button to turn the camera on.

2. Set the mode dial to [ ].
].
3. Press the [  ] button, press the [
  ], [
], [  ] buttons to choose the desired setting,, and then press the [
  ], [
], [  ] buttons or turn the [
  ] dial or [
  ] dial to complete the setting.
] button, press the [ ], [ ] buttons to choose the desired setting,, and then press the [ ], [ ] buttons or turn the [ ] dial or [ ] dial to complete the setting. 

4. After you have completed all the desired settings, press the [  ] button to return to the shooting screen.
] button to return to the shooting screen.

5. Shoot.
REFERENCE
When shooting with flash, [Background] cannot be set.
NOTE
- Adjust the values of the options with [ ] shown next to them in the shooting screen by turning the [ ] dial. Press the [ ], [ ] buttons to move the [ ], and select the option to adjust.
- Your settings are reset when the power is turned off, but you can set [ Keep setting] in [
 - 4] to [Enable] to save your settings even after turning off the camera.
 - Touch [
 ] at the upper right of the screen to show settings. You can also touch options in the settings screen to adjust them. Touch [
  ] to return to the shooting screen.
You can save your favorite settings and reload them later for repeated use.
1. Follow steps 1 and 2 of "Shooting with Your Favorite Settings (Creative Assist)" to select [ ] and set up your preferences.
] and set up your preferences.2. Press the [ ] button, press the [ ], [ ] buttons to choose  [
[  ], then press the [ ], [ ] buttons or turn the [ ] dial or [ ] dial to select
  where to save your settings.
] button, press the [ ], [ ] buttons to choose [ ], then press the [ ], [ ] buttons or turn the [ ] dial or [ ] dial to select where to save your settings.
- You can save up to six sets of settings.
- If you select a previously-saved set [
 Compare] will be displayed. In this mode, when you press the [
  ] button, the previously-saved settings will be displayed onscreen, letting you compare them with your new settings.
3. Press the [ ] button, and a confirmation screen will appear. Press the [ ], [ ] buttons or turn the [ ] dial to select [OK], then press the [ ] button.
] button, and a confirmation screen will appear. Press the [ ], [ ] buttons or turn the [ ] dial to select [OK], then press the [ ] button.
1. Follow step 1 of "Shooting with Your Favorite Settings (Creative Assist)" to select [ ].
].2. Press the [ ] button, press the [ ], [ ] buttons to choose [  ], then press the [ ], [ ] buttons or turn the [ ] dial or [ ] dial to select the settings to load.
] button, press the [ ], [ ] buttons to choose [ ], then press the [ ], [ ] buttons or turn the [ ] dial or [ ] dial to select the settings to load.
3. Press the [ ] button to apply the saved settings.
] button to apply the saved settings.Select [–] and press the [ ] button to go back without applying any settings.
] button to go back without applying any settings.You can load settings from images shot in [ ] mode and use them to shoot your own pictures.
] mode and use them to shoot your own pictures.1. Set the mode dial to [ ].
].2. Press the [  ] button to enter playback mode, and then select an image shot in [ ] for display.
] button to enter playback mode, and then select an image shot in [ ] for display.
REFERENCE
The [ ] icon will be displayed on images captured in [ ] mode when information is displayed.
] icon will be displayed on images captured in [ ] mode when information is displayed.To display the [ ] icon, press the [ ] button several times to switch between information display 1 (basic info.), information display 2 (details).
] icon, press the [ ] button several times to switch between information display 1 (basic info.), information display 2 (details).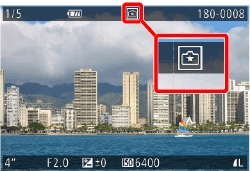
3. Press the [ ] button, choose [ ] in the menu, and press the [ ] button again.
] button, choose [ ] in the menu, and press the [ ] button again.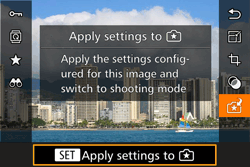
The settings are applied and the camera goes into shooting mode.
NOTE
- A message is displayed if you try to apply settings when the mode dial is set to anything besides [ ]. The camera does not return to shooting mode. Turn the mode dial to [ ] to apply the settings.
- Images shot in anything besides [ ] mode will not be shown in [ ] mode.
When displaying images shot in [ ] mode, press the [ ] button to display the screen shown to the left, letting you view the settings used when the picture was taken.
] mode, press the [ ] button to display the screen shown to the left, letting you view the settings used when the picture was taken.
[ ] Mode and Creative Zone Settings
] Mode and Creative Zone Settings
| [ ] mode setting | Creative Auto setting |
|---|---|
| (A) Background | (a) Aperture value |
| (B) Brightness | (b) Exposure compensation Flash time is (b') Flash exposure compensation |
| (C) Color tone | (c) WB Correction |
| (D) Contrast | (d) Picture Style contrast |
| (E) Saturation | (e) Picture Style saturation |
| (F) Monochrome | (f) Picture Style  filter and toning effect filter and toning effect |