Solution
This section describes how to connect the camera to a computer when importing images to the computer or specifying the camera settings from the computer.
IMPORTANT
Use the provided interface cable or one from Canon. When connecting the interface cable, use the provided cable protector. Using the cable protector prevents the cable from accidental disconnection and the terminal from getting damaged.
CAUTION
- Connecting interface cable without using the cable protector may damage the digital terminal.
- Do not use a USB 2.0 cable equipped with a Micro-B plug. It may damage the camera’s digital terminal.
- Check that the interface cable is securely attached to the digital terminal.
1. Confirm that the camera is not connected to the computer, and then set the camera's power switch to [ON].
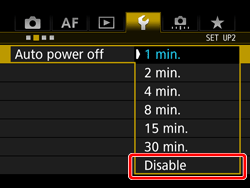
2. Press the [MENU] button to display the menu screen.
4. Press the [MENU] button to turn off the display on the LCD monitor, and then set the camera's power switch to [OFF].
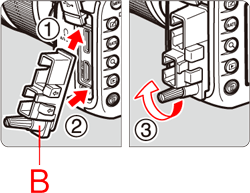
5. Remove the cable protector clamp (A).
6. Open the terminal cover, and attach the Cable protector (B) to the interface terminal area of the camera.
7. Next, attach the clamp you removed in step 5 as shown in the image below.
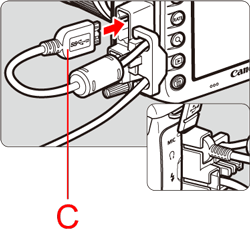
8. Connect the cable to the digital terminal with the plug’s [

] icon (C) facing the back of the camera.
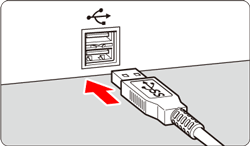
9. Connect the cord’s plug to the computer’s USB terminal.
The location of the terminal varies by computer model. For more information on the location of the terminals on your computer, please refer to its instruction manual.
10. Set the camera's power switch to [ON].
11. Communication between the camera and the computer begins.
If EOS Utility Ver.3.x is installed on your computer, it will start automatically when the camera and computer are able to communicate with each other.
NOTE
If EOS Utility Ver.3.x is not installed on your computer, the following screen will be displayed when the camera is connected.
If EOS Utility Ver.3.x is installed on your computer, it will start automatically when the camera and computer are able to communicate with each other
If EOS Utility is not displayed, click the [EOS Utility] icon in the Dock.
IMPORTANT
- For information about operations after connecting the camera to the computer, please refer to the Software instruction manual (PDF file) included on the [ EOS DIGITAL Solution Disk ] that was supplied with your camera.
- Before disconnecting the cable, turn off the camera. Hold the plug (not the cord) to pull out the cable.
- The message that appears on the screen differs depending on the computer's operating system or software installed in the computer.
This completes the process of connecting the camera to the computer.

 ] button and select the [
  ] tab.

 ] dial to select the [
  ] tab.

 ] dial to select [Auto power off], then press [
  ].
].

 ] dial to select [Disable], then press [
  ].
]. 


 ] icon (C) facing the back of the camera.

