Solution
ScanGear is the scanner driver software used for scanning documents and film. You can start ScanGear from an application program that supports TWAIN, an industry standard for acquiring images using external devices.
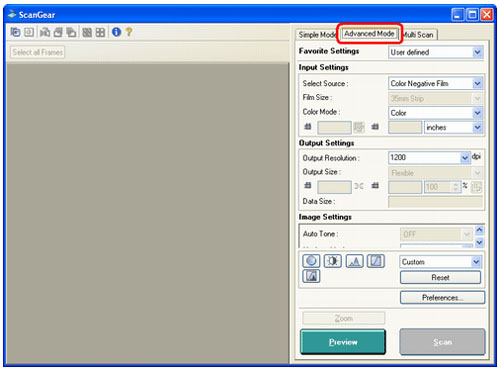
In Advanced Mode of ScanGear, you can specify more detailed settings (i.e., color mode, output resolution, brightness, and color balance) when scanning.
PhotoStudio is used as an example.
1.Remove the protective sheet and film guide from the document cover, set film into the Film Guide, and then set the Film Guide to the document cover
2.Close the document cover
Windows:
Click the [Start] menu and select [(All) Programs] - [ArcSoft PhotoStudio 5.5], and click [PhotoStudio 5.5].
Macintosh:
Double-click the [PhotoStudio] alias on the desktop, or open [Applications] - [PhotoStudio] folders, then double-click the [PhotoStudio] icon.
4.Click the [File] menu and select [Select Source]
Select your scanner model in the [Select Source] window and click [Select] (Windows)/[OK] (Macintosh).
IMPORTANT
- Do not select the model name that includes [WIA] in it.
IMPORTANT
- You do not need to set it from the second time onward with the same scanner.
- You will need to do this step if you select a different scanner or a digital camera.
- With some applications, you may have to do this step every time you start the application.
5.Click the [File] menu and select [Acquire]
6.Click the [Advanced Mode] tab
REFERENCE
- When ScanGear starts, the mode last used is displayed. If the [Advanced Mode] window is already displayed, proceed to the next step.
7.Select the type of film you set on the scanner in [Select Source]
Select [Color Negative Film], [Color Positive Film], [Monochrome Negative Film], or [Monochrome Positive Film].
8.Select [Color Mode] to match the color mode of your film
Select [Grayscale] or [Color].
REFERENCE
- If you place the check mark on [Enable 48/16 bit Output] in the [Preferences] window ([Scan] sheet), [Grayscale(16bit)] and [Color(48bit)] are also available.
9.Click the [Preview] button
The thumbnail images are displayed in the preview area.
Check the frames you want to scan.
IMPORTANT
- If the preview image is not displayed correctly, correct the position of the film strip in the film guide and click [Preview] again.
10.Select [Output Resolution]
You can select [50], [75], [100], [150], [200], [300], [400], [600], [800], [1200], [1600], [2400], [3200], [4800], [6400], or [9600]. You can also enter a value directly from 25 dpi to 19200 dpi in 1 dpi increments.
You can select [Flexible] to specify the width and height of an image, or fixed sizes for printing or for on-screen display. You can also use [Add/Delete] to register custom output sizes.
- Flexible
If you select [Flexible], you can specify the width, height, and the zoom ratio.
The output resolution is set to 1200 dpi and the zoom ratio to 100% by default. Change these values as needed.
- Paper Sizes (for printing)
You can select [Business Card], [4" x 6" Landscape], [4" x 6" Portrait], [A5], [B5], [A4], [Letter], [Legal], [B4], or [A3].The output resolution is set to 300 dpi by default. You cannot specify a width, height, or zoom ratio. The zoom ratio is automatically determined according to the size of the cropping frame specified.
- Image Sizes (for on-screen display)
You can select [128 x 128 pixels], [640 x 480 pixels], [800 x 600 pixels], [1024 x 768 pixels], [1280 x 1024 pixels], [1600 x 1200 pixels], [2048 x 1536 pixels], [2272 x 1704 pixels], or [2592 x 1944 pixels]. Select the best size for your monitor or digital viewer.The output resolution is set to 150 dpi by default. You cannot specify a width, height, or zoom ratio. The preview image will be automatically cropped according to the size specified. The cropping frame retains the aspect ratio, but can be enlarged/reduced or moved around within the preview image.
IMPORTANT
- You can set an output resolution separately for each category ([Flexible], [Paper Size], or [Image Size]).
- A warning message will be displayed if you set the output resolution too high. Scanning at a very high resolution may take an extremely long time to complete or yield a very large image file.
Guideline for Data Sizes
When 35 mm film is enlarged to the output size of 4" x 6":
| Output Resolution | Zoom Ratio | Scanning Resolution | Data Size* |
| 300 dpi | Approx. 400% | Approx. 1200 dpi(300 dpi x 400%) | Approx. 6.5 MB |
| 600 dpi | Approx. 400% | Approx. 2400 dpi(600 dpi x 400%) | Approx. 25.9 MB |
| 1200 dpi | Approx. 400% | Approx. 4800 dpi(1200 dpi x 400%) | Approx. 105.7 MB |
| 2400 dpi | Approx. 400% | Approx. 9600 dpi(2400 dpi x 400%) | Approx. 414.7 MB |
| 4800 dpi | Approx. 400% | Approx. 19200 dpi(4800 dpi x 400%) | Approx. 1.66 GB |
* When saved in BMP or PICT format. Data sizes will be smaller if saved in JPEG or other formats that produce compressed image files.
12.Set [Fading Correction] and [Color Balance] as needed
13.Click the [Scan] button
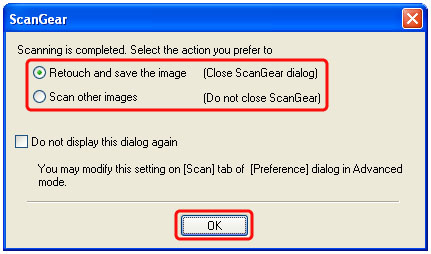
After the scanning is completed, the scanning completed window appears.
Select [Retouch and save the image] and click [OK] if finished with scanning. The scanned image is displayed in the ArcSoft PhotoStudio window for editing.
Select [Scan other images] and click [OK] to scan additional film strips.
IMPORTANT
- You can also click [X] at the top right corner to close ScanGear if the selection window is not displayed.
14.After the scanning is complete, remove the film strip and put the film guide and protective sheet back


