Solution
1. Set the film on the scanner.
(1) Place the film adapter unit on the scanner and set a film strip.
(2) Close the document cover.
CAUTION
To scan monochrome films, start CanoScan CS from an application and scan in ScanGear's Advanced Mode.
2. Start CanoScan Toolbox.
Windows: Click the [Start] menu and select [(All) Programs] - [Canon Utilities] - [CanoScan Toolbox 4.9], and click [CanoScan Toolbox 4.9].
Macintosh: Open [Applications] - [Canon Utilities] - [CanoScan Toolbox 4.9] folders, then double-click the [CanoScan Toolbox X] icon.
3. Click the button for the required function.
You can scan films using [Copy], [Print], [Save], [Scan-1] and [Scan-2] buttons.
In this example, the [Scan-1] button is used.
The setting window of CanoScan Toolbox is displayed.
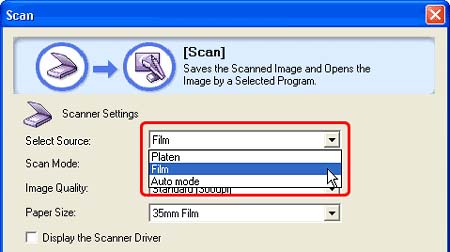
4. Select the type of document in [Select Source].
Film: You can select [Image Quality].
Auto mode: Scans 300 dpi images at the photo size (4" x 6"). You cannot select [Image Quality]. If you select [Auto mode], proceed to step 7.
CAUTION
By default, [Platen] is selected in [Select Source] for the [Save] window. To scan film, select [Film] or [Auto mode].
Negative Film(Color): Select this to scan color negative films.
Positive Film(Color): Select this to scan color positive films.
High Speed (150dpi): Select this option to print the scanned image at the photo size (4" x 6") or for viewing it on a computer screen.
Standard (300dpi): Select this option to print a high-quality print at the photo size (4" x 6").
High Quality (600dpi): Select this option to print up to A4 or Letter size, or for printing on a high performance color printer.
The film will be scanned, loaded into the application and saved.
CAUTION
Calibrate the scanner if the following message appears: "Recommend executing a calibration command to keep higher image quality."
REFERENCE
Move the film adapter unit over and repeat the procedures listed above to scan additional frames.
8. After the scanning is complete, put the protective cap back on the film adapter and remove the film strip and the Film Guide.
CAUTION
・Always put the protective cap back on the film adapter unit when it is not in use. Dust, dirt or scratches on the light panel of the film adapter unit may affect image quality or damage the film.
・Film may be damaged if left on the document glass for an extended period of time.


