Solution
This section describes how to replace the fixing unit.
Contact your local authorized Canon dealer to obtain replacement fixing unit.
When the Message <PREP.FIX.UNIT> Appears
When the counter of the fixing unit reaches the stipulated value, the message <E5 PREP.FIX.UNIT> appears. You can continue printing, however, the print quality will deteriorate. When <E5 PREP.FIX.UNIT> appears and the print quality deteriorates, it is recommended that you replace the fixing unit with a new one. Although the fixing unit is a periodical replacement part, you can replace it as needed.
NOTE
The lifetime of the fixing unit (Canon Genuine Fixing Unit) designed for this printer is approximately 150,000 pages when performing 1-sided printing on A4 size paper.
Replacing the Fixing Unit
1. If you are using the multi-purpose tray, close it.
2. Open the front cover.
While pressing the lever on the right side of the front cover, open the front cover toward you.
IMPORTANT
Before opening the front cover, make sure that the multi-purpose tray and the paper cassette of the printer are closed.
3. Tilt the fixing unit toward you.
While pressing the green lock release buttons (A) on the left and right side of the fixing unit (1), hold the tabs (B) and tilt the fixing unit toward you (2) as shown in the figure.
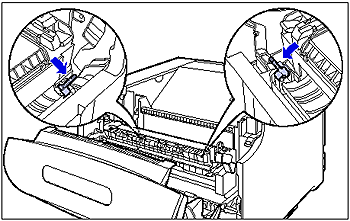
4. Tilt the lock release levers located on both sides of the back of the fixing unit in the direction of the arrows to release the lock.
5. Hook your fingers into the tabs on both sides of the fixing unit (1), tilt them backward a little , and then remove the fixing unit (2).
6. Take the new fixing unit out of the protective bag.
7. Remove the tape attached to the fixing unit.
Make sure that the lock release levers (A) located on both sides of the back of the fixing unit are tilted.
8. Install the fixing unit in the printer.
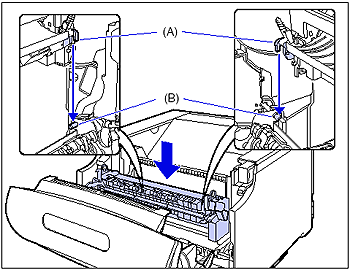
Hang the hooks of the fixing unit (A) on the projections on the printer (B) as shown in the figure.
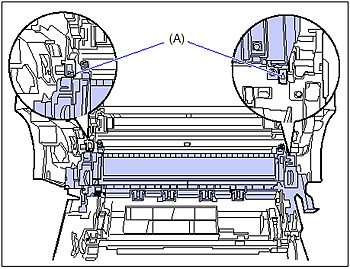
Hang the hooks on the projections at the inner side of the triangular marks (A). Make sure that they are hooked properly.
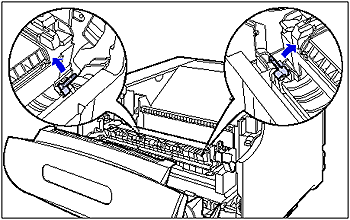
9. Tilt the lock release levers located on both sides of the back of the fixing unit in the direction of the arrows to lock the fixing unit.
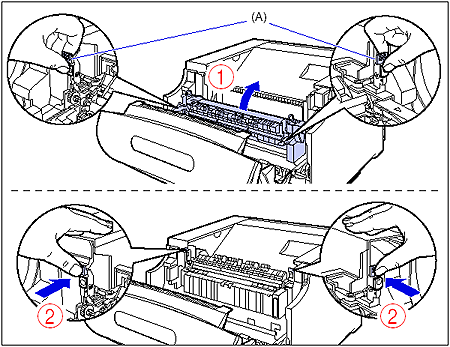
10. While holding the tabs (A), move the fixing unit back to its original position (1), and then press the tabs on the both sides as shown in the figure (2).
11. Close the front cover.
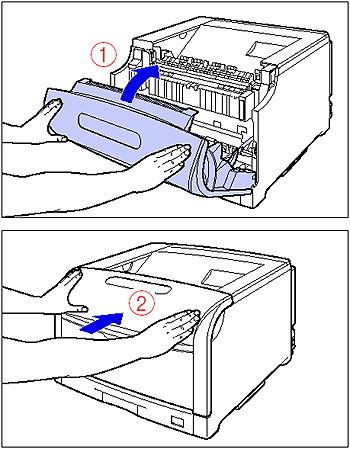
While supporting the front cover (1), push and close the front cover with both hands as shown in the figure (2).
Precautions on Replacing the Fixing Unit
IMPORTANT
- Reset the counter after replacing the fixing unit.
- Be careful not to hold or touch areas that are not specified in this procedure, such as the roller in the fixing unit. This may result in deterioration in print quality or damage to the fixing unit.
- Dispose of the packing materials according to local regulations.
NOTE
The packing materials may be changed in form or position to be placed, or may be added or removed without notice.


