Solution
Preview each shot of your photos saved on the memory card on the LCD of the machine, and print the photos.
This section describes the basic operation, using the settings to print borderless photos on 4" x 6" / 10 x 15 cm paper as an example.
For the operation, see the notes and operation procedure described in the reference page.
1. Prepare for printing.
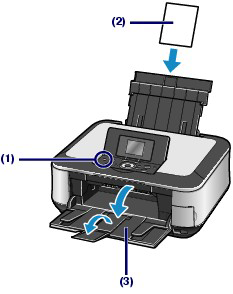
(1) Turn on the power.
Here we load 4" x 6" / 10 x 15 cm photo paper in the Rear Tray.
REFERENCE
Load A4 or Letter-sized plain paper in the Cassette. Load other sizes or types of paper in the Rear Tray.
(3) Open the Paper Output Tray gently, and open the Output Tray Extension.
2. Insert a memory card.
(1) Select Memory card

on the HOME screen, and press the OK button.
(2) Make sure that Select and print

is selected, and press the OK button.
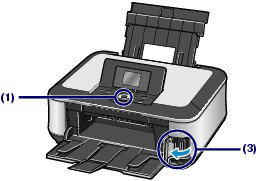
(3) Insert a memory card WITH THE LABELED SIDE FACING TO THE LEFT into the Card Slot.
The photo selection screen appears.
REFERENCE
- You can also display the photo selection screen in Select and print by inserting a memory card while the HOME screen or any screen of the Copy, Easy photo reprint, and Settings menus appears.
- You can also select useful printing functions other than Select and print.
- When Writable from USB PC or Writable from LAN PC is selected in Read/write attribute of Advanced settings under Device settings in the Settings menu, you cannot print image data on the memory card using the Operation Panel on the machine. Set Read/write attribute to Not writable from PC.
3. Select photos to print.
(1) Use the Easy-Scroll Wheel or the

button to display the photo you want to print.
REFERENCE

may appear on the LCD while reading photos. If you use the Easy-Scroll Wheel or the

button to display the photo while

appears on the LCD, the desired photo may not be selected.
(2) Press the [+] or [-] button to specify the number of copies.
(3) Repeat the procedures of (1) and (2) to specify the number of copies for each photo.
REFERENCE
- To change the display of photos
- To crop a part of photo (Trimming)
- To search photos by a specified date (Search)
(4) Press the OK button.
The print confirmation screen appears.
4. Start printing.
(1) Confirm the page size, media type, print quality, etc.
Here we confirm that 4"x6" (10x15cm) is selected for Page size and the type of loaded photo paper for Media type.
To change the settings, use the Easy-Scroll Wheel or the

button to select the item to change, and press the OK button.
REFERENCE
When Plain paper is selected for Media type and A4 or 8.5"x11" (LTR) for Page size, Cassette appears for Paper source.
When other sizes or types of paper are selected, Rear tray appears.
Confirm that the selected paper is loaded in the correct paper source.
(2) Confirm the number of sheets to be used for printing the selected photos.
(3) Press the right Function button (B) to select Check photo, and confirm the selected photos and number of copies for each photo.
Press the OK button to return to the print confirmation screen.
(4) Press the Color button.
The machine starts printing photos.
REFERENCE
- You can correct photos automatically or manually, if you press the left Function button (A) to select Advanced. By default, the machine is set to correct photos automatically.
- Press the Stop button to cancel printing.
- Printing does not start if you press the Black button.
- You can display the Memory card menu and select other useful printing functions, if you press the Back button after printing is completed.
If you press the HOME button or remove the memory card, the HOME screen appears.
The print confirmation screen in Select and print is shown as below:
(1) Page size
Select the page size of the paper to print: 4"x6" (10x15cm), A4, etc.
(2) Media type
Select the media type of the paper to print: Plus Glossy II, Plain paper, etc.
REFERENCE
If you do not select the page size and media type correctly, the machine may feed paper from the wrong paper source or may not print with the proper print quality.
(3) Print quality
Adjust the print quality: High(quality-priority) or Standard.
(4) Borderless print
Select bordered or borderless print: Bordered or Borderless.
REFERENCE
When Plain paper is selected for Media type, you cannot select Borderless.
(5) Paper source
The paper source for the selected page size and media type appears on the screen.
When A4 or Letter-sized plain paper is selected, Cassette appears.
When other sizes or types of paper are selected, Rear tray appears.
Confirm that the selected paper is loaded in the paper source displayed on the screen.
REFERENCE
- The settings of the page size, media type, print quality, borderless print, image correction, etc. are retained, and these settings will appear next time when the Memory card menu is selected even if the power is turned off and on.
- Combination of some items cannot be specified depending on the function.
- Using Photo Index Sheet to print
Thumbnails of photos on the memory card are printed on A4 or Letter-sized paper (this printed sheet is called Photo Index Sheet). You can select photos, number of copies, page size, etc. on this sheet, and print them.
Select Photo index sheet

on the HOME screen, and Index sheet print

.


 on the HOME screen, and press the OK button.
 is selected, and press the OK button.
 button to display the photo you want to print.
 may appear on the LCD while reading photos. If you use the Easy-Scroll Wheel or the
  button to display the photo while
  appears on the LCD, the desired photo may not be selected.
 button to select the item to change, and press the OK button.

 on the HOME screen, and Index sheet print
  .
.