Solution
Connect the camera to the printer and print directly from the camera.
CAUTION
- In this section, [PowerShot SD940 IS / DIGITAL IXUS 120 IS] is used as an example to explain the operations. Depending on your model, the position of buttons, screen indications, and setting items may vary.
- These instructions show how to print one image on one sheet of paper as an example.
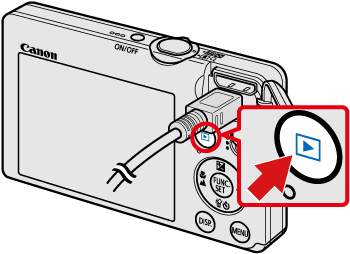
1. Connect the camera to the printer.

Connect the [interface cable] to the camera's [DIGITAL terminal].

Connect the other end of the cable to printer's USB terminal.
2. Turn the printer's power on.
3. Press the <Playback> (

) button to turn on the camera.
4. Operate the <directional buttons> left or right to display an image to print on the LCD monitor.
Press the <FUNC./SET> (

) button.
5. The following screen appears.
Make sure that the [Print] (

) is selected, and then press the camera's <FUNC./SET> (

) button.
6. The screen for specifying the print settings appears.
Operate the <directional buttons> left or right to select

[Date] for adding the date.
Operate the <directional buttons> left or right to specify

the number of prints.
Select

[Paper Settings], and then press the camera's <FUNC./SET> (

) button.
7. The screen for setting the paper size appears.
Operate the <directional buttons> up or down to select the paper size, then press the camera's <FUNC./SET> (

) button. In the image shown above, the [9 x 13 cm] size is selected.
8. The screen for setting the paper type appears.
Operate the <directional buttons> up or down to select the paper type, and then press the camera's <FUNC./SET> (

) button. In the image shown above, [Photo] is selected.
9. The layout (border) settings screen appears.
Operate the <directional buttons> up or down to select the layout type, and then press the camera's <FUNC./SET> (

) button. In the image shown above, [Bordered] is selected.
10. Return to the print setting screen.

Make sure that the settings are correct.
Select

[Print] and press the camera's <FUNC./SET> (

) button to start printing.

 Connect the [interface cable] to the camera's [DIGITAL terminal].
 Connect the other end of the cable to printer's USB terminal.
 ) button to turn on the camera.

 ) button.
 ) is selected, and then press the camera's <FUNC./SET> (
 ) button.
 [Date] for adding the date.
 the number of prints.
 [Paper Settings], and then press the camera's <FUNC./SET> (
 ) button.
 ) button. In the image shown above, the [9 x 13 cm] size is selected.
 ) button. In the image shown above, [Photo] is selected.
 ) button. In the image shown above, [Bordered] is selected.
 Make sure that the settings are correct.
 [Print] and press the camera's <FUNC./SET> (
 ) button to start printing.