Issue
IMPORTANT
A warning message is not displayed on your computer even if the toner cartridge is nearing the end of its life. The time when longitudinal white streaks on the printed paper or when the printing appears faint or uneven can be used as the rough guide to replace the toner cartridge. When you are replacing the toner cartridge, be sure to use the toner cartridge designed for this printer. When you purchase a replacement toner cartridge, contact your local authorized Canon dealer.
Cause and Solution
Before Replacing the Toner Cartridge:
The toner cartridge are consumable products. When the amount of toner is insufficient, longitudinal white streaks may appear on paper, or the printing may appear faint or uneven. If this symptom occurs, take out the toner cartridge in use before replacing it, then install it again after distributing the toner inside the cartridge evenly.
NOTE
a. For details on removing the toner cartridge, see Step 1 to 2 in "How to Replace the Toner Cartridge" below.
b. For details on distributing toner inside the toner cartridge evenly, see Step 4 in "How to Replace the Toner Cartridge" below.
c. For details on reinstalling the toner cartridge, see Step 6 to 7 in "How to Replace the Toner Cartridge" below.
When the printing is faint even after the toner cartridge in use is taken out, the toner inside the cartridge is distributed evenly, and then it is installed again, replace the toner cartridge with a new one.
How to Replace the Toner Cartridge:
Replace the toner cartridge with a new one using the following procedure. When replacing the toner cartridge, clean the fixing unit using the Printer Status Window. For details on cleaning the fixing unit, see "How to clean the fixing unit" in Related Information at the end of this page.
IMPORTANT
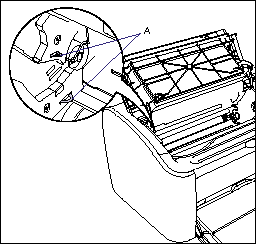
Do not touch the high-voltage contacts (A) inside the top cover, as this may result in damage to the printer.
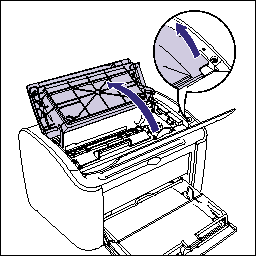
1. Open the top cover.
Holding the top cover by the cutout edge, open the cover until it stops.
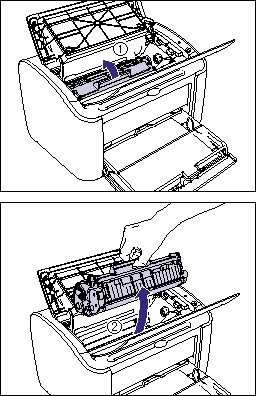
2. Raise the toner cartridge in the direction of the arrow (1), then remove it (2).
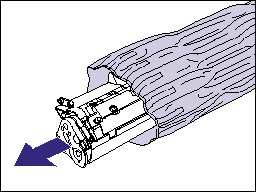
3. Take a new toner cartridge out of the protective bag.
As there is a notch cut near the arrow, you can tear open the bag by hand. However, if you are unable to tear open the bag by hand, use scissors to open the protective bag so as not to damage the toner cartridge.
IMPORTANT
a. Keep the protective bag for the toner cartridge. It will be required after taking out the toner cartridge for printer maintenance.
b. Print quality may deteriorate if you touch or damage the drum inside the drum cartridge. Be sure not to touch or open the drum protective shutter (A). Be careful not to hold or touch sensitive areas that are not specified in this procedure. This may result in damage to the cartridge.
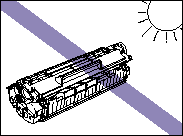
c. Do not expose the toner cartridge to direct sunlight or strong light.
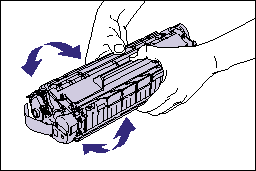
4. Hold the toner cartridge as shown in the figure, shake it gently 5 or 6 times to evenly distribute the toner inside the cartridge.
IMPORTANT
a. If the toner is not distributed evenly, this may result in deterioration in print quality. Be sure to perform this step properly.
b. Be sure to shake the toner cartridge gently. If you do not shake the cartridge gently, toner may spill out.
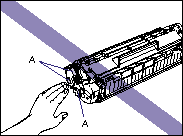
c. Be careful not to hold or touch sensitive areas such as the electrical contacts (A) or sensor, as this may result in damage to the toner cartridge or printer.
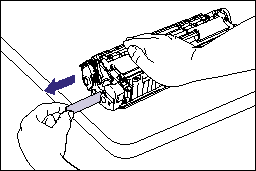
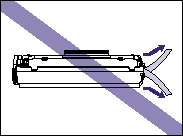
5. Place the toner cartridge on a flat surface, then pull out the sealing tape (approx. 50 cm long) gently while supporting the toner cartridge.
Pull out the sealing tape straight in the direction of the arrow.
IMPORTANT
a. Do not pull the sealing tape diagonally, upwards, or downwards. If the tape is severed, it may become difficult to pull out completely.
b. Pull out the sealing tape completely from the toner cartridge. If any tape remains in the toner cartridge, this may result in poor print quality.
c. When pulling out the sealing tape, be careful not to hold the drum protective shutter (A) with your hands.
d. After removing the protective bag, install the toner cartridge in the printer as soon as possible.
e. Dispose of the sealing tape according to local regulations.
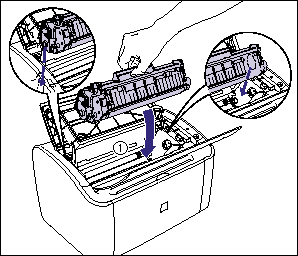
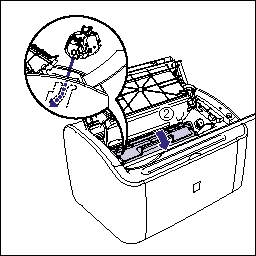
6. Align the projections on both sides of the toner cartridge with the toner cartridge guide inside the printer, push the toner cartridge completely into the printer (1), and then pull it down toward you (2).
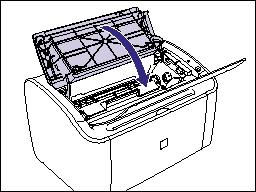
7. Close the top cover.
IMPORTANT
a. If you cannot close the top cover, check if the toner cartridge is installed properly. If the top cover is closed forcefully, this may result in damage to the printer.
b. Do not leave the top cover open for a long time after installing the toner cartridge.
Then clean the fixing unit using the Printer Status Window. For details on cleaning the fixing unit, see "How to clean the fixing unit" in the following Related Information.
Related Information
