Solution
The focal length guide aids you when using two camcorders for 3D recording. The guide appears as a numerical
value and has a range of 202 steps. You can set the guide to 0 at any point in the zoom range to help precisely
calibrate both camcorders.
Using the Focal Length Guide
1. Set up two camcorders and align their picture angle at full telephoto.
2. Hold down the button on the <POWER> switch and slide the switch to <CAMERA>.
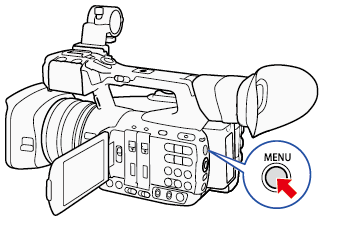
3. Press the <MENU> button.
4. Push the joystick up/down to select [

Camera Setup] > [Zoom] > [Focal Length]. Then select [Set To 0] and then press SET.

: Joystick

: In the following procedures, 'Press <SET>' refers to the action of pressing the joystick straight down to select the desired setting.
5. Press the <MENU> button.
- The focal length guide appears on the left of the screen as [
 ±0].
±0].
6. Operate the zoom.
If both camcorders are set so that the same value is displayed during zoom, the focal length for both camcorders will remain almost the same.
NOTE
Although the focal length guide is an aid for 3D recording, make sure to check the picture angle visually while recording.
- You can obtain more accurate results when you perform this procedure at full telephoto.
- The same picture angle for both camcorders cannot be guaranteed.
When using the digital tele-converter or digital zoom
- When the focal length is reset to zero, the digital tele-converter or digital zoom is deactivated and [Camera Setup] -> [Zoom] -> [Mode] is set to [Normal] (optical zoom only).
- If the focal length was reset to zero while the zoom was in the digital zoom range, the zoom position will change automatically to the telephoto end of the optical zoom.


 Camera Setup] > [Zoom] > [Focal Length]. Then select [Set To 0] and then press SET.
 : Joystick
 : In the following procedures, 'Press <SET>' refers to the action of pressing the joystick straight down to select the desired setting.
 ±0].
±0].