Solution
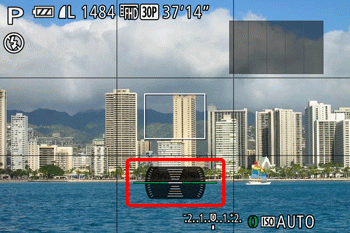
An electronic level can be displayed as a guideline to ensure the camera is level from front to back and left to right.
Please use it as a guide for determining whether the camera is level when shooting.
IMPORTANT
- The following section explains the setting procedures when the camera’s shooting mode has been set to [Program AE] (
 ).
).
- [Hybrid Auto] (
 ) cannot be set.
Using the Dual Axis Electronic Level
1. Press the power button to turn the camera on.
2. Press the <DISP.> button a few times to display the [Electronic Level].
Calibrating the Electronic Level
You can calibrate the electronic level if it seems ineffective in helping you level the camera
If you use the [Grid Lines] to confirm that the camera is level beforehand, you can calibrate the electronic level more accurately.
NOTE
- To display the [Grid Lines], press the <DISP.> button a few times, and the [Grid Lines] will appear.
- If the grid lines are not displayed, press the < MENU > button, and on the [Shooting] (
 ) tab, choose [Custom Display]. Add a [
  ] to [
  ] or [
  ] to choose the grid lines.
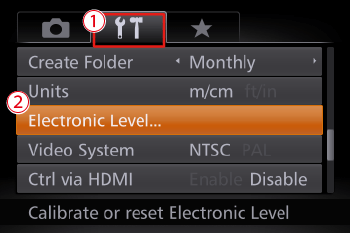
1. Place the camera on a flat surface, such as a table.
2. Press the <MENU> (

) button.
3. The following screen appears.
Press the <

><

> buttons to choose the

[Set Up] (

) tab.
Press the <

><

> buttons to choose

[Electronic level].
Press the <FUNC./SET> (

) button.
4. The following screen appears.
To adjust left/right tilt, choose [Horizontal Roll Calibration], and to adjust forward/ backward tilt, choose [Vertical Pitch Calibration], followed by the <FUNC./SET> (
) button.
NOTE
If you want to restore the default settings for the [Electronic Level], select [Reset]. Note that this is not possible unless you have calibrated the electronic level.
5. The following screen appears.
Press the <
><
> buttons to choose [OK], and then press the <FUNC./SET> (
) button.
6. The following screen appears.
This concludes the electronic level calibration procedure.