


Creative Auto [CA] Shooting
Solution
The method for shooting in [CA] Creative Auto mode is explained below.
In the [  ] mode, you can set the following functions for shooting:
] mode, you can set the following functions for shooting:(1) Extra Effect Shot, (2) Ambience-based shots, (3) Background blur, (4) Drive mode, and (5) Flash firing. The default settings are the same as the [  ] mode.
] mode.* CA stands for Creative Auto.
IMPORTANT
The position and shape of the operation buttons may differ depending on the model you use.
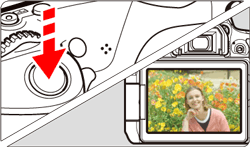
1. Set the camera's power switch to [ON].
2. Set the Mode Dial to [ ].
].
3. Press the [  ] button.
] button.
The Quick Control screen is displayed.
4. Press the [  ], [
], [  ] or [
  ], [
], [  ] keys to select the desired item.
], [ ] or [ ], [ ] keys to select the desired item.
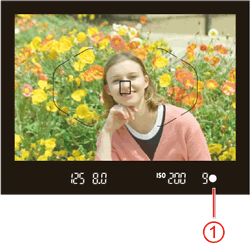
5. Focus.
Press the shutter button halfway. The lens focusing ring will rotate to focus.

- The AF point(s) that achieve(s) focus will be displayed. At the same time, the beeper will sound and the focus indicator [
 ] (
] ( ) in the viewfinder will light up.
 - In low light, the AF point(s) will light up briefly in red.
6. Press the shutter button completely to take the picture.
- The captured image will be displayed for 2 sec. on the LCD monitor.

(a): Shutter speed (b): Aperture (c): ISO speed
If you set ,  , or
, or  when the camera is set for Live View shooting, you can see the effect on the screen before you start shooting.
, , or when the camera is set for Live View shooting, you can see the effect on the screen before you start shooting.| Function | Setting Procedure | |
| Extra Effect Shot | You can select any of the following effects for shooting: Creative filters, Picture Styles, and Ambience-based shots. Press the [ ], [ ] keys to select [  : Enable ]. Turn the [ : Enable ]. Turn the [  ] dial to select a shooting effect and shoot. ] dial to select a shooting effect and shoot.When you take a picture, two images will be recorded. One with the effect applied and one without. Both images will be displayed together immediately after you take the picture. The image without the effect is displayed on the left and the one with the effect on the right. Registering your favorite shooting effects During the image review immediately after shooting and during playback, the image applied with the effect will have the [  ] icon. After you press the [ ] icon. After you press the [  ] button and then the [INFO] button, you can check which shooting effect is applied. ] button and then the [INFO] button, you can check which shooting effect is applied.You can register up to two shooting effects under [  :Favorite effect]. :Favorite effect].When you select the registered [ : Favorite effect], you can shoot with that shooting effect applied. You can also overwrite the[ : Favorite effect]. |
| Ambience-based shots | You can select and shoot with the ambience you want to convey in your images. Press the [ ], [ ] keys to select the ambience. |
| Background blur | If [OFF] is set, the degree of background blur will change depending on the brightness. If it is set to any setting other than [OFF], you can adjust the background blur regardless of the brightness. If you turn the [ ] dial to move the cursor to the right, the background will look sharper.Turning the [ ] dial to move the cursor to the left will blur the subject’s background. Note that depending on the lens’s maximum aperture (smallest f/number), certain slider adjustments may not be selectable.If you use Live View shooting, you can see how the image is blurred in front of and behind the point of focus. When you turn the[ ] dial, [Simulating blur] will be displayed on the LCD monitor.Depending on the lens and shooting conditions, the background may not look so blurred. This function cannot be set if you use flash. If [  ] has been set and you set background blur, [ ] has been set and you set background blur, [  ] will be set automatically. ] will be set automatically. |
 | Drive mode | Set with the [ ] dial. [  ] Single shooting: Shoot one image at a time. ] Single shooting: Shoot one image at a time.[  ] Continuous shooting: While you hold down the shutter button completely, shots will be taken continuously. You can shoot up to approx. 5 shots per sec. ] Continuous shooting: While you hold down the shutter button completely, shots will be taken continuously. You can shoot up to approx. 5 shots per sec.[  ] Silent single shooting: Single shooting with less shooting sound than [ ]. ] Silent single shooting: Single shooting with less shooting sound than [ ].[  ] Silent continuous shooting: Continuous shooting (max. approx. 3.0 shots per second) with less shooting sound than [ ] . ] Silent continuous shooting: Continuous shooting (max. approx. 3.0 shots per second) with less shooting sound than [ ] .[  ] Self-timer: 10sec./remote: The picture is taken 10 seconds after you press the shutter button. A remote controller can also be used. ] Self-timer: 10sec./remote: The picture is taken 10 seconds after you press the shutter button. A remote controller can also be used.[  ] Self-timer: 2 sec.: The picture is taken 2 seconds after you press the shutter button. ] Self-timer: 2 sec.: The picture is taken 2 seconds after you press the shutter button. [  ] Self-timer: Continuous: Press the [ ], [ ] keys to set the number of multiple shots (2 to 10) to be taken with the self-timer. 10 seconds after you press the shutter button, the set number of multiple shots will be taken. ] Self-timer: Continuous: Press the [ ], [ ] keys to set the number of multiple shots (2 to 10) to be taken with the self-timer. 10 seconds after you press the shutter button, the set number of multiple shots will be taken. |
 | Flash firing | Set with the [ ] dial. [ ] Auto flash: The flash fires automatically when necessary.[  ] Flash on: The flash fires at all times. ] Flash on: The flash fires at all times.[ ] Flash off : The flash is disabled. |
IMPORTANT
- If you are using an Eye-Fi card and have set it to erase images after their transfer, the image without the effect will not be displayed during the playback immediately after shooting.
- The Live View image displayed with Extra Effect Shot applied will not look exactly the same as the actual photo.
NOTE
- If [Simulating blur] is effective during Live View shooting, the image displayed with [
 ] blinking may have more noise than the actual image being recorded, or it may look dark.
 - You cannot set both (1) Extra Effect Shot and (2) Ambience-based shots at the same time.
- You cannot set both (1) Extra Effect Shot and (3) Background blur at the same time
- If you have set Extra Effect Shot,
 +
+  , , and [ ] [ ] [ ] cannot be set.
 - If you have set background blur, you cannot use flash.