Solution
This message is displayed if there is no response when connecting to a computer via Wi-Fi. Possible causes for this message include the following:
- The computer is not turned on, or is in sleep mode.
- There is no access point (Wi-Fi router) nearby.
- The access point (Wi-Fi router) is not turned on. An error occurs.
- Security software settings are blocking transmission.
- The computer and camera are not connected to the same network (SSID).
- "Wi-Fi connection setup" has not been configured.
- The camera driver is not installed in the computer.
- There is a problem with the computer (Windows).
Check the following details in order.
1. Check that the computer is turned on and not in sleep mode.
If the computer is in sleep mode, the camera cannot connect to the computer. Check what mode the computer is in.
2. Check the status of the access point (Wi-Fi router).
Signal reception may be poor if the access point (Wi-Fi router) is too far away, or if there are walls, doors, or other obstacles between the access point and the camera. Move the camera as close as possible to the access point to make a connection. Also, confirm that an error has not occurred at the access point. For details about access point errors, contact the manufacturer of the access point.
3. Try connecting with the security software settings temporarily disabled.
Some security software settings will block connections. Temporarily disable the security software and then try connecting again. For details about how to temporarily disable security software, contact the manufacturer of the software.
4. Confirm that the computer and camera are connected to the same network (SSID).
If the computer and camera are connected to access points (Wi-Fi routers) with different SSID, you cannot save images to the computer. Confirm that the computer and camera are connected to the same SSID.
5. Configure "Wi-Fi connection setup".
If you have not done so already, configure "Wi-Fi connection setup".
[For Windows 8]
1.

Move the mouse pointer to the lower right corner to open the Charms, and then

select [Start].
2. On the Start screen, click [Wi-Fi connection setup].
3. When the following screen is shown, click [Yes].
4. When you click [OK] on the following screen, the settings for connecting the computer to Wi-Fi are complete.
[For Windows 7]
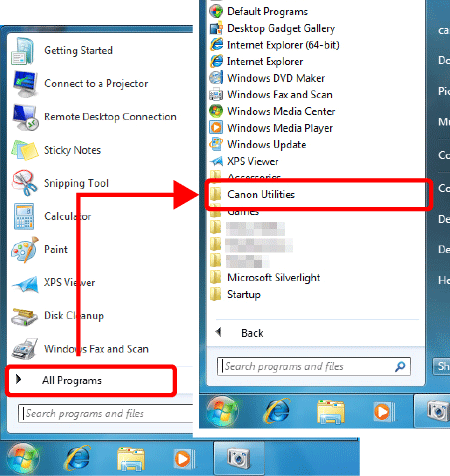
1. Click in the following order: Start menu > [All Programs] > [Canon Utilities].
2. Click in the following order: [CameraWindow] > [Wi-Fi connection setup].
3. When the following screen is shown, click [Yes].
4. When you click [OK] on the following screen, the settings for connecting the computer to Wi-Fi are complete.
6. Reset the camera's Wi-Fi connection settings (default settings).
Select in the following order from the camera's menu: [Wi-Fi Settings] > [Reset Settings] > [OK].
After resetting the settings, perform the steps to connect to the computer again.
CAUTION
Other Wi-Fi settings (for printers, smartphones, etc.) will also be reset.
7. Install the camera driver.
After connecting the camera to the computer, install the driver. When "Connecting: Connected device: XXXX" is displayed on the camera's LCD monitor, install the driver.
[For Windows 8]
1. On the computer desktop screen, move the mouse pointer to the lower-right corner to open the [Charms], and click [Settings] > [Control Panel] > [Add a device].
2. The icon for the device name is displayed on the [Add a device] screen. Double-click the icon and driver installation will begin.
3. When the connection between the camera and the computer is established, the screen on the right is displayed on the computer. Click the message [Tap to choose what happens with this device ].
At this time, nothing is displayed on the camera's LCD screen.
4. When driver installation is complete, the screen on the right is displayed. Click [Downloads Images From Canon Camera].
* If the following screen is not displayed, start CameraWindow manually.
[For Windows 7]
1. Click the Start menu, and then click [Control Panel] > [Add a device].
2. The icon for the device name is displayed on the [Add a device] screen. Double-click the icon and driver installation will begin.
3. When driver installation is complete, the [AutoPlay] screen is displayed. Click [Downloads Images From Canon Camera].
* If the [AutoPlay] screen is not displayed, start CameraWindow manually.
If there is no improvement after checking the items above, contact a Canon Customer Support Help Desk.
 Move the mouse pointer to the lower right corner to open the Charms, and then
  select [Start].


