Setting IP Addresses
12-Feb-2016
8202861500
Solution
Connecting the machine to a network requires a unique network IP address. Two versions of IP addresses are available: IPv4 and IPv6. Configure these settings depending on the network environment. To use IPv6 addresses, you need to properly configure the IPv4 address settings.
The machine's IPv4 address can be either assigned automatically by a dynamic IP addressing protocol, such as DHCP, or entered manually. When connecting the machine to a wired LAN, make sure that the connectors of the LAN cable are firmly inserted into the ports. For details, see the "e-Manual" (HTML manual) in the DVD-ROM supplied with the machine. You can test the network connection if necessary.
1. Tap <Menu> in the Home screen
2. Tap <Network Settings>.
- If the logon screen appears, enter the correct ID and PIN using the numeric keys, and then press
 . For details, see the "e-Manual" (HTML manual) in the DVD-ROM supplied with the machine.
3. Select <TCP/IP Settings>

 <IPv4 Settings>

 <IP Address Settings>.


 <IPv4 Settings>

 <IP Address Settings>.
4. Configure IP address settings.
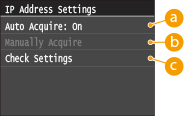
 <Auto Acquire>
Select to automatically assign an IP address via DHCP protocol. When <Auto Acquire: On> is displayed, automatic addressing is enabled.
 <Manually Acquire>
Select to configure the IP address settings by manually entering an IP address. In order to select this option, <Auto Acquire> must be set to <Off>.
 <Check Settings>
Select when you want to view the current IP address settings.
 4-A. Automatically assigning an IP address
4-A-1. Select <Auto Acquire>

 <Select Protocol>.


 <Select Protocol>.
4-A-2. Tap <DHCP>.
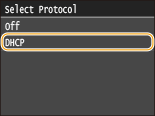

If you do not want to use DHCP to assign an IP address
- Tap <Off>. If you select <DHCP> when this service is unavailable, the machine will waste time and communications resources searching the network for this service.
4-A-3. Check that <Auto IP> is set to <On>.
- If <Off> is selected, change the setting to <On>.
4-A-4. Tap <Apply>.

- IP addresses assigned via DHCP override the address obtained via Auto IP.
 4-B. Manually entering an IP address
4-B-1. Check that <Auto Acquire> is set to <Off>.

- If <On> is displayed, tap <Auto Acquire>, and set both <Select Protocol> and <Auto IP> to <Off>.
4-B-2. Tap <Manually Acquire>.
4-B-3. Specify the IP address, subnet mask, and gateway address (or default gateway).
- Specify the settings in the following order: <IP Address>


 <Subnet Mask>

 <Gateway Address>.
 - Enter each setting using the numeric keys, and tap <Apply>.

5. Restart the machine.
- Turn OFF the machine, wait for at least 10 seconds, and turn it back ON.
NOTE
Checking whether the settings are correct
- Make sure that the Remote UI screen can be displayed with your computer. If a computer is not available, you can check the connection by using the operation panel. For details, see the "e-Manual" (HTML manual) in the DVD-ROM supplied with the machine.
If you changed the IP address after installing the printer driver
- If you are using an MFNP port, and the machine and the computer are on the same subnet, then the connection will be maintained. You do not need to add a new port. If you are using a standard TCP/IP port, then you need to add a new port. For details, see the "e-Manual" (HTML manual) in the DVD-ROM supplied with the machine.
 Testing the Network Connection
1. Tap <Menu> in the Home screen.
2. Tap <Network Settings>.
- If the logon screen appears, enter the correct ID and PIN using the numeric keys, and then press
 . For details, see the "e-Manual" (HTML manual) in the DVD-ROM supplied with the machine.
3. Select <TCP/IP Settings>

 <IPv4 Settings>

 <PING Command>.


 <IPv4 Settings>

 <PING Command>.
4. Enter the IPv4 address of another device on the network, and tap <Apply>.
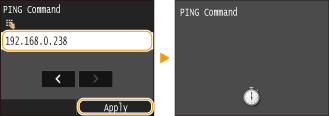
 If a proper connection has been established, the following screen is displayed.
The IPv6 addresses of the machine can be configured via the Remote UI. Before setting IPv6 addresses, check the IPv4 address settings. You need to set the correct IPv4 settings to use IPv6 addresses. Note that the scan function that uses the scanner driver or MF Scan Utility is not available in an IPv6 environment. The machine can use up to nine of the following IPv6 addresses:
| Type | Maximum number available | Description |
|---|---|---|
| Link-local address | 1 | An address that is only valid within a subnet or link and cannot be used to communicate with devices beyond a router. A link-local address is automatically set when the IPv6 function of the machine is enabled. |
| Manual address | 1 | An address that is entered manually. When using this address, specify the prefix length and default router address. |
| Stateless address | 6 | An address that is generated automatically using the MAC address of the machine and the network prefix that is advertised by the router. Stateless addresses are discarded when the machine is restarted (or turned ON). |
| Stateful address | 1 | An address obtained from a DHCP server using DHCPv6. |
1. Start the Remote UI and log on in System Manager Mode.
2. Click [Settings/Registration].
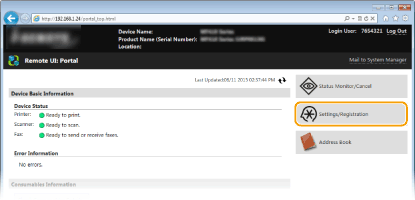
3. Click [Network Settings]

 [TCP/IP Settings].


 [TCP/IP Settings].
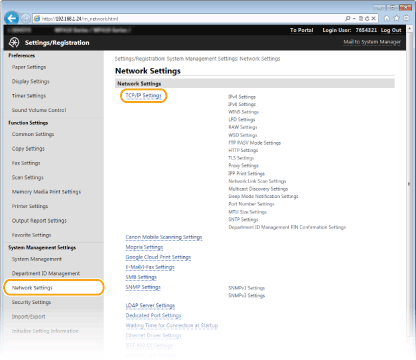
4. Click [Edit] in [IPv6 Settings].

5. Select the [Use IPv6] check box and configure the required settings.

[Use IPv6]
Select the check box to enable IPv6 on the machine. When not using IPv6, clear the check box.
[Use Stateless Address]
Select the check box when using a stateless address. When not using a stateless address, clear the check box.
[Use Manual Address]
When you want to manually enter an IPv6 address, select the check box and enter the IP address, prefix length, and default router address in the corresponding text boxes.
[IP Address]
Enter an IPv6 address. Addresses that start with "ff" (or multicast address) cannot be entered.
[Prefix Length]
Enter a number that indicates how many bits are available for the network address.
[Default Router Address]
Specify the IPv6 address of the default router as necessary. Addresses that start with "ff" (or multicast address) cannot be entered.
[Use DHCPv6]
Select the check box when using a stateful address. When not using DHCPv6, clear the check box.
6. Click [OK].
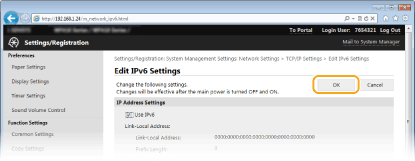
7. Restart the machine.
- Turn OFF the machine, wait for at least 10 seconds, and turn it back ON.
NOTE
Checking whether the settings are correct
- Make sure that the Remote UI screen can be displayed with your computer by using the IPv6 address of the machine. For details, see the "e-Manual" (HTML manual) in the DVD-ROM supplied with the machine.
Using the operation panel
- IPv6 settings can also be accessed from <Menu> in the Home screen.
When you have changed the IP address after installing the printer driver
- You need to add a new port. For details, see the "e-Manual" (HTML manual) in the DVD-ROM supplied with the machine.
NOTE
- The IP address is not correctly configured if it is displayed as "0.0.0.0".
- Connecting the machine to a switching hub or bridge may result in a connection failure even when the IP address is correctly configured. This problem can be solved by setting a certain interval before the machine starts communicating. For details, see the "e-Manual" (HTML manual) in the DVD-ROM supplied with the machine.
- You can print a list of the current network settings. [ Printing Reports and Lists ]
 Viewing IPv4 Settings


 <Network Information>

 <IPv4>

 Select the setting to view

 Check the settings


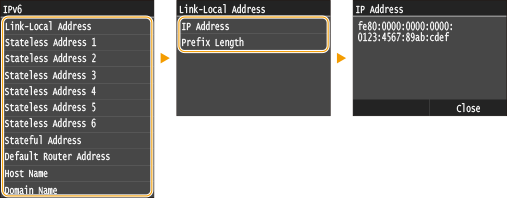
 Viewing IPv6 Settings


 <Network Information>

 <IPv6>

 Select the setting to view

 Check the settings


 Viewing the MAC Address for Wired LAN
1. Tap <Menu> in the Home screen.
2. Tap <Network Settings>.
- If the logon screen appears, enter the correct ID and PIN using the numeric keys, and then press
 . For details, see the "e-Manual" (HTML manual) in the DVD-ROM supplied with the machine.
3. Tap <Ethernet Driver Settings>.

 Viewing the MAC Address and Information for Wireless LAN
 1. Tap <Menu> in the Home screen.
2. Tap <Network Settings>.
- If the logon screen appears, enter the correct ID and PIN using the numeric keys, and then press
 . For details, see the "e-Manual" (HTML manual) in the DVD-ROM supplied with the machine.
3. Tap <Wireless LAN Settings>.
- If the <Do you want to enable the wireless LAN?> message is displayed, tap <Yes>.
4. Read the message that is displayed, and tap <OK>.
5. Tap <Connection Information>.
6. Select the setting to view.

 Viewing WEP and WPA/WPA2-PSK information
 1. Tap <Security Settings>.
2. Confirm and tap the current security setting.
- If the security settings are not configured, <None> is displayed.
3. Select the setting to view.
WEP
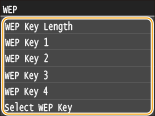
WPA/WPA2-PSK


- <Wireless LAN Status> and <Latest Error Information> can be viewed from
 . Press


 <Network Information>

 <Network Connection Method>

 <Connect. Info.> and select the setting to view.