Solution
This explains the procedure for uninstalling MF drivers and software that are no longer needed.
Uninstalling the MF Driver
This explains the procedure for uninstalling the MF driver. Perform this procedure if an MF driver has become unnecessary.
There are two methods for uninstalling: uninstalling from Windows, and using the uninstaller. If you cannot find the MF driver in the Windows screen, you can uninstall using the uninstaller.
Confirm that the following conditions are satisfied. Complete the preparation operations.
- MF Driver installation
- When starting the computer, log on as a member of Administrators.
- [Desktop] screen display (when using Windows 8/8.1/Server 2012/Server 2012 R2)

To Uninstall from Windows
1. Select [Control Panel] from the [

] (Start) menu.
Select [Settings] > [System] > [Apps & features] > the uninstaller of the driver to be uninstalled → click [Uninstall] → proceed to step 3.
- For Windows 8/8.1/Server 2012/Server 2012 R2:
Display the charm bar to the right of the screen in [Desktop] → click [

Settings] > [Control Panel].
2. Click [Programs] > [Uninstall a program] → select the MF driver → click [Uninstall] or [Uninstall/Change].
- For Windows Vista/Server 2008:
Click [Programs] > [Programs and Features] > [Uninstall a program] → select the MF driver → click [Uninstall].
If you cannot find the MF driver when selecting the driver, uninstall it according to the procedure in "To Uninstall Using the Uninstaller."
3. When the uninstaller is displayed, click [Uninstall].
4. If the confirm deletion message is displayed, click [Yes].

To Uninstall Using the Uninstaller
1. Acquire the uninstaller.
Access the uninstaller on the supplied DVD-ROM or download it from the download page of the Canon web site (http://www.canon.com/).
2. Open the following folder where the uninstaller is stored in the DVD-ROM or the downloaded files.
32-bit version: DRIVERS\32bit\misc
64-bit version: DRIVERS\x64\misc
3. Double-click [DelDrv.exe].
4. When the uninstaller is displayed, click [Uninstall].
5. If the confirm deletion message is displayed, click [Yes].
Uninstalling MF Scan Utility
This explains the procedure for uninstalling only the MF Scan Utility if the MF Scan Utility is no longer needed.
Confirm that the following conditions are satisfied. Complete the preparation operations.
- MF Scan Utility installation
- When starting the computer, log on as a member of Administrators.
- [Desktop] screen display (when using Windows 8/8.1)
1. Select [Control Panel] from the [

] (Start) menu.
Select [Settings] > [System] > [Apps & features] > MF Scan Utility → click [Uninstall] → proceed to step 3.
Display the charm bar to the right of the screen in [Desktop] → click [

Settings] > [Control Panel].
2. Click [Programs] > [Uninstall a program] → select MF Scan Utility → click [Uninstall] or [Uninstall/Change].
Click [Programs] > [Programs and Features] > [Uninstall a program] → select MF Scan Utility → click [Uninstall].
3. If the confirm deletion message is displayed, click [Yes].
Uninstall Method for Software
If software installed at the same time as the MF driver is no longer needed, you can uninstall the software by the following method.
Uninstall the various types of software from [Programs and Features] or [Add or remove programs] in Windows after logging on with an Administrator account.
Uninstalling the Driver (for macOS)
IMPORTANT
When you upgrade a driver, you can overwrite the old driver with a newer one. Uninstalling the driver is not required before the upgrade.
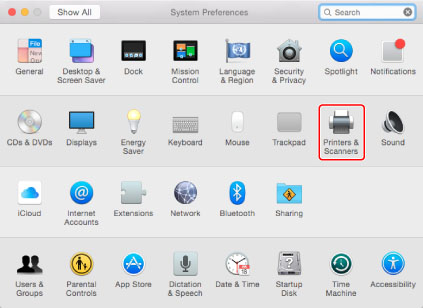
1. Open [System Preferences] → click [Print & Scan] or [Printers & Scanners].
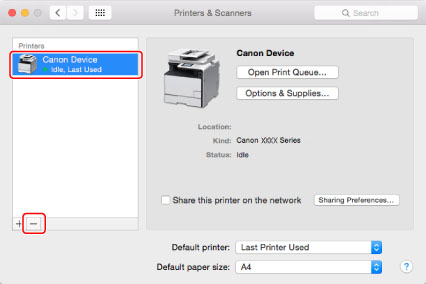
2. Select all devices set from the driver you are deleting → click [-].
3. Delete the folders and files for the driver you are deleting.
- [System Volume]/Library/Printers/Canon/CUPS_MF_Printer
- [System Volume]/Library/Printers/PPDs/Contents/Resources/CNPZB***ZB.ppd.gz
Where *** indicates a character string that represents the printer model.
- If you delete a "ppd.gz" file other than that of the printer model you want to delete, the driver may not work correctly.
- If the [Authenticate] dialog box is displayed, enter the administrators name and password → click [OK].
4. Restart your computer.
Uninstallation is complete.
 To Uninstall from Windows
 ] (Start) menu.
 Settings] > [Control Panel].
 To Uninstall Using the Uninstaller
 ] (Start) menu.
 Settings] > [Control Panel].


