30-May-2017
8203476100
 icon, and camera setting procedures are indicated by the
  icon.
icon.  ] : high ] , [
  : medium ] , [
  : low ] , [
  : weak ] 1-A-1. Confirm the smartphone's settings. 1-A-2. Download Camera Connect from the App Store and install it on the smartphone. 1-A-3. Press the power button. 1-A-4. Press the [MENU] button, choose [Wireless settings] on the [
  ] tab.
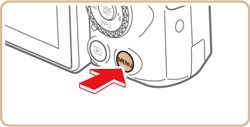
 1-A-5. Press the [
  ] , [
] , [  ] buttons to choose [Nickname], and then press the [
  ] button.
 1-A-6. Press the [ ] button to access the keyboard, and then enter a nickname.
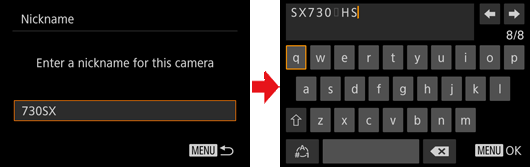 1-A-7. To return to [Wireless settings] after pressing the [MENU] button, press the [MENU] button again.
 1-A-8. Choose [Bluetooth settings], press the [ ] , [ ] buttons to choose [Pairing], and then press the [ ] button.
 1-A-9. A screen is displayed indicating that the camera is waiting to connect.
 1-A-10. Touch the [Canon Connect] (
 ) application icon on the smartphone to start [Camera Connect].
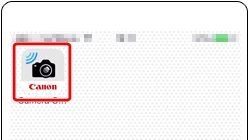 1-A-11. After the camera is recognized, a camera selection screen is displayed.
 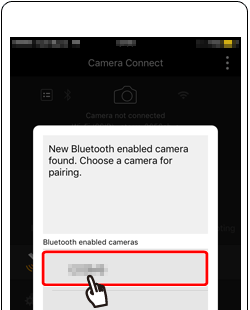 1-A-12. Touch [pair].
 1-A-13. Press the [
  ] , [
] , [  ] buttons to choose [OK] after the confirmation message on the camera, and then press the [ ] button.
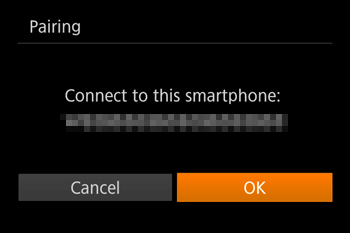 1-A-14. Press the [ ] button when the screen at left is displayed.
 1-B-1. Confirm the smartphone's settings. 1-B-2. Download Camera Connect from the App Store and install it on the smartphone. 1-B-3. Press the power button. 1-B-4. Press the [
  ] button,
 ] button.
  ] , [ ] buttons to choose the [Nickname] field, press the [ ] button to display the keyboard, and then enter the desired nickname. After you have finished entering the nickname, press the [MENU] button to return to the registration screen, press the [ ] button, choose [OK], and then press the [ ] button. 1-B-5. Press the [ ] , [ ] , [ ] , [ ] buttons to choose [
  ] , and then press the [ ] button.
 1-B-6. Press the [ ] , [ ] buttons to choose [Add a device], and then press the [ ] button.
 ] , [ ] buttons to choose the device and then pressing the [ ] button. To add a new device, display the device selection screen by pressing the [ ] , [ ] buttons, and then configure the setting. ] tab -> [Wireless settings] -> [Wi-Fi Settings] -> [Target History] -> [Off]. 1-B-7. The camera's SSID and password are displayed.
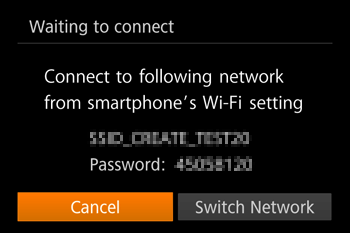 1-B-8. Wi-Fi setting menu, choose the SSID (network name) displayed on the camera to establish a connection.
 ] tab -> [Wireless settings] -> [Wi-Fi Settings] -> [Password] -> [Off]. [Password] is no longer displayed on the SSID screen (in step 7). 1-B-9. Touch the [Canon Connect] () application icon on the smartphone to start [Camera Connect]. 1-B-10. On the camera selection screen displayed on the smartphone, choose the camera to begin pairing.
 1-B-11. Adjust the privacy setting. ] , [ ] buttons to select [Yes], and then press the [ ] button.
 1-B-12. The following screen is displayed when the connection with the smartphone is established.
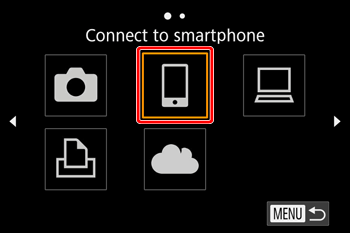
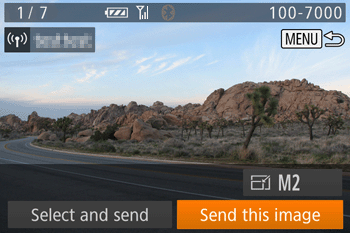 2-A-1. On the smartphone, select [Bluetooth remote controller] from the Camera Connect menu screen.
 ).
). : Connected ] , [
  : Disconnected ] ] tab -> [Wireless settings] -> [Bluetooth settings]. Choose [Address check] to check the camera's Bluetooth address. 2-A-2. The smartphone screen changes to a screen for remote control via Bluetooth.
 ].
]. 2-A-3. Use the smartphone to shoot in Shooting mode. ].
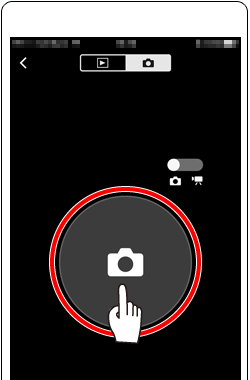 2-B-1. On the smartphone, select [Remote live view shooting] from the Camera Connect menu screen.
 2-B-2. Once the camera is ready for remote live view shooting, a live image from the camera is displayed on the smartphone.
 ].
].
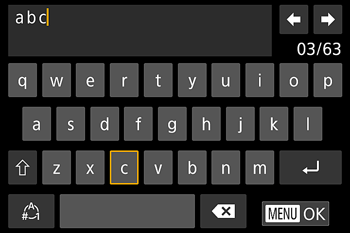 ] [ ] [ ] [ ] buttons to choose a key labeled with a character, and then press the [ ] button repeatedly to enter the character you want.
 ] or [
  ] and press the [ ] button.
 ] and press the [ ] button.
 and press the [ ] button.
 ] and press the [ ] button.
 ] and press the [ ] button. The previous character will be deleted. ] and holding down the [ ] button will delete five characters at a time.